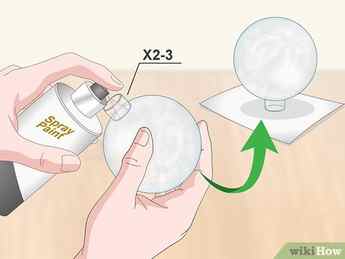
One option is to use a spray paint. This is a quick and easy way to get a solid background, and it will help to prevent the paint from seeping through the cracks in the ornament. Make sure to use a light coat of paint and to let it dry completely before moving on to the next step.
How to Paint Glass Ornaments
This article was co-authored by wikiHow Staff. Our trained team of editors and researchers validate articles for accuracy and comprehensiveness. wikiHow’s Content Management Team carefully monitors the work from our editorial staff to ensure that each article is backed by trusted research and meets our high quality standards.
There are 8 references cited in this article, which can be found at the bottom of the page.
This article has been viewed 32,512 times.
Painting is one of the best ways to transform glass ornaments into color, festive decorations. As long as you have acrylic craft paints and a place to dry your ornaments, painting them is quick and easy. When it comes to painting ornaments, your options are limitless: you can create beautiful monochromatic bulbs, swirled ornaments with multiple colors, or even glittery masterpieces. With the right technique and materials, you can give your glass ornaments a whole new look in time for special events!
Steps
Method 1
Method 1 of 3:
Making Solid or Marbled Glass Ornaments
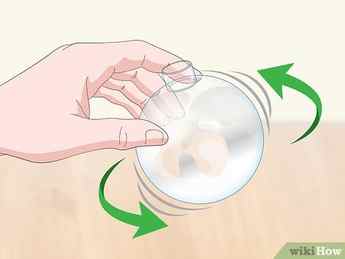
- Let the ornament air dry, which should take several hours, face down before painting the interior.
- Set the ornament top aside somewhere safe, as you’ll put it back on after painting it.
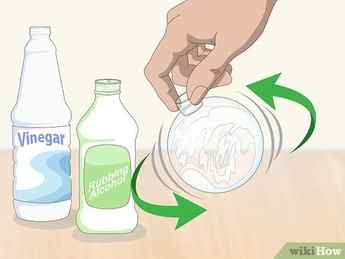
- Remove the ornament’s top for this and the rest of the painting process.
Advertisement
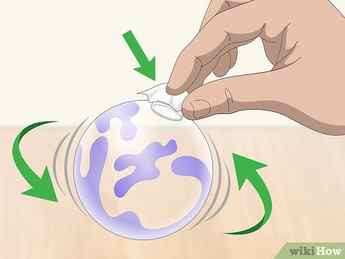
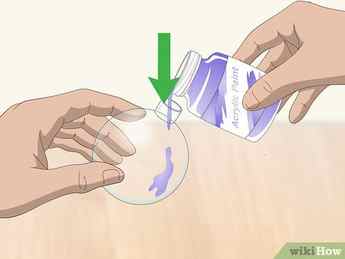
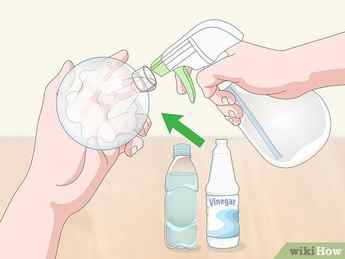
Cover the opening with a paper towel and swirl the paint around. While pressing the paper towel over the opening, tilt the ornament back and forth to spread the paint around the surface. If you didn’t add enough paint to spread around the ornament, squirt more into the opening as needed. [2] X Research source
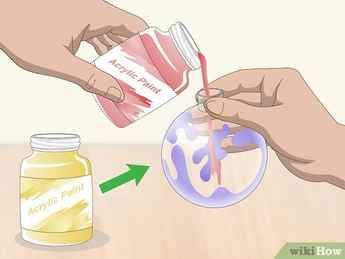
- Limit yourself to 2-3 paints per ornament, as any more can create a muddled color.
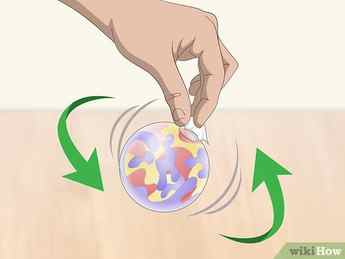
- Stop shaking after you’ve coated the surface completely if you’ve added 2 or more colors, as too much shaking can muddle the color.
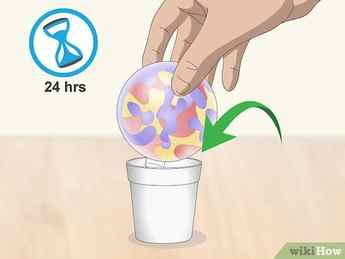
- The ornament has to be upside down while it dries to get rid of excess paint. If it dries right-side up, excess paint can pool in the bottom and prevent it from drying. [6] X Research source
- After you’ve dried the ornament, reattach the top and hang it with the rest of your decorations.
Advertisement
Method 2
Method 2 of 3:
Creating Mercury Glass Ornaments
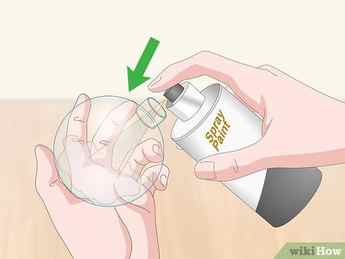
- Although you can use any spray paint color, mirrored spray paint mimics mercury glass best.
Swirl the spray paint around the interior. Holding the ornament in your hand, shake the ornament gently to spread any excess paint around the inside. This will prevent excess spray paint from pooling in the bottom and create a more even coat. [8] X Research source
- You don’t have to wait for the paint to dry before misting.
- Let each additional coat dry for 30-60 minutes before applying another one.
Advertisement
Method 3
Method 3 of 3:
Choosing the Right Flat Acrylic Ornaments
Christmas is a time for spending time with family, friends, and loved ones. It is also a time for giving and receiving gifts. If you are looking for a unique and easy-to-make gift, consider painting flat acrylic ornaments.
Flat acrylic ornaments are a great option because they are easy to paint and they come in a variety of shapes and sizes. You can choose from a variety of colors and finishes, which means that you can create a one-of-a-kind gift for your loved ones.
In order to paint flat acrylic ornaments, you will need:
– Flat acrylic ornaments
– Acrylic paint
– Paintbrushes
– A bowl of water
– Paper towels
The first step is to choose the colors that you want to use. You can use a variety of colors, or you can create a gradient effect by using two or more colors.
Once you have chosen the colors, it is time to start painting. The first step is to paint the ornament with the lightest color. Be sure to use the same technique for all of the ornaments, so that they all have the same finish.
Once the lightest color has dried, it is time to paint the next color. Be sure to use the same technique as before. You will need to paint two coats of each color in order to get the desired effect.
Once the paint has dried, it is time to add the finishing touches. You can use a sealant to protect the paint, or you can add a gloss or a matte finish.
Be sure to allow the paint to dry completely before adding the ribbon or the hanger.
Flat acrylic ornaments make a great gift for Christmas, birthdays, anniversaries, and other special occasions.
Gathering the Necessary Materials
– Flat acrylic ornaments
– Paintbrushes in various sizes
– Acrylic paint in desired colors
– Paint palette or paper plate to mix colors on
– Pencil
– Ruler
– Scissors
– Clear sealant or varnish
1. Begin by gathering your materials. This includes the flat acrylic ornaments, paintbrushes in various sizes, acrylic paint in desired colors, paint palette or paper plate to mix colors on, pencil, ruler, and scissors.
2. Next, thoroughly clean the acrylic ornaments with a damp cloth to remove any dust or particles. Allow to dry completely.
3. Paint the ornaments in desired colors. You can use a variety of techniques, such as brush strokes, dots, or swirls. Be creative!
4. Once the paint is dry, use a pencil to draw a design on the ornament, if desired.
5. Use a ruler to carefully measure and cut out the design with scissors.
6. Finally, apply a coat of clear sealant or varnish to protect the paint and design. Allow to dry completely.
Preparing the Surface of the Ornaments
If you’re looking to give your Christmas tree a bit of extra flair, consider painting some acrylic ornaments. Not only are they inexpensive, but they’re also easy to paint. Here’s how to get started:
1. Begin by cleaning the surface of the ornament with a damp cloth. This will remove any dirt or dust that may be present.
2. Next, use a piece of sandpaper to rough up the surface of the ornament. This will create a textured surface that will help the paint adhere better.
3. Finally, apply a coat of primer to the ornament. This will help the paint to adhere better and will also help to prevent the paint from chipping.
4. Once the primer has dried, you can begin painting the ornament. Be sure to use light, even strokes, and to allow each coat of paint to dry completely before applying the next.
5. Once the ornament is finished, allow it to dry completely before attaching it to the tree.
Instructions
Gather Materials

Collect your materials and work on a protected surface.
Apply Your Base Coat
Hold your ornament by its opening and begin painting your first coat. Chalky finish paint has great coverage after a single coat. Once your ornaments are painted, allow them to dry for 30 minutes to an hour. Once dry, go back and do any touchups if needed.
What Is Chalk Paint?
Chalky-finish paint resembles a surface covered in chalk, giving items a flat, matte-looking appearance. It is different from chalkboard paint; you can’t write on it as you can with chalkboard paint. This latex-based paint cleans up with water instead of mineral spirits.

Paint the Accent Color

There are two parts to the pattern. The first is the underlying shade. Select one of your paint colors and begin painting dashes all around the ornament. Once finished, let it dry for about 30 minutes.
Make a Pattern

On top of the painted silhouette or accent dashes, go back and paint a dash in a different color on top of each one. Allow it to overlap slightly but allow the underlying color to show through.
Let the Ornaments Dry

Insert cake pop sticks pointy side down into your craft foam to create a makeshift drying rack. Place your ornaments upside down onto the cake pop sticks. Wait a full hour to allow the ornaments to dry.
Assemble and Display
After the ornaments have finished drying, replace the ornament caps, add some string or a hook, and display. 

Wooden Ornaments
For fans of Scandinavian-influenced decor and minimalist aesthetics, wooden ornaments will skew closer to your taste. They’re simple yet chic and look naturally stunning against the boughs of evergreen trees.

Gather Materials

Gather all the items you’ll need for creating these wooden ornaments and set them out on your workspace.
Select Your Pattern and Apply the Masking Tape

Here we used a simple striped pattern, but the options are endless with masking tape. You can make stripes, scallop the edges, or cut out shapes; the list goes on. Once you’ve decided on a pattern, apply the tape to your wooden sphere.
Tip
Remember that the paint will go everywhere that the tape is not. So if you want a stripe around the center, do the reverse with tape and put two strips of tape on both the top and bottom of the ornament to mark out the middle stripe.
Start Painting

Take a medium-size brush and begin painting your ornament. Start with the exposed wood and gently work your way around the tape. Be careful around the edges to avoid the paint from seeping underneath the tape.
Finish Pattern and Let Dry

If you’d like to add a second pattern, this is a great time to do so while your other side is drying. Then, allow your ornaments to dry for an hour. If needed, go back and do a second coat or any touch-ups.
Remove the Tape

Carefully peel off the masking tape once your ornaments are completely dry. Pulling off the tape too early can smear the paint, so check to ensure the paint isn’t still tacky.
Glue String or Drill Hooks

A drill bit makes this part quick and easy. Drill a small hole and insert a screw eye hook. If you don’t have an electric drill, you can hot glue a piece of string or twine to the top of your ornament. Tie a knot on one end, then glue the knotted end down to the top. Allow it to set and dry before lifting it by the string.
Decorate the Tree

Hang your completed ornaments on the tree.
Other Types of Paint You Can Use
For this project, we used chalky-finish paint. It adheres well to most surfaces and has a unique, matte look. However, if you want a glossier look, most people use acrylic paint with glass or plastic balls. This painting technique is much different, requiring you to unscrew the ornament top and drizzling the paint inside the ornament using a squirt bottle. You are essentially coating the inside of the ornament with the paint color you select. This method allows your ornaments to have a shinier appearance from the outside.
Another method people like to personalize ornaments or recolor old glass or plastic ornaments is to use spray paint. It’s less precise, but you can lay out an ornament on a piece of plywood or cardboard and spray a few coats (even mix different colors) for colorful effects.
What kind of paint do you use for ornaments?
You can use several different types of paints on ornaments, including chalky-finish paint, acrylic paint, and spray paint.
How do you seal acrylic paint on ornaments?
To seal the paint on your ornament, you can apply a clear craft sealer to the surface.
How do you get paint to stick inside ornaments?
To paint the inside of an ornament, pour a small amount of paint inside, cover the open top with a paper towel, and then swirl the paint around until it coats the entire inner surface. Wait for the paint to dry completely before replacing the ornament top.


