Instant Download: Price $8.99
How To Paint A Cat In Watercolor

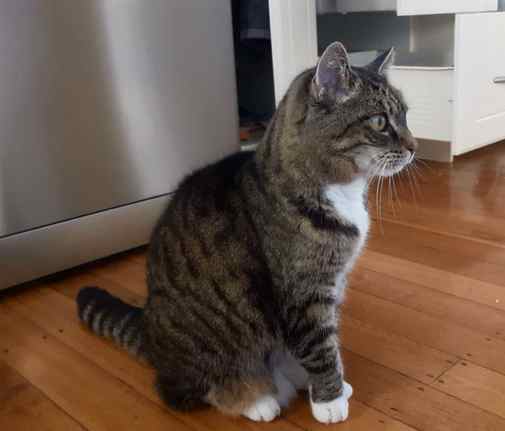
Meet Buffy our grumpy fifteen year old tabby cat. She is the subject of today’s tutorial on how to paint a cat in watercolor. In the reference photo below I managed to catch her in a rare moment, between sleeping and eating!

If you would like to follow this tutorial you can download my drawing and print it on to a sheet of A4 watercolor paper. Remember, when printing on to thick watercolor paper, always use your printer’s rear tray. Using your printer’s cassette tray could cause a jam as the thick paper has to bend round the printer’s rollers.
Table Of Contents
- Materials List
- Paint
- Brushes
- Paper
- Misc
- How To Paint A Cat In Watercolor Step By Step
- Steps 1 – 3
- Completing The First Wash
- Steps 4 – 5
- How To Paint Realistic Eyes
- Steps 6 – 9
- Steps 10 -12
- Step 13
- Adding Fur Details & Background Wash
- Steps 14 and 15
- Steps 16 and 17
- Final Painting
- Watch The Video
Materials List
Paint
Brushes
Princeton round detail brush 9650R-2 Buy from Amazon
Winsor & Newton Series 150 Bamboo Round #6 Buy From Amazon
Paper
Arches Watercolor Paper Block, Cold Press, 9″ x 12″, 140 pound Buy From Amazon
Misc
Pebeo Palette Knife Buy from Amazon

Subscribe to my newsletter and get my free email course plus free art critiques, videos, tips and discount offers
Free Course! Learn Watercolor In 7 Days
n.b. I will never share your email address with any 3rd parties
According to Wikipedia, The English term tabby originates from the translation of the French phrase “striped silk taffeta,” the root of which is tabis, meaning “a rich watered silk.” This can be further traced to the Middle French atabis (14th century), which stemmed from the Arabic term attabiya.[3] This word is a reference to the Attabiya district of Baghdad, noted for its striped cloth and silk;[4] Itself named after the Ummayad Governor of Mecca Attab ibn Asid such silk cloth became popular in the Muslim world and spread to England, where the word “tabby” became commonly used in the 17th and 18th centuries.
Tabby cats are possibly the most difficult type of cat to paint as there is a lot of complexity to their coats with the colors and stripy patterning. The stripes are a mixture of hard and soft edges and I used a couple of different techniques to create them which I will discuss.
How To Paint A Cat In Watercolor Step By Step
Steps 1 – 3
The first step is to really look at the photo and try and see what colors are their. Notice how the fur has lots of blues and greys but also subtle reddish browns too.
The general approach I used was to lay down a variegated wash of Ultramarine Blue and Paynes Grey on dry paper working from top to bottom with the paper angled at about 30 degrees. The important thing at this stage is to ensure that the edges form a bead just like when painting a regular flat wash.
Painting back into the wet bead of paint will ensure that you can extend the wash smoothly without creating any obvious hard edges and lines.
I left plenty of unpainted white flecks and patches. These are hard-edged highlights. It will be possible to modify them later, if needed, in the subsequent washes.
To warm up the blue grey in places, I “charged” the wash with some Burnt Sienna. Charging simply means dropping in additional colors wet in wet, into your wash. creating interesting colour variations. A variegated wash mimics the way that light behaves in reality as objects are never just one flat color. They have localised color and tonal variations as well as being modified by reflected light
Tip: My studio can get quite hot and the paint was drying too fast. In order to stop the beads of paint drying up, you can see in pic 3 above that I’m holding two brushes simultaneously. One brush is loaded with paint and the other just with clean water for rewetting, blending out and softening edges where needed.
STEP 1:

Using a glycerin based white and a petal sponge, I created the muzzle and ears. Next I sponged the middle section of the face with an ivory colour. Using a glycerin based face paint makes it easier to blend the different colours together and has a softer feel to the skin. The petal sponge is quite small, which makes it easier to build up the shape of the mask.
STEP 2:

To define the mask’s shape, I used superstar mocca on the edges. I use the edge of the sponge to shape the ears, which are rounded and end along the nostril – the outer corner of the eye line. The cheeks follow a rounded shape ending in the corners of the mouth. I also added a light dab of mocca on the tip of the nose and blended everything with the ivory colour.
STEP 3:

To create cheetah spots, I used a stencil and a petal sponge loaded with superstar chocolate. Be sure to use a somewhat dry paint consistency to avoid bleeding the paint underneath the stencil. I released pressure near the edges of the stenciled area to create a faded effect and made sure to stencil some spots on the edge of the mask as well to create the illusion of spots continuing beyond the mask edges.
If your results on even simple designs like this leave you feeling frustrated, we’d love to help you improve your skills, boost your confidence, and impress your clients.
Allow us to guide you through the fundamentals and advanced techniques that are getting between you and the painter you know you could become.


