Celebrate the Winter season with themed art!
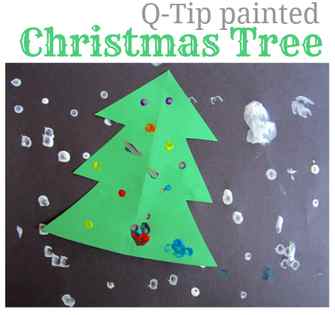
Simple Q-Tip Painted Christmas Tree
This post contains affiliate links.
Q-Tips are one of my favorite painting tools. Christmas trees all lit up for Christmas are possibly my daughter’s favorite thing ever. This is a fun Q-tip Christmas tree craft that isn’t too structured but offers kids the opportunity to work on fine motor skills while getting to decorate a Christmas tree just the way they want. Although my daughter dotted the q-tip encourage your child to use the q-tip however they see fit.
Q-Tip Christmas Tree Craft
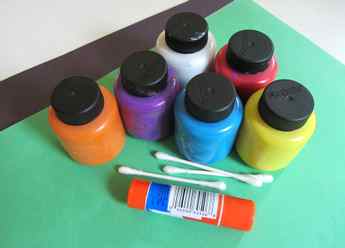
- Gather your materials. You will need some construction paper in green and another in black. White and various colors of paint, scissors and a glue stick. You may also want some extra sheets of paper for extra exploration after.
- Start by painting the snow scene by using only white paint on black paper. While it looks like snow to us, to my 2-year-old, it was just polka dots and that is cool!

- As they paint the background, cut the green paper into a Christmas tree.

- While her dots dried, I gave her a 2nd piece of paper to paint. She chose her hands as the tools this time. With toddlers especially, always have extras on hand of everything. Emotions are high and their hands don’t always do what they want and art time should be fun, not upsetting. I like this activity because it balances a little structure with a lot of open-ended.

- After the background is mostly dry, add glue to the tree.

- Glue it on to the background.
- Add colored paint. When we paint with Q-tips I like using the lids of the paint jars as mini paint palates. You don’t need much paint and you don’t waste much doing it this way. Just make sure you have one Q-Tip per color.

- Let your Q-tip Christmas tree craft dry and grab another extra sheet to finger paint some more.

–>
Like this post? Share it with a friend!
GRAB THIS FREE OUTLINE OF A CHRISTMAS TREE!
Do you need a Christmas tree outline? Sometimes you just need a template to get started with the basic shape, or you’re looking for a simple Christmas craft project. These Christmas tree outlines are quick, simple, and printer-friendly. PLUS, we’ve created a quick art project to go along with each tree outline.
HOW TO USE THE CHRISTMAS TREE OUTLINE
Watch the video below for a quick overview of the projects we picked to do with our Christmas tree outlines. While the techniques are simple, the projects are easily adapted for many age levels and include fun process art techniques that even adults can enjoy!
SUPPLIES NEEDED:
- Christmas Tree Outlines plus written and photo instructions!
- Art Supplies
- Gluestick and Scissors
- Extra paper, ribbon, or blank cards (see tips below)
STEP 1: Download and print the Christmas tree outlines. You can print it out and use it as is on copy paper, or you can cut out the tree and trace it onto heavier-weight paper or posterboard! Make sure to watch the video above!
Grab the FREE Christmas Outlines Pack with templates!

CHRISTMAS TREE CUTOUT ACTIVITIES
Make sure to grab the free printable pack to try these four Christmas art projects, or use the ideas as a starting point for your own take on this Christmas craft. You can easily use these Christmas tree printouts to make homemade Christmas cards.
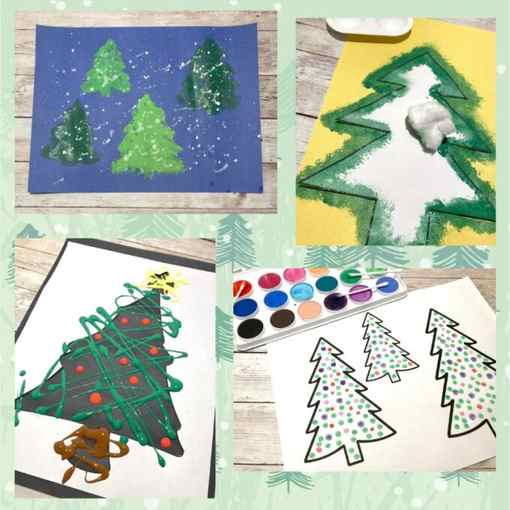
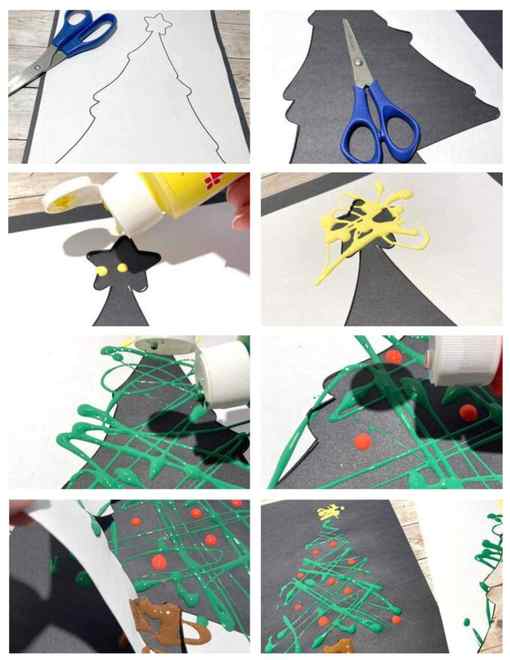
PROJECT #1: Paint Splatter Tree Outline
STEP 1: Print and cut out the center of the tree.
STEP 2: Using acrylic paint, use the drizzle and splatter technique to design your tree.
STEP 3: Lift your stencil and remove it before the paint dries.
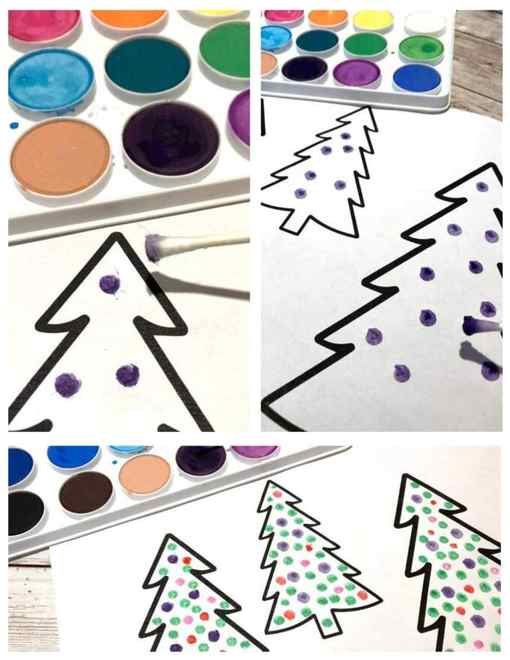
PROJECT #2: Water Color Tree Outline
STEP 1: Print template.
STEP 2: Use cotton swabs and watercolors to design your perfect Christmas trees!
Alternate idea: Outline the tree in white school glue, sprinkle it with salt, and allow it to dry. You can also do this with circles for ornaments on the tree. Use your watercolors to color the salt. See how salt painting works here.
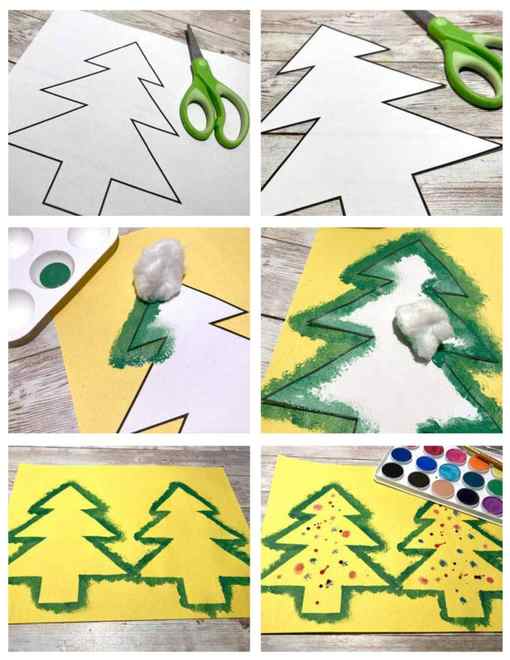
PROJECT #3: Cotton Ball Painted Tree Outline
STEP 1: Print template.
STEP 2: Cut out your tree outline and place it onto card stock.
STEP 3: Using cotton balls and acrylic paint, dab the cotton around the edges of your tree, creating a stippling effect. Remove stencil.
STEP 4: Use watercolor to splatter lights onto your tree.
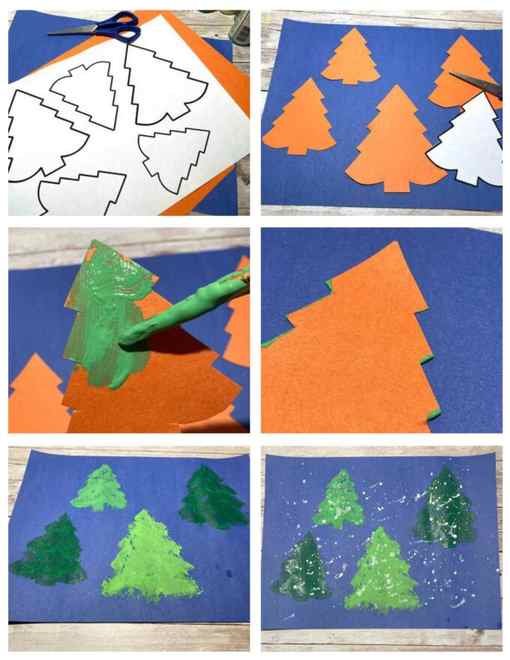
PROJECT #4: Stamped Christmas Tree Outline Art
STEP 1: Print template.
STEP 2: Cut out trees and use them as a template to cut out card stock.
STEP 3: Cover each tree with acrylic paint and then stamp them onto card stock.
STEP 4: Splatter white paint to create a snowy effect