You can really see the difference that a quick coat of sealer makes in the crispness of the letters and shapes!
Art for Kids: Silhouette Painting
This post and its photos may contain affiliate links. As an Amazon associate I earn from qualifying purchases. If you make a purchase through these links, I may receive a small commission at no extra cost to you!
This fun Art for Kids Activity is perfect for birthday parties, classrooms, and large groups! Use vinyl stickers to create a negative-space silhouette painting of your child’s name or other graphics! Quick, easy, and inexpensive!

![]()
One of my favorite art activities to do with children is silhouette painting because it doesn’t require a ton of prep work, and there’s no need for a lengthy lesson or technique explanation. This quick and easy kids art project is a fantastic way to teach children about negative space and masking! Because this lesson is so simple and inexpensive (and the results are so incredible!), it’s a great activity for large groups such as birthday parties, art classes, Scouts, and more!
TABLE OF CONTENTS
Art for Kids: Silhouette Painting
- Canvas Panels
- Vinyl Name or Graphic or Alphabet Stickers
- Matte Mod Podge
- Acrylic or Tempera Paint & Paintbrushes
- Plastic Wrap, optional

Start by applying your vinyl name or graphic (or alphabet stickers) to the canvas. If using transfer tape, I have found that the paper-type transfer tape works best when working with canvas. Use a scraper or the edge of a plastic card to press the letters down into the canvas as much as possible.
Because the canvas is textured, which lends itself to a little bit of paint bleed underneath the edges of the letters, I highly recommend sealing the letters with a quick coat of Mod Podge to help keep the edges crisp and clean.

You can really see the difference that a quick coat of sealer makes in the crispness of the letters and shapes!

Again, this step is totally optional, but highly recommended! Allow the Mod Podge to dry fully before painting (this doesn’t take very long!).

Using acrylic or tempera paint, cover the entire canvas including the name.

While the paint is still wet, carefully peel up the letters (this part usually requires some adult assistance for younger children!). Tweezers and/or the flat edge of an X-acto knife (for adults) make easy work of removing the letters. Do NOT allow the paint to dry completely before peeling the letters or you may run the risk of peeling up the paint with the letters.

Isn’t that fun?! I love the bold contrast between the negative space and the colorful paint!

Another fun technique that you can try is silhouette painting with plastic wrap!

Drizzle and drop a generous amount of paint on top of the canvas, and then cover it with a sheet of plastic wrap.

Use your hands and/or a plastic card to push the paint around the plastic wrap until the entire canvas is covered.

Carefully peel up the plastic wrap to reveal a marbled swirl of colors!

This plastic painting technique is generally less messy than traditional painting (just make sure you cover the work surface underneath!), and it is especially great when working with a large group of children all at once since it doesn’t require brushes or water.
There are SO many different combinations of fonts, graphics, colors, styles, and techniques that you’ll never grow bored of this fun kids art activity! Each piece from every single artist will be completely original and unique!
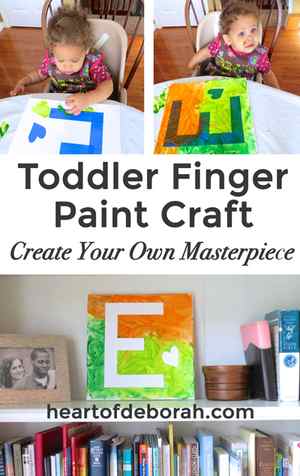
Toddler Finger Painting Craft
Finger painting is a great natural sensory activity for kids. You can also create a beautiful canvas masterpiece from this simple activity. I decided to create this toddler finger painting craft because I love kid made art and I wanted to create something our daughter could look at years from now!
When we first started the activity, Izzy was a little unsure of the finger paint, but with exposure and practice she learned to love the messy craft.
See more details below to make your own toddler masterpiece out of finger paint.
This post may contain affiliate links.
Toddler Finger Painting Craft Supplies:
-
-
- Finger Paint (homemade or store bought)
- Painter’s Tape
- Canvas (We used a 1.5″ thick square canvas)
- Kid’s Smock
We purchased a few 12×12 canvases in bulk at a craft store last year. I love buying canvases and coming up with new craft ideas for our house. We had a few leftover so I thought why not let our daughter make her own canvas masterpiece.
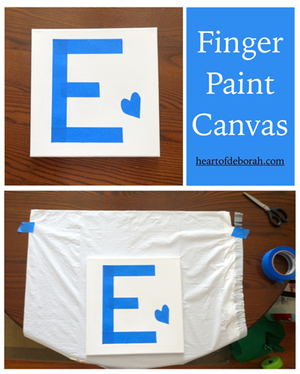
I used painter’s tape and made the letter E along with a simple heart. Make sure all the edges are sealed to the canvas. I taped a garbage bag to our kitchen table to help control the mess, it also made clean up quick.

Then let your toddler get to work. I helped our daughter with some of the painting since she was new to the paint and not sure how to spread it across the canvas. You can also give your child a paint brush to create a brushed work of art.
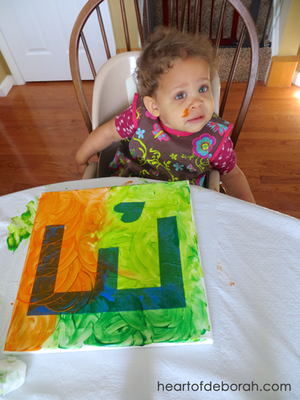
I let the canvas dry for about 1 hour then I peeled off the painter’s tape. We were left with a beautiful creation! We have it displayed on the bookshelf in our daughter’s play area.
Make sure you’re following me on Instagram, Facebook, and Pinterest for more fun kid’s activities and crafts!
-


