The matting agents which are suspended in the varnish tend to have a longer lifespan and do not catch dust and dirt nearly as readily as the wax versions. The wax matting agents tend to mark very easily, however, some artists prefer the soft and subtle reflection of light off this finish. (It is possible to use a very light coverage of wax applied over solvent-based varnishes, once they are dry, to achieve this same effect).
Natural Glass Varnish and Painting Medium
Natural Glass is a revolutionary new water-based bio-polymer varnish and painting medium made from milk casein and beeswax, with a few other natural ingredients added to help it remain flexible and tough. Fast drying to a water-resistant, semi-gloss film, Natural Glass works beautifully as a varnish or medium for all painting and drawing media (not oil pastel), and on virtually all supports, including canvas, paper, Yupo, ceramic, stone, glass, leather, fabric (not washable), wood, gourds, jewelry and other materials. It can be re-worked, removed, painted over, layered or used as pouring medium. The dried surface remains wonderfully non-sticky to the touch, and does not require Glassine or other separating films to prevent two coated pieces from sticking together. It may be gently wiped with a lightly dampened cloth to remove dust or soil.
Pastel and watercolor artists no longer need to frame their work under glass! No more annoying reflections and glare, concerns about breakage and expense, Natural Glass makes shipping and hanging a show easy. Its lustrous surface adds depth to your colors while protecting from scratches and moisture. Pigment brilliance is preserved, you won’t lose your highlights or dull your colors, in fact, pigments become even more luminous.
Like all SpectraFix products, Natural Glass washes up with water, is completely non-toxic with no irritating fumes, and can be used indoors.


SKU: N/A Categories: Mailable , Medium , Natural Glass , Varnish
Share
- Additional information
- Reviews (1)
8 oz, 16 oz, 32 oz, Gallon
Reviews
H Meeks (verified owner) – January 12, 2021
I bought this recently as I have a lot of chemical sensitivities and also care about the environment, but didn’t want to sacrifice the finish quality or archival longevity of my art. This new FinalFix and Natural Glass checked all my finicky boxes so I bought them both to try them. I couldn’t be happier with the results; this is one of the few products I am delighted to leave reviews for. First I used FinalFix as an undercoat that didn’t change or smear my watercolor, gouache, or ink paintings when sprayed on with the aerosol-imitating bottle. Then I topped it with Natural Glass, in 3 coats that quickly dried in between–I like glossy, shiny finishes for my pieces and the Natural Glass is perfect for that. I also tried the Natural Glass as a glue/medium for glitter decoration and to glue on small paintings onto wood blanks for ornaments, and it worked very well for that, too! I will happily replace all my acrylic fixative, varnish, and medium with these two versatile and hypoallergenic products–I can display my watercolor, gouache, and ink pieces and ornaments without always having to buy expensive and fragile glass-and-mat with frames, as I tested them and my paintings are now easily dry dustable or damp wipeable and look just like the gloss acrylic varnish I’ve used from a big brand for many years! I am also itching to try this as a varnish on paper beads and air dry clay, things I can return to after many years as I won’t have to buy acrylic varnishes for them. Hooray!!
Add a review Cancel reply
This site uses Akismet to reduce spam. Learn how your comment data is processed.
Why This Renaissance Painting Glows

Even when on view in a gallery full of striking works, Lorenzo Lotto’s half-length portrait of Saint Catherine has an unusual presence. Part of the sense of its loveliness comes from the beauty of the saint herself, but it’s not only her face that makes this painting so engaging. The colors reverberate; green and red are arranged in strong opposition. The green is intense, with hints of yellow in the highlights. The reds range from the deep burgundy hue of the velvety brocade curtain behind the saint to the bright-hot color of her dress. That dress adds amazing power—opulent, undulating folds of fabric reflect light, suggesting lustrous silk.

In his Saint Catherine, Lotto achieved the visual effects of texture and shimmer using methods and materials that were a little unusual for painters in Italy during the 16th century. To create a brilliant, luminous effect, he exploited the translucency of oil paint made using organic red colorants, which we call red lakes.
Lotto’s complex painting method is revealed by a tiny cross-sectional sample taken from the bottom edge of the panel. The sample shows Lotto’s sequence of layering color and the pains he took in depicting the fabric for the dress.

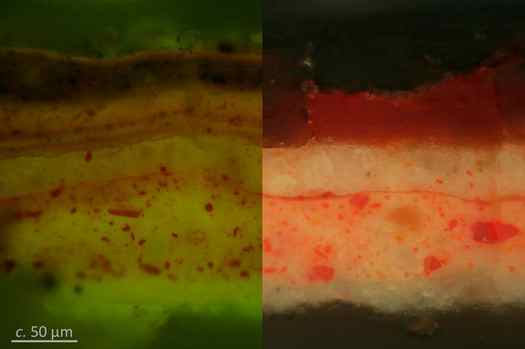
Cross section of paint layers in Saint Catherine, under fluorescence (left) and visible light (right)
The right-hand side of this image shows the cross section in visible light. On a white preparatory layer, seen at the very bottom of the cross section, he put down pink paint—mixed from lead white, vermilion, and some red lake—then a thin glaze of red, then paler pink, and translucent deep-red paint. (The red layer is overlaid by a dark-brown layer to suggest a shadowed fold in the cloth, although it is difficult to discern against the black background in this image.)
The image on the left-hand side of the cross section, which was obtained using fluorescence microscopy, shows that what appears to the eye in visible light as a single thick layer of red paint is actually four or five thin layers. The difference in color of the fluorescence between layers strongly suggests that there are different pigments in alternating paint layers. The multiple layers of translucent paint glazed over opaque light-pink paint make this work appear to glow.
Red lake paints are very slow to dry, and that may be one reason why Lotto built up the depth of color using many thin layers. To hasten the slow drying, and perhaps to increase translucency, some artists added powdered glass to their red lake paints. We found that Lotto did something a little different: he added powdered quartz.
Pure quartz pebbles were the source of silica, a crucial raw material for Venice’s robust glassmaking industry. These quartz pebbles needed to be ground into powder—the glassmaker Antonio Neri, in his 1612 treatise on the craft, said it should be as fine as flour. The particles of quartz in Lotto’s paint are so small as to be invisible to the naked eye and cannot be seen in the magnified cross section shown here; they can only be found using scanning electron microscopy. Lotto returned to Venice, his birth city, off and on throughout his career, and he could have purchased finely powdered quartz from the sellers who traded there.
Lotto’s sophisticated technique and use of unconventional materials for painting are signs of creative ingenuity, a trait as prized in the Renaissance as it is today. Rediscovering artists’ innovations from the past can deepen our appreciation of achievements such as Saint Catherine and inspire new ideas to shine through in our own work.
Additional technical detail on the analysis of this painting is available in the article “Material Innovation and Artistic Invention: New Materials and New Colors in Renaissance Venetian Paintings.”
COMMON VARNISHING QUESTIONS
A varnish may help to make an otherwise water- sensitive work waterproof. A professional grade artist acrylic should dry waterproof. However, if copious amounts of water have been used to dilute the strength of colour by reducing the pigment concentration, also the binder will have been reduced (as in watercolour techniques) sometimes rendering the acrylic water- sensitive. The careful application of a varnish over the top will help to bind the work and improve the water resistance, e.g. Polymer Gloss Varnish.
The addition of Acrylic Painting Medium to either the paint or the water used to dilute the paint at the point of application, will also avoid water-sensitivity.
A varnish may also be used to protect the work from physical abuse. Although not quite a shield of steel, some varnishes are extremely tough and heat-resistant and will protect utility items very well, e.g. MM11 Satin Varnish & MM19 Poly-U-Gloss Varnish .
Although the primary purpose of any varnish is to create a protective surface, there are numerous ways to do this, all dependent upon the type of artwork and the specific needs (practical and aesthetically) of the artist. One of the less common varnishing techniques is the application of what is called an isolation coat or varnish. As the name suggests, this is a varnish layer applied that will create a permanent (non removable), protective barrier between the actual artwork’s painted layers and the application of subsequent removable varnish layers. Isolation coats are only applied to acrylic paintings, and are commonly used by art conservationists as well as regular artists.
This approach to finishing off an acrylic work is universally recommended by conservators the world over. More and more, the larger galleries are requiring their artists to use it.
Firstly, one or two coats of water-based acrylic varnish such as MM7 Polymer Gloss Varnish & Gloss Medium is applied to the work then, when thoroughly dry, a coat of removable solvent-based varnish such as MM14 Final Varnish Gloss Finish is used to finish off the work. Using a removable varnish allows this varnish to be stripped off, taking with it years of accumulated airborne rubbish, then a fresh coat applied. Because both of these varnishes are acrylic, they have the flexibility and elasticity to withstand the constant movement and expansion and contraction of most substrates. Therefore, these varnishes will not crack or show signs of stress as they age, neither will they yellow with age and they will help to protect the work from the destructive effects of ultraviolet light.
Step 1.
Water-Based Varnish : A water-based acrylic varnish (such as MM7 Polymer Gloss Varnish and Gloss Medium or MM6 Polymer Matt Varnish) affords the work it covers substantial resistance to physical and chemical attack; however, this varnish is not completely impervious. Water-based varnishes dry by evaporation, thus the evaporating water can leave microscopic capillary holes in the varnish, which allow the paint to breath and cure. Allowing the paint to cure is of benefit; however, the small holes which are left behind have two potential drawbacks.
The first is that of allowing water back under the surface of the varnish. This will not affect the paint or varnish chemically (as long as both the paint and varnish have cured). However, when the acrylic and water are combined, their differences in refractive index mean they may look translucent or white. This may, in turn, produce cloudiness in the varnish over the work. This is only likely to occur when the work is literally soaking in water for a great length of time. Removing the water and applying an indirect warm dry heat can usually reverse this cloudiness (providing the varnish was cured prior to exposure to the water).
The second problem is that of dirt and grime catching in these holes. It is very easy for airborne rubbish to catch in the tiny holes which may, in tropical climates, lead to the increased chance of bacteria and mould growing in these areas.
However, in the majority of cases, the water-based varnish will be sufficient. This varnish alone is most certainly better protection for the paint than nothing at all.
Leave at least 48 hours for the water-based varnish to dry before applying Step 2.
Step 2.
Solvent-Based Varnish : It has been found that by applying a removable final finish varnish such as MM14 Final Varnish Gloss Finish (turps-based) or MM15 Matt Varnish (turps-based) after the water-based varnish, conservators are able to easily clean and repair the work. When the work is to be cleaned, the final varnish can be redissolved in mineral turpentine; the water-based varnish helps to protect the paint during the removal of the original final varnish. Then a new coat of final varnish is applied over the clean original water-based varnish.
This process is recommended for those artists seeking the best long-term results from their materials and most certainly recommended for exterior mural work.
Put simply, water-based acrylic varnishes are made up of microscopic beads of acrylic dispersed in water. Acrylic is clear and water is clear; however, when the two are put together they appear milky. This is due to the difference in refractive light index between water and acrylic. When light rays pass through this mixture they are defracted or bent to such an extent as to appear white. When the water evaporates so too the “whiteness” goes with it.
It follows that if water is trapped in the varnish it will remain milky or cloudy. Water can be trapped in the film of varnish in a few ways: recoating a varnish before it is dry, application of a thick coat or the top drying too quickly.
Re-coating time : If a water-based varnish is recoated before it has had time to dry it may go cloudy, even if it appeared to be touch dry and clear. The water from the second varnish coat will “re-wet” the first coat and, as described above, will cause cloudiness. Drying times may vary from varnish to varnish, with the thickness of the coat and, of course, the climate; if in doubt leave overnight.
Thin coats : If the varnish is applied too thickly, it can start to cure on the top while water is still trapped on the bottom of the film layer. As described above, this can lead to a cloudiness in the varnish film. To avoid this, apply the varnish as thin as possible; do not flood the surface. Varnish the work in a position closer to vertical than horizontal. This is most important when varnishing works with high relief or 3-dimensional surfaces, which can catch the varnish resulting in a milky pool. Be careful to avoids runs in the varnish.
Forced drying : Even if the varnish has been applied thinly but is allowed to dry too quickly, water can be trapped in the varnish film. To avoid this, DO NOT force dry the varnish. Hair dryers, heaters etc. can cause the varnish to dry and cure on the surface, trapping water underneath. If heating is required, use indirect heat not above 35°C.
Ambient temperature : In the days of the old masters, varnishing was a very tricky business. The temperature and humidity had to be just right and had to remain that way while the work dried. Today’s varnishes are much more forgiving; however, they too have certain limitations. It is strongly advisable to varnish in a temperature range within 12°C and 35°C with a medium to low level of humidity.
The minimum “film-forming” temperature is approx 8-12°C. Minimum film-forming temperature is the lowest temperature at which the varnish will bind together forming the tough interlocked coat that is desired. If the temperature climbs above approx 40°C, the water may tend to “flash off” or evaporate far too quickly leaving the top of the film of varnish dry and cured, trapping the water underneath leading to the cloudiness described above.
Extremes of humidity should also be avoided. In ultra-dry climates, the water may tend to “flash off” quickly, as described above, whilst in extremely humid conditions, the water may not evaporate fast enough and be trapped inside the varnish. However, humidity is not as much of a concern as the temperature and will only present a problem in extreme climates. For the most part, these problems should never arise. However, it has been discussed more out of interest for those artists in quite abnormal conditions.
Dilute with water: Most water-based varnishes can be diluted with water (some should not; check the label). Diluting with water will make it easier to brush the varnish out and also allow a thinner coat. If diluting equal parts with water in order to thin the varnish, then 2 coats should be applied.
Spray apply : It is possible to use an airbrush or spray gun for larger areas with MM7 Polymer Gloss Varnish & Gloss Medium & MM6 Polymer Matt Varnish. Dilute either of these varnishes with water up to equal parts and spray apply. An approved mask should be worn when spraying with acrylic varnishes (as with the paints). Even though the varnishes are non-toxic, INHALATION SHOULD BE AVOIDED.
Brush application : Dilute the varnish with up to equal parts water to achieve the desired consistency for application. It is advisable to use water to assist with flow and brushing. Brush in the one direction then brush at right angles to the first brushstrokes, being careful when brushing back over an area not to “lift” the varnish. If the varnish has tacked off (become tacky), it is starting to dry, so DO NOT brush over this area. If the area becomes tacky and is brushed over, the brush will pull the semi-dry varnish and leave marks and little particles of dry varnish. If an area has been missed, leave the work until it is fully dry (usually 6 hours) and apply another coat.
Use a soft wide brush; do not soak the brush in the varnish but rather dip the bristles only half-way up their length in the varnish.
MM6 Polymer Matt Varnish is a water-based acrylic varnish containing matting agents to reduce the sheen, resulting in a matt to satin finish. MM6 Polymer Matt Varnish will help to bring out the intense, vibrant colours of the Matisse Professional Artist Acrylics. MM6 Polymer Matt Varnish may be used as a final varnish (see Two-Varnish Finish System) and dries non-yellowing and completely clear. This varnish may be used to matt off a work for photography or wherever a matt finish is required. The MM6 Polymer Matt Varnish can be used as a matting medium added into the paint. To achieve an even lower sheen, mix MM5 Matt Medium in with Matisse Colours before painting. This varnish should be stirred as it contains matting agent which may, in prolonged storage, tend to settle out and fall to the bottom of the container.
Do not use over oil-based paints.
MM7 Polymer Gloss Varnish is a water-based acrylic varnish which has an exceptionally high gloss level. MM7 Polymer Gloss Varnish will bring out the full intensity of the Matisse Colours. It can be used as a final varnish (see Two-Varnish Finish System) which dries non-yellowing, completely clear and it will remain totally flexible.
Do not use over oil-based paints.
Glazing : The MM7 Polymer Gloss Varnish may also be used as a medium (added in with the paint) to reduce the intensity of colour without reducing the binder content. When Matisse Colours are reduced with MM7 Polymer Gloss Varnish they will have a glowing, glossy finish and will remain water-resistant.
Glass : MM7 Polymer Gloss Varnish can be used successfully as a bond coat for painting Matisse Colours on glass and other non-porous surfaces (see Surface Preparation: Glass).
Decoupage : MM7 Polymer Gloss Varnish is also used as a sealer and glue as well as the varnish for decoupage. Many coats can be applied and the MM7 Polymer Gloss Varnish can be sanded between coats, if required.
A popular method of decoupage has been to apply 4 or 5 coats of MM7 Polymer Gloss Varnish to a colour print (from a magazine or newspaper) leaving each coat to dry for 24 hours and the last coat for at least 48 hours, then soak in lukewarm water. The paper can then be removed and the image has been soaked up and is now embedded in the acrylic film. This film can then be glued down using another coat of the MM7 Polymer Gloss Varnish. This will not work over paper that already has a gloss finish (such as the glossy cover of a magazine) as this stops the varnish from “soaking up” the ink.
MM7 Polymer Gloss Varnish is an efficient sealer, glue, binder medium, gloss glazing medium as well as a gloss varnish. It is quite a universal medium, which would be a useful addition to any paint box.
Water-based polyurethane varnishes should not be diluted with water. Even though they have water in them, the addition of water post-manufacture will not allow emulsification and will therefore upset the formulation of the varnish. These varnishes should be applied reasonably generously to the work and brushed out evenly.
DO NOT apply polyurethane varnishes to canvas or paper substrates. They should only be used on hard substrates such as wood, medium-density fibreboard, etc. The polyurethane varnishes are very hard wearing and tough varnishes and, for this reason, do not have the flexibility required for a surface such as canvas.
Brush application : Brush in the one direction then brush at right angles to the first brushstrokes, being careful when brushing back over an area not to “lift” the varnish. If the varnish has tacked off (become tacky), it is starting to dry, so DO NOT brush over this area. If the area becomes tacky and is brushed over, the brush will pull the semi-dry varnish and leave marks and little particles of dry varnish. If an area has been missed, leave the work until it is fully dry (usually 6 hours) and apply another coat.
Use a soft wide brush; do not soak the brush in the varnish but rather dip the bristles only half-way up their length in the varnish.
MM11 Satin Varnish is a water-based polyurethane varnish that dries completely clear. It is an extremely hard varnish that has been designed for utility surfaces and folk art. Once cured, it is reasonably heat-resistant (up to approx 60°C) and non-yellowing.
DO NOT dilute the MM11 Satin Varnish with water. Use directly from the bottle.
As the MM11 Satin Varnish contains matting agents, it should be stirred before use. Do not shake the bottle as this may produce bubbles. If the bottle has been shaken, leave it to stand for about 10 mins to let the bubbles disperse.
Do not use over oil-based paints.
MM19 Poly-U-Gloss Varnish is a water-based polyurethane varnish that dries completely clear with a high gloss finish. It is an extremely hard varnish that has been designed for utility surfaces and folk art. Once cured, it is reasonably heat-resistant (up to approx 60°C) and non-yellowing.
DO NOT dilute the MM19 Poly-U-Gloss Varnish with water. Use directly from the bottle.
DO NOT apply polyurethane varnishes to canvas or paper substrates. They should only be used on hard substrates such as wood, medium density fibreboard, etc. Polyurethane varnishes are very hard wearing and tough varnishes and, for this reason, do not have the flexibility required for such surfaces as canvas.
Do not use over oil-based paints.
SOLVENT-BASED VARNISHES
As described in the section on Two-Varnish Finish System, the solvent-based varnishes (MM14 Final Varnish Gloss Finish, MM29 Final Varnish Satin Finish and MM15 Final Varnish Matt Finish) can be redissolved so they can be removed and a fresh coat applied; thus any built-up rubbish is removed with the varnish. These are varnishes with an acrylic resin dissolved in mineral turpentine. They produce a crystal clear, non-yellowing finish that is impervious to water. These varnishes will help reduce the destructive effects of ultraviolet light on the work.
Brush application : Brush in the one direction then brush at right angles to the first brushstrokes, being careful when brushing back over an area not to “lift” the varnish. If the varnish has tacked off (become tacky), it is starting to dry so DO NOT brush over this area. If the area becomes tacky and is brushed over, the brush will pull the semi-dry varnish and leave marks and little particles of dry varnish. If an area has been missed, leave the work until it is fully dry (usually 6 hours) and apply another coat.
Use a soft wide brush; do not soak the brush in the varnish but rather dip the bristles only half-way up their length in the varnish.
Spray apply : It is possible to use an airbrush or spray gun for larger areas with the Matisse solvent-based varnishes. Dilute the varnish with clean mineral turpentine, if required, and spray apply. An approved mask should be worn when spraying with solvent-based acrylic varnishes and approved equipment designed to be used with flammable varnishes. DO NOT SPRAY WITHOUT APPROVED RESPIRATORY AND SPRAY EQUIPMENT.
Removal : The MM15 Final Varnish Matt Finish and MM14 Final Varnish Gloss Finish are both removable varnishes (see Two-Varnish Finish System).
To remove the varnish, use a piece of lint-free cloth soaked in mineral turpentine and rub over the area of varnish to be removed. The surface will start to become tacky; this is the varnish being redissolved by the turps. The varnish resin will build up on the cloth. Work a small area at a time, moving the turps-soaked cloth around in the hand to present a clean area of the cloth to the surface each time it is rubbed.
N.B. If the cloth develops any colour, i.e. it is dissolving the paint, STOP and leave the work to dry overnight before attempting again.
Once the varnish is removed, allow the painting to dry (preferably overnight) and recoat with 2 coats of MM14 or MM15.
Clean-up : Brushes and equipment used with the MM14 Final Varnish Gloss Finish and MM15 Final Varnish Matt Finish should be cleaned up in mineral turps.
Exterior : When these varnishes are applied for outside use, it is advisable to apply 3 coats.
MM14 Final Varnish Gloss Finish is a final finish varnish (see Two-Varnish Finish System). It will dry to a very high gloss and is non-yellowing.
It is possible to achieve a satin or semi-gloss finish by mixing the MM14 Final Varnish Gloss Finish and MM15 Final Varnish Matt Finish.
It is advisable to use 2 thin coats of this varnish (see section on MM14 Final Varnish Gloss Finish).
MM15 Final Varnish Matt Finish (mineral turps-based acrylic resin with matting agent) is an acrylic resin dissolved in mineral turpentine like the MM14 Gloss. It produces a crystal clear, non-yellowing finish that is impervious to water.
This varnish dries to one of the lowest sheen levels available on the market today whilst still remaining clear and free of “haze”. It is possible to achieve a satin or semi-gloss finish by mixing the MM14 Final Varnish Gloss Finish and MM15 Final Varnish Matt Finish (see section on MM15 Final Varnish Matt Varnish (Turps-Based)).
This varnish should be stirred as it contains a matting agent which may, in prolonged storage, tend to settle out and fall to the bottom of the container.


