Some more activities for toddlers that you might enjoy are:
Hand print flower paintings for toddlers

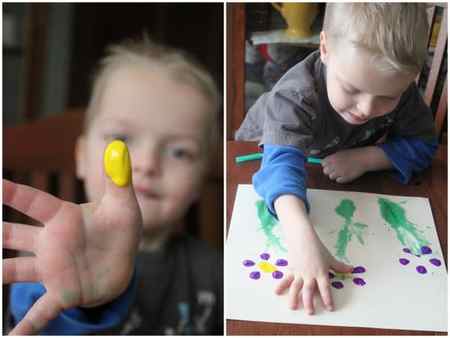
Painting activities and toddlers go hand in hand, and there’s nothing more fun than hand prints. Turn those wiggly hand prints into beautiful flowers with this easy painting activity that’s a perfect Spring craft activity. They also make a great toddler Mother’s Day gift idea.


Hand print flower paintings for toddlers
Making hand print flowers is a fun and easy way to save your child’s hand print in a beautiful picture.
Kids love dipping palms and fingers in gooey paint-filled trays, and making hand prints or finger prints on cardboard or paper. Their faces light up as they see the amazing results of transferring the paint from their hands onto paper.

Supplies for hand print flowers craft for toddlers
- Paint– we always recommend washable paint (you can get a set like this one on Amazon).
- Paper
- Foam tray
- Paint brush – a pack like this is PERFECT for painting with toddlers.

Easy Stamping Spring Flower Art Project for Kids
I’ve been meaning to do bottle stamping for ages. And I’m so glad we did it as a flower art project! It was so simple!
We were all in the mood to add a little spring color to our house. This simple spring craft was just the ticket!
Plus, it’s super simple. Even toddlers can handle stamping the bottom of a bottle into paint and onto paper.
To stamp your own spring flowers, you’ll need:
- empty soda bottle
- paint
- green food coloring
- water
- dropper or syringe
- paper
- straw
Even though the actual stamping is really simple, it’s still three steps to get to the finished project. I’m actually amazed that Henry took to this activity because it was on one of those days.
But he really, really enjoyed it.
And we got some great artwork for the wall just in time for the flowers to start popping up outside! Anyone else as super excited as I am for that first bloom?
Get Stamping for Pretty Spring Flower Art
I was going to say that the straw blown stems was his favorite part… but now I’m not sure! Every step was really fun!
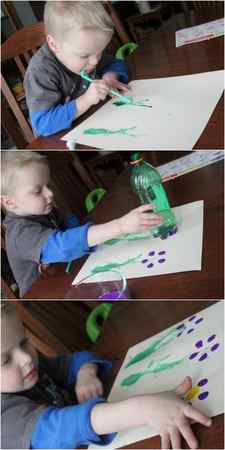
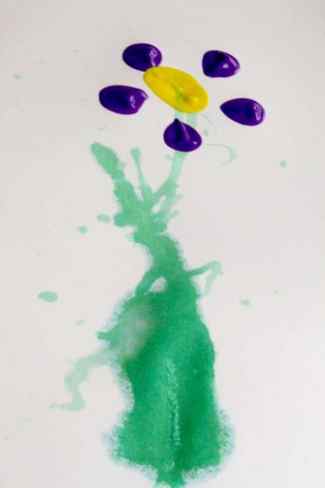
To make the stems, I dropped a few drops of green food coloring into a small bowl of water. Henry used a dropper/syringe to squirt some in one spot on the paper.
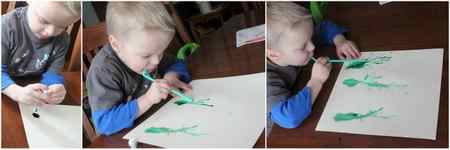
Then he blew it, using the straw, as far across the paper as he could!
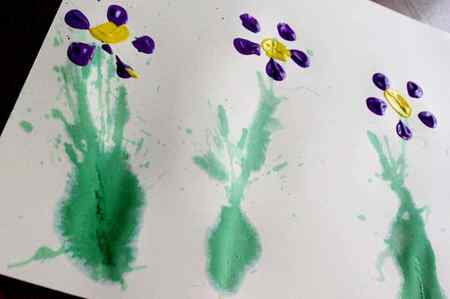
Once the paper was filled with flower stems, it was time for the flowers to “bloom.” See what I did there?
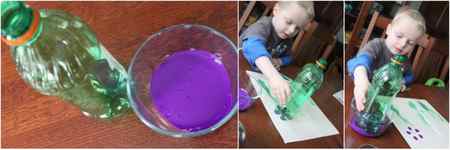
I put some purple paint in a small dish just big enough for a soda bottle to fit into. Henry dipped the bottle into the paint and printed flowers on the top of his stems.
For the finishing touch: the flower center.
With a quick dip of his thumb into some yellow paint, Henry added the centers to the flowers.
That’s it! His flower art project is complete.
What are your favorite spring flower art projects? We’d love to share your creativity with our community!
SHARE POST
Henry is 3 years old
About Jamie Reimer
Jamie learned to be a hands on mom by creating activities, crafts and art projects for her three boys to do. Jamie needed the creative outlet that activities provided to get through the early years of parenting with a smile! Follow Jamie on Pinterest and Instagram!
More Hands on Kids Activities to Try
Reader Interactions
19 Comments
- carol klein says May 8, 2019 at 5:59 am
what a super cute fun activity…I think I can do this on wood pieces add the word welcome spring add a piece of ribbon to the top and hang it on my door. carol
Looking forward to trying this activity with my special needs students tomorrow!
Thanks for the ideas!
What a cute, fun and simple project! I can’t wait to do this with my little guy. Thanks Jamie 🙂
- Jamie Reimer says March 24, 2014 at 9:47 pm
Thanks Priscilla! If you do it! Take a pic and share it on our Facebook page! I’d love to see how it turns out!
I love this post.These handmade artworks are really so pretty.In the growing age of the children parents must be conscious about their activities,trough this activities they should increase their learning ability.
What sort of paper did you use? I would think that the food coloring would get absorbed quickly…
- Jamie says March 19, 2012 at 7:17 am
I just used 12×12 scrapbook paper. That’s what we usually use for most of our projects. It did soak up quickly, but it still worked well for the little bit of blowing it across that we did. If we were doing an entire project of straw blowing, watercolor paper might work better.
This is so cute…I would love to invite you to join us and link this to Hey Mom, Look What I Did at Adventures In Mommy Land (http://adventures-in-mommy-land.blogspot.com/2012/03/hey-mom-look-what-i-did-22.html)
Very cute! Looks like lots of fun. Nice keepsake too.
Leave a Comment Cancel reply
This site uses Akismet to reduce spam. Learn how your comment data is processed.
Primary Sidebar
Hey! I’m Jamie. I have 3 boys that are crazy energetic & we like to have fun!
SUBSCRIBE TO OUR WEEKLY NEWSLETTER AND RECEIVE A FREE KIDS ACTIVITIES PLANNER
handsonaswegrow


What Parents Have to Say…
There’s always something new for us to discover, as well as old favorites. I am so grateful to have activities handed to us. Fun and easy ones that can be put together in a moment’s notice! You’re awesome Jamie and I appreciate you sharing your activities and ideas!! – Melissa C.
I feel like a new mama having so many fun ideas. I used to dread the afternoon, after naps, as it was so boring doing the same thing day after day but now I look forward to our “play” time! – Haley S.
You have changed how I spend time with my kid in so many positive ways! I am now one happy dad that no longer wonders what I am going to do with this little guy for the next 12 hours 😛 Your site was this first time dad life saver! – Jack C.
It is hard to think of things to keep the 3 year old entertained and engaged while taking care of the baby. Everything we have tried so far from your website, the three year old has loved. Your ideas are so simple and he can do them for hours. HEAVEN! – Karen I.


