Now, to give the tree more naturalness and movement, we are going to bend it a bit.
How to Paint Tree Branches
Painting trees is a lot like climbing them: Fun and games ‘til you’re stuck in the branches because you can’t figure out your next move. In either situation, the worst thing you can do is overthink it.
Painting trees is pretty easy, even for beginners. Where a lot of beginners go astray is in trying to make their branches too perfect. Focusing on getting the exact right thickness and placement of each branch will end up making the whole tree look unrealistic.
If you know how to paint tree branches, you can paint any other thin line with ease. You’ll encounter thin lines a LOT outside of tree branches (lamp posts, feather edges, fence slats, grass blades, background stripes). Once you’ve gotten the technique down, you’ll be able to paint all those lines with ease.
And frankly, this is where a glass of wine or a nice vodka tonic helps out. A drink makes it easier to release the death-grip on your tiny paintbrush and to go with the flow.
To recap the video tutorial:
• Water the paint down until it’s the consistency of ink. This makes smooth lines that don’t need retracing.
• Press lightly. Natural lines come from easygoing brushstrokes.
• If your hand needs some stability, you can rest you wrist on the edge of the canvas (watch out for wet paint!).
• Fast movements give you straighter lines. Slow movements give you “branchier” lines. Most trees need some of both!
This is an important painting technique for the three paintings in our fall DIY series:
• August’s painting features abstract tree branches that reach across two mini canvases.
• September’s feather painting has countless thin, wispy lines.
• October’s big, bold, floral painting involves a prominent striped background.
If your branches come too branchy or your thin lines come out on the chunky side, it’s okay! Ask your studio artist what you can do to keep the painting on track. They’re artists themselves and know the tricks for turning mistakes into miracles!
Tree Painting Trick Using A Stainless Steel Scrubber
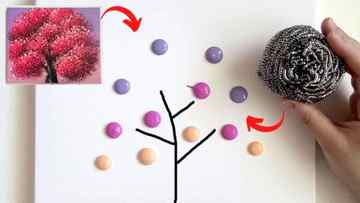
Image credit: Little Fantasy art via YouTube
Advertisement
Advertisement
330 Shares
If you’re a beginner in painting or simply looking for an easy painting technique that you can try, then check out this video tutorial by Little Fantasy art on YouTube. This hack will definitely make painting a tree easier with the help of a stainless steel scrubber and a few cotton swabs! You can make a small or big version of this art project, then display it in your house, or give it as a gift to a loved one.
Advertisement
Materials:
- Canvas
- Painting knife
- Flat paintbrush
- Detail paintbrush
- Acrylic paint
- Steel wool or scrubber
- Cotton swabs
- Rubber band
Step 1
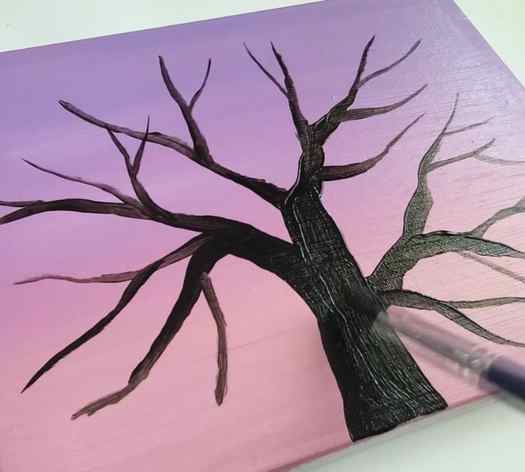
Make a few dots of paint on the upper center of the canvas with brilliant purple, then a couple of dots of medium magenta underneath, and maize yellow at the bottom. Spread them out using a painting knife, make sure to cover the whole canvas as much as possible, then dip a flat brush in white paint, and brush the paint to blend the background. Mix the burnt umber and black paint, then use a pointed or a detail brush to draw the tree’s body and branches.
330 Shares
Step 2
Next, grab an iron scrubber and blot the mixture of burnt umber and magenta, then dab it all over the branches to paint the leaves, and dab a lighter shade above it using the same scrubber. Lightly dry the paint with a hair dryer if you want, then tie a couple of cotton swabs with a rubber band, dab it in paint of a lighter shade than the previous, and dab it all around the leaves. Add some random white dots, then paint small branches, and add a few light strokes over the body of the tree for a light effect.

*These amazing images are all credited to Little Fantasy art via YouTube. Check her other content and follow for more!
1 Cylinder and structure
The trunk and branches of a tree are like cylinders. A cylinder that expands on the sides.
A cylinder that widens below on its support, and narrows above, until it reaches the limit of the branches, where it begins to widen more to be able to support the crown (branches and foliage).
The branches are also like cylinders, but these are longer and thinner. We can understand them as cylinders that come out of other cylinders. being the trunk the largest cylinder.
After the fold, we are going to give it a directionality with an arrow or curve. This is to distinguish where the tree grows.
We’ll also add overlapping cross branches, to give a sense of remoteness. These branches are also intervened by perspective.
Finally we are going to follow the first steps, making the figures of the foliage.
4 Final process: sketch and color
All that remains is to color and refine the strokes with the flat oil paint brush, the process is the same as the beginning, only we must spend more time on it.
We will also paint the background and we will be guided by the drawings we made previously.
That’s all, now compare the first drawing with the last one and you will see the difference.
Tutorial: How to draw a tree? #1 by MrPandaCrea


