85 DIY Christmas Decorations to Transform Your Home Into a Winter Wonderland
These craft projects will make your home merry and bright.
By Amy Mitchell Updated: Dec 12, 2022
Save Article
Dylan Chandler
‘Tis the season for decking your halls (and trees, walls, doors. you get the picture). Sometimes using store-bought (or even more convenient—ordering them online) decorations is the way to go, but there’s something so special and charming about homespun DIY Christmas decorations that money simply cannot buy. Case in point: These thoughtful Christmas craft ideas and projects are impossibly easy, make for tons of family fun and are easy on the wallet (couldn’t we all use a little extra dough to spend on gifts for kids and stocking stuffers?).
From easy-to-make Christmas ornaments to simple Christmas table decorations and even show-stopping DIY holiday wreaths, there’s something here for every taste and skill set. Handmade sweater stockings, a DIY advent calendar made using galvanized pails, loads of ideas made with vintage Shiny Brite ornaments and cookie cutters, and boxwood chair markers are just a few of the inspired ideas you’ll find on this list. Don’t own a hot glue gun? No worries! The most novice crafters will find a suitable (and adorable!) project to enjoy.
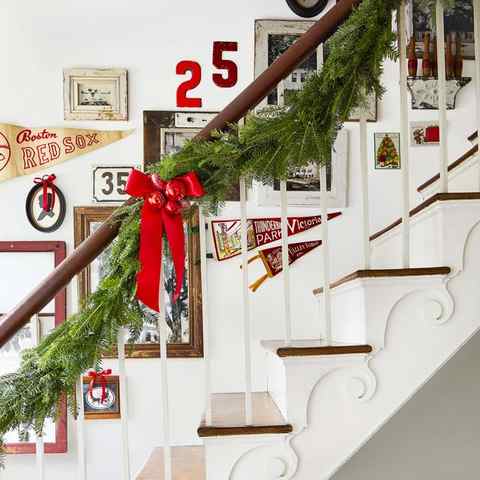
Once the inside is all dolled up, take your creativity outside. We’ve included a few DIY outdoor Christmas decorations that’ll have your front porch looking ready for the holiday season in a snap. For example, a wreath made of collected Shiny Brite ornaments gives your door a vintage-inspired feel, while “snow-covered” pine cones lend an organic, natural touch. Let’s get crafting!
Advertisement – Continue Reading Below
Merry Little Mobile
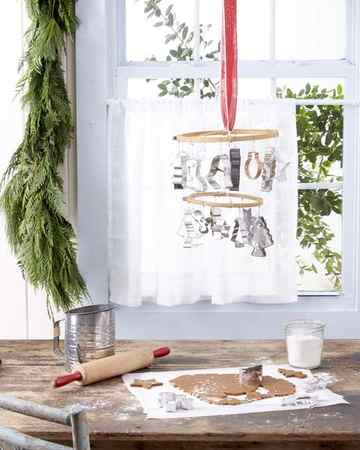
Set a festive baking tone with a cookie cutter mobile. Start with two embroidery hoops (we used 9- and 10-inch) and wrap with gold ribbon. Tie two lengths of twine across each hoop so they cross in the middle. Cut a piece of craft wire about 8 1/2 inches long; bend the ends into hook shapes. Connect the two hoops by hooking the wire to the twine where it meets in the middle. Hang cutters from hoops using twine, adjusting as needed to hang evenly.
How to Paint Watercolor Pine Cones (The Easy Way)
The thing about pine cones is they have a very complicated appearance. For this reason they seem like very tricky subjects to paint.
In this article I’ll show you how to simplify the process of painting pine cones in watercolor.
These prickly little things are a great subject for practicing your painting skills. And where I am at this time of the year there’s an abundance of pine cones. They’re easy to find… My garden is cluttered with them !
So next time you’re out and about try collecting a few to set up your own still life composition. Or if you prefer you can download the worksheet and outline sketch for this exercise and paint your own version using the step by step example below.
Painting Pine Cones in Watercolor
Pine cones can be a daunting subject because they look so complicated.
Here’s an example of what I mean. The overall form of the cone is somewhat similar to an egg. But the whole thing is broken down into a multitude of uneven scales (yep… that’s what they’re called apparently).
The best way to simplify complex organic forms like this is to break the subject down into simple big shapes using the main differences in value as a guide.
(As a quick reminder: value in art simply refers to the lightness or darkness of a given hue).

In the case of this pine cone, it’s easy to see that the outer tips of the scales represent the lightest part of the object. These can be grouped into a single set of light valued shapes, which can be isolated and painted first using a light range of colors.


On the other hand, the inside of the scales is in the shade (darkest values). This part of the cone painting can be considered as one large dark shape. So to complete the painting of the cone you can just fill in the shape in between the tips of the scales using a dark toned mix of paint.

And if you want you can then add more depth to the painting by adding some brush strokes of darker paint to the underside of a few scales.
The whole thing can be done in a few layers of watercolor.

Splitting darks and lights into simple groups of shapes like this is an excellent way to organize your painting process and make your watercolor paintings easier to handle.
In art, this is known as defining the “value structure”.

The hard part is training yourself to recognize differences in values. One trick you can try is squinting at the subject to blur the details, and help you to see the big shapes more easily.
Watercolor Pine Cones – Step by Step

Try this painting for yourself ! Click the button below to download the worksheet for this painting.
The colors I used for this painting were as follows (links to Amazon) :
- Burnt umber – Pigment number: PBr7
- Hansa Yellow Deep – Pigment number: PY65
- French ultramarine – Pigment number: PB29
- Paynes Gray – Pigment number: Pb29 PBk9
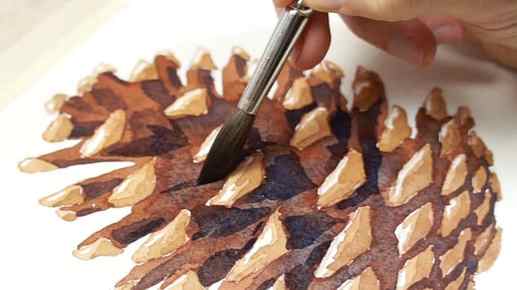
Start by painting the tips of the cone’s scales using a diluted brown color. As you can see I’m leaving a small part of each shape untouched to represent the highlights. This is a watercolor technique known as “reserving whites“.
When the first layer of paint has dried, you can add some more brush marks to the underside of each tip. Painting successive layers of paint onto a dry surface like this is a method called “glazing“.
This helps give a 3-dimensional feeling to the shapes , with the white highlights suggesting the faces turned up towards the light, and the darker glazed brush marks suggesting the shaded faces turned downwards.
Leave the paint to dry again before moving on to the next stage.
Now you can start filling in the rest of the pine cone shape by painting around the tips with a darker toned brown mixture. Treat the whole of the shaded parts as one big shape and paint everything in one go.
I used a medium reddish brown for this layer of color. Then, before the shape has time to dry, I dropped in some brush marks of darker neutral brown to intensify the shaded centre of the cone.
To make a neutral color like this you can start with a brown paint such as Burnt umber and add some of it’s complementary color – in this case I used French Ultramarine (complementary hues are colors that are opposite each other on a color wheel).
Leave the painting to dry completely before adding the final touches.
To intensify the shadows underneath some of the scales I used a mix of French ultramarine with a small amount of burnt umber. This produces a neutral blue mixture, but because this is applied as a glaze over the top of a red hue, the transparency of watercolors allows the two layers to combine to produce a gray appearance. This is one of the characteristics of glazing in watercolors.
In essence, the successive layers of paint merge to produce a new color appearance.

Finally, if you want to add more depth to your cone painting you can add some cast shadows underneath the pine cone using a diluted mixture of gray. To do this, dampen the surface of the paper first so that the gray paint spreads out to produce a nice diffused edge to the shadows.
Now go grab some pine cones !!


