Dogs have always been the favorite subjects (Dogs: Gatekeepers of Devotional Relationships in Art) of many artists to depict devotional relationships because of how loyal and kind they are. In this contemporary world too, we dedicate oil paintings, acrylic portraits, and even sculptures to our beloved dogs as they are symbols of love and fidelity.
How to Paint a Dog in Acrylics: A Step By Step Guide For Beginners
This entry was posted on April 28, 2023 by Gauri Thoyakkat .

Pet portraits are the perfect gift for any animal lover who considers their pet their child. It is even an ideal gift to yourself and your house if you know how to paint a dog. There is no better way to honor the bond you share with your pet than with pet portraits. It can also add aesthetics to your house.
Pet portraits are beautiful gifts, but it can be way more rewarding if you can paint a portrait of your dog on your own. Painting a pet portrait on your own will also help you feel connected to your dog more than ever, and it will be a fulfilling process. Many artists throughout history have created art pieces dedicated to their dogs and other pets because of how satisfying it can feel.
Painting a dog using acrylics or even oil painting is easier than it may seem. Once you learn the basics and have a good understanding of how to use the paints, you can paint a dog on your own. This article will be a detailed guide to help you learn how to paint dogs.
How To Paint A Dog And Make Your Own Pet Portrait?
We love our dogs, and we love to dress them up and sometimes even paint to make them look prettier than they already are. We love looking at ways to make art pieces, bitmojis, and even small toys and sculptures of our dogs to decorate our house and constantly remind us of the unconditional love that they shed.
But why not take such matters into your own hands and draw a dog portrait, which will be the best gift you can give?
It is the dream of every pet owner and animal lover to learn how to paint dogs and cats, or any animal for that matter, based on preferences. Many unique applications exist today that can change dog photos into paintings. But being capable of painting pet portraits of your own pet using acrylic paint is a skill every pet owner wishes to acquire.

If you are such a pet owner wishing to learn how to paint dogs using acrylic paint, read on further. Through the step-by-step guide, even a beginner can learn how to paint a dog with acrylics.
Steps By Step Guide To Paint Your Dog In Acrylics
Dogs are said to be capable of appreciating art. So why not gift a portrait with its face to your dog by painting one on your own? You can follow this acrylic painting tutorial to successfully make a dog portrait. Here are the steps you must follow to successfully paint a dog in acrylics if this is your first time.
1. Before Starting To Paint Your Dog Portrait
a. Get all the required supplies.
b. Gather your thoughts and ask yourselves relevant questions.
c. Do some warm-up drawings
d. Practice color mixing
2. Start By Sketching First
a. Use the reference image to map out the proportions
b. Complete the under-structure sketch
3. Underpaint on the sketch
a. Identify the different value areas from your reference
b. Proceed to first paint the basic values on the under-structure sketch
c. Using black, paint eyes and nose
d. Paint the background and the additional parts
4. Start applying the colors
a. Use under-paint as a guide and start applying colors
b. Refine the edges of major areas
c. Add more finishing to your background
d. Create a fur-like texture
5. Proceed to add details
a. Carefully add details to the eyes
b. Carefully add details to the nose and mouth
c. Add details to the fur strands
6. Complete the Portrait
1. Before Starting To Paint Your Dog Portrait
You must follow some steps before you sit down to paint your dog portrait to warm up. You have to follow these and feel ready before starting to work on the pet portrait.
Step 1: Get all the required supplies
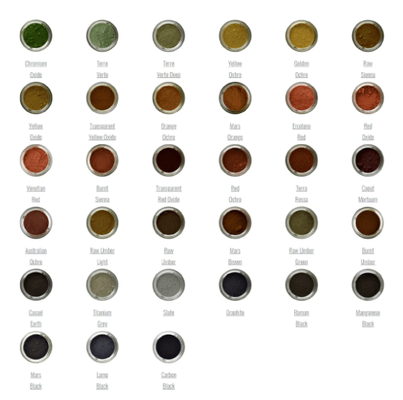
The first important step for painting dogs using acrylic is to gather all the necessary supplies. The items that you will require are as follows.
Paints: Make sure to have all the acrylic paint tubes ready that you will require to complete the dog painting.
Paintbrushes and Palette: You will need various paintbrushes to paint the different areas of the pet portrait and a palette to mix colors.
Tracing Paper: You will need carbon copy tracing paper to help you sketch the reference photo you will use.
Soft Art Pencils and Black Marker: Keeping soft art pencils and a black marker near you can come in handy.
Canvas: Make sure to have a canvas ready to paint your dog portrait.
Step 2: Gather your thoughts and ask yourselves relevant questions
Before starting to paint a dog portrait, you must first gather your thoughts and quickly run through several different aspects relevant to the painting.
Pick a good reference picture that can help you paint the dog portrait.
a. Pick a good photo that has the perfect angle.
b. Pick a reference photo that has good lighting.
c. Make sure the reference photo provides you with an accurate representation of the dog.
Understand the fur length and texture of your dog.
Having a good idea of your dog’s fur length and texture is essential to pick the right paint brushes.
1. Filbert brushes for dog breeds like poodles to get the right curly texture.
2. Round brush for dog breeds like labradors to get the short fur length right.
3. Angle paintbrush for dogs with spikier coats.

Understand what colors you will have to use
a. Based on your dog’s coat and fur color, you must figure out the colors you must use.
b. For most dogs, you can build the basic tones using a combination of Burnt Sienna, Burnt Umber, Carbon Black, Yellow Ochre, and Titanium White colors.
Step 3: Do some warm-up drawings
Before starting with your dog painting, warm-up drawing exercises can help you get in the flow and put you in the mood. You can practice drawing straight lines using connecting dots, which will be helpful later while sketching.
Step 4: Practice color mixing
Knowing how to mix colors before getting into an acrylic painting is essential if you are a beginner. So, before you start with your dog portrait, try mixing random colors to make different shades. Then, use a reference color and try mixing paints to get that color with maximum accuracy. You can use cheap paints and brushes to learn and practice color mixing. That way, you can avoid the wastage of expensive good paints.
You can use cheap paints and brushes to learn and practice color mixing. That way, you can avoid the wastage of expensive good paints.

You should also practice color mixing on canvas paper to understand how it absorbs paint. Different kinds of papers or surfaces may result in slight shade changes, so you must know how the color you want looks on the canvas material you will use for your portrait.
Suggestions To Help Mix Colors For Dog Portraits
1. Cream or Yellow colored dogs: For dogs belonging to dog breeds like Golden retrievers and Labradors, you can mix the colors buff titanium, titanium white, and yellow ochre to help provide a foundation for the base color.
You will have to change the ratio in which you use these paints to get the different shades of the color you want for the different areas of your dog.
2. Black-colored dogs: You must pay close attention to your subject’s different values and tones if you are looking to paint a black dog. You must mix shades to get the light, dark, and mid-tones.
Mixing carbon black and titanium with different shades of gray will help paint most of your dog. However, looking into introducing reflected colors will give a more realistic look to your painting.
3. White-colored dogs: For white dogs, along with white paint, add touches of cream or yellow color to bring a life-like look to your dog portrait. This is required because most white dogs will have some degree of straining to their coats.
Like for black dogs, adding reflected colors based on the dog’s background will also help improve the realism of your dog painting.
4. Brown or Chocolate colored dogs: To paint a good life-like portrait of a brown or chocolate-colored dog, you will have to mix burnt umber paint with different amounts of titanium white and carbon black to achieve the correct fur color. Sometimes red and burnt sienna paint colors can also help achieve the desired shade if your dog’s fur has copper tones.
2. Start By Sketching First
Before starting to paint your dog portrait, you must first do a rough sketch with the outlines of your dog on the canvas.

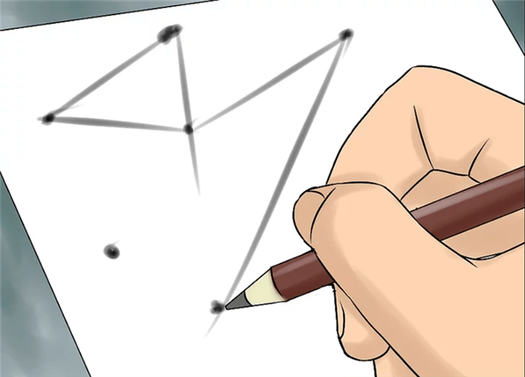
Step 5: Use the reference photo to map out the proportions of your dog
Before sketching, you can start by carefully mapping out your dog’s proportions using your reference image. Mark the major lines of action, like the tilt of the eyes or the center line of the head, etc. You must also map the negative space (shadow formed by the dog) created around the area surrounding your dog.
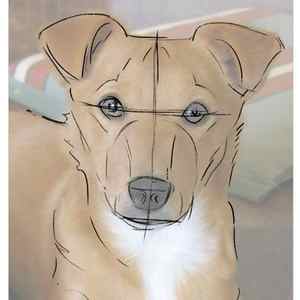
Marking these lines and noting the angles made by all the parts of the head are very important to ensure the proportions of your painted dog are correct. You can trace the reference paper onto another piece of paper and then map these proportions, so you will understand how you have to sketch on the canvas.
Step 6: Complete the under-structure sketch
After you have mapped out the proportions, you can sketch the understructure on your canvas. Some artists recommend giving a background color after deciding where the dog should sit on the canvas. Giving a background color can help the dog in the painting pop out a little bit on the painting.

Use simple lines like in the above picture to map out and adjust the proportions of the dog. You can keep adjusting these guidelines until the proportions seem fine and accurate.
3. Underpaint on the sketch
Now that the under-structure is ready, you have to proceed to under-paint it.
Step 7: Using black, paint the eyes, nose, and nostrils
Once you complete the sketch, use a detail brush to outline the nose and eyes and fill in the nostrils and pupils. These will be the painting’s darkest parts, and with acrylics, it is best to paint these first. While you can use black color to outline the nose, you have to use mid-gray to fill it.

Doing this will also help boost your confidence to further work on the painting. The eyes and nose are the two key features of your dog that the viewer notices first.
Step 8: Paint the background and the additional parts
You have to first paint the background behind the dog and any other objects that may be there in the portrait before you start working on the dog. You don’t have to thoroughly detail the background, but it is best to solidify it and the other parts before beginning to work on the fur.

Step 9: Identify the different value areas from your reference
From the reference image, you have to identify how the light is hitting your dog and how the background gets reflected on it. Adding reflected colors on your dog’s fur in the painting, as mentioned earlier, can help give the portrait a life-like touch.
Identify the light, medium, and dark value areas from the reference image. The light-value regions are the places where the light hits the subject. The medium-value areas are the places that are a bit away from the light and are about to go into shadow. The dark value areas, as the name suggests, are the areas that are not getting any light.

As you identify these areas, you can also try figuring out how to mix colors to achieve the shades caused by the different value areas of the picture.
Step 10: Proceed to first paint the basic values on the under-structure sketch
Mix the basic neutral values, including light, medium, dark, and background values, for the under-structure sketch. You are not required to perfectly match all the values as these neutral colors are only to mark the different value areas to act as an organizational tool to help you paint.
Use a large brush to apply the mixed paint on the different value areas based on whether they are light, medium or dark value area. If you find it difficult to paint the medium values, you only have to paint the light and dark values for now. Once you complete the thunder-structure sketch, you will notice that the painting appears three-dimensional.
4. Start applying the colors
Once the underpainting is ready, start applying the colors so that your dog portrait looks as realistic as possible.
Step 11: Use under-paint as a guide and start applying colors
The under-paint will give you a better idea of the different value areas. You can also use the reference further to understand the additional value areas. Start painting properly this time by mixing and applying the correct shades of acrylic paint to the different areas of the dog. You can use the above suggestions on how to mix colors depending on your dog’s fur color.

.
You can also try giving a touch of the reflected color of the background to improve the realistic look of the portrait. You can proceed using the large portion and first paint the bigger areas. Continue using this brush to add another layer of paint in areas where that is required.
Step 12: Refine the edges of major areas
Once you complete the large areas, switch to a medium brush to refine the major forms of your dog, like the large skin creases or the jaw.
Step 13: Add more finishing to your background
Before you add furs to your dog, you have to add more details to your background to make it look finished. Strands of fur will stick out for more dogs, so before you draw them, you have to almost complete your background to prevent any overlapping.
Step 14: Create a fur-like texture
You have to start creating the fur texture after you paint the dog. You must create the texture in the direction the fur moves on your dog. In dogs like golden retrievers and those with similar furs, it may be sticking out the left on the left side of its face and to the right on the right side of the dog’s face.

The furs you have to create vary depending on the kind of fur your dog has and the way it may be sticking out in the photo reference you are using. The best paints to create furs are a thin round detail brush or a thin flat brush. However, if your dog has long fur, you may use a large flat brush with its bristles damp and thin with paint.
5. Proceed to add details
Once you add all the colors are added to the painting, you can start adding finer details to the painting to make it realistic and beautiful.
Step 15: Carefully add details to the eyes
You can start by adding details to the eyes to make it as lively as possible. Eyes, when drawn realistically, are capable of expressing emotions even in a painting. Make sure to really understand the mix of colors in your dog’s eyes in the reference image and replicate it as much as possible in the portrait.

Step 16: Carefully add details to the nose and mouth
It is common for dogs to have wet snouts, so adding such detailing to your portrait is essential to make it look realistic. You have to check your reference to see whether there are any placements of small, bright, and hard headlights which are called specular reflections. Add these textures and highlights to give your dog’s nose a realistic look in the painting.
If the painting you drew features a dog with its mouth open, you must add the related details. You can break the tongue into larger planes based on the value areas and then add small amounts of paint accordingly to give it a shiny look.

Step 17: Add details to the fur strands
You should continue repeating layers for dark, medium, and light value areas on the dog’s fur until you feel you got it right.
6. Complete the Portrait
The last phase of your painting process is to complete the portrait. This is the touch-up phase to smooth everything out and cover if you have left behind any rough patches. You can also use this phase to complete the sides of your canvas and even sign your portrait.

Three Quick Tips on How to Paint Dog Portraits
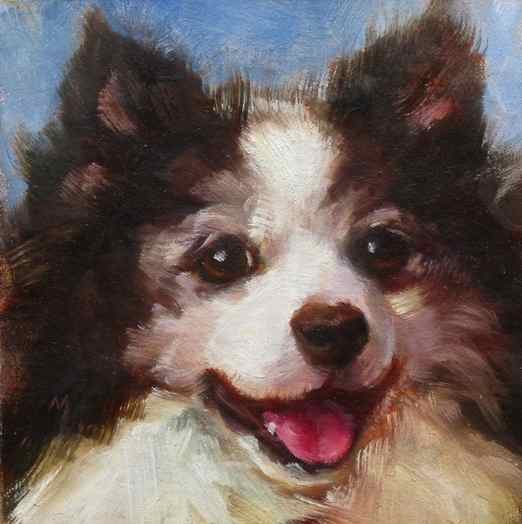
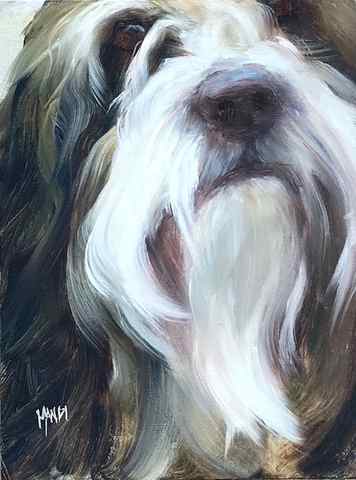
When Johanne Mangi, one of the world’s top painters of dogs, spent the day at our studios, she recorded a detailed video on how to paint dog portraits, step by step. Drawing and painting dogs can be enjoyable — we love our dogs so much — but there’s a market for commission work as well. Once you master the art of painting dog portraits, consider the possibilities. To start, take a master class, such as studying Johanne’s “The Fine Art of Painting Dog Portraits” (available here). Until then, check out these quick tips to get you started.

3 Quick Tips on How to Paint Dog Portraits
By Johanne Mangi
I hear it all the time: “I don’t know where to start!”
“How do I paint fur?”
“Why do my animal paintings not look right?”
If you think these statements were made by new, inexperienced artists, think again. These were actual statements by experienced, accomplished painters. There’s just something about fur that confuses even the most confident artist.

I will give you a few quick tips that will set you in the right direction when it comes to learning how to paint dog portraits:
1. Under all that fur lies a roadmap. A skeletal structure. You just have to look for it.
2. IT’S JUST PAINT! That’s right. Easy on, easy off. If that first stroke didn’t work, get rid of it and do it again!
3. BIG BRUSHES! People love their teeny, tiny brushes. Trust me, you won’t get the effect you’re looking for. Only a big brush will do.
I guarantee if you follow these simple steps you will immediately improve. Good luck! ~Johanne Mangi
Watch a preview of Johanne’s new instructional art DVD, “The Fine Art of Painting Dog Portraits,” here:
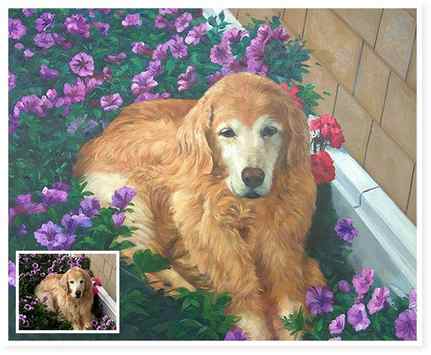
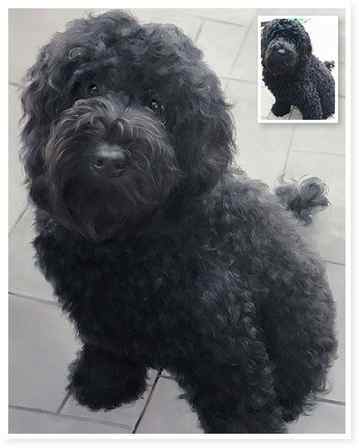
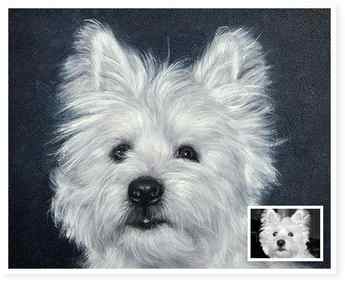
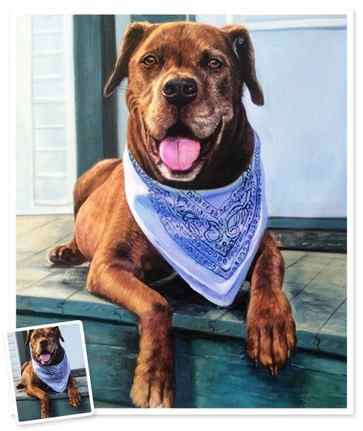
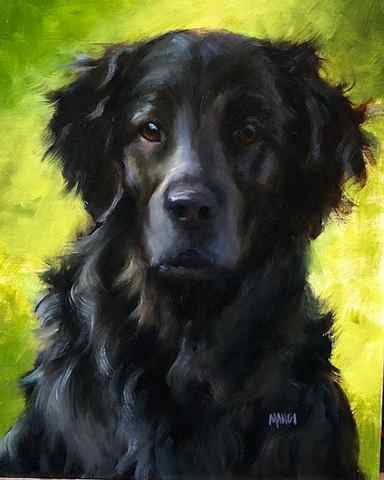
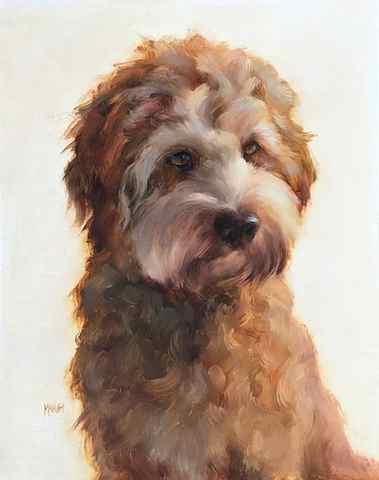
Additional Dog Portraits by Johanne Mangi:
- TAGS
- Advice for Artists


