Immerse yourself in the beauty of a watercolor painting depicting a peaceful lake scene. With a blend of blues, greens, and browns contrasted against the mountains, this painting captures the charm of untouched nature.
Art Spotlight: Celebrating the Summer Sunset
Well, Summer has officially come to a close. As always we’re sad to see the season go, but this was a big year for summer sunset artwork so at least we can still revel in the sunsets it offered!
As Mattie Stepanek said, “Sunset is my favorite color, the rainbow is second.”
The dramatic sights have certainly been reflected in the artwork submissions from our Painting with a Twist artists nationwide. Sunsets in summer are so fleeting and so gorgeous that they demand each one be the most beautiful thing in the world, that is, of course until the next one comes along.
Here are some of our favorite sunset paintings from the Painting with a Twist art library.
“L.A. Sunset”
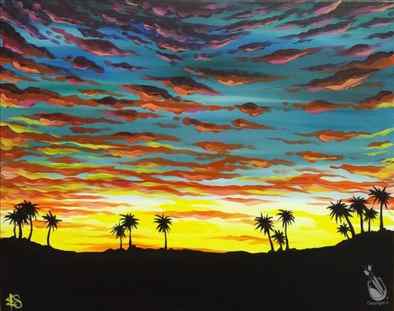
Remarkable, right? We are California dreamin’ right when we lookover this painting. It is brought to you from Painting with a Twist – Mandeville, LA but was inspired by a beautiful photograph taken in Sun Valley, CA. If you’d like to paint this stunner, here’s where to find a studio near you.
“Lovely Lake Sunset”
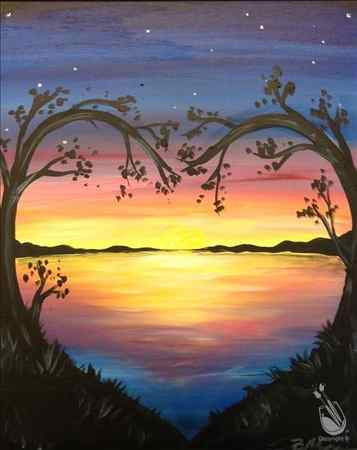
This one is so sweet, so sentimental, and so striking. The colors grab you and draw you in from the start. It was painted by an artist in Painting with a Twist – Fort Collins, CO . This is the perfect painting for a date night! Here are a few studios where this charming painting is available this week.
What is landscape photography?
Landscape photography is the art of capturing the natural scenery or landscape. Typically it depicts a wider, open space rather than small details. It can include people, animals or man-made structures, but the main focus of the image is always the great outdoors. It can be your way of showing how you see the world around you and capture the beauty of the environment.

Beautiful landscape at sunset, Londrangar, Snaefellsnes Peninsula, Iceland, Credit: Arctic Images, Getty Images
What kit do I need for landscape photography?
- A camera plus a lens that has a wide-angle view of 28mm or wider is a great place to start, but some will want an even wider view, so a 24mm or wider lens could be a good choice, particularly if you want to capture vast scenes and big open spaces. Find the best camera for landscapes, plus the best wide-angle lenses.
- A tripod will help, especially if you want to capture scenes with water, as you can use longer exposures to smooth the water, or when you want to use a lower ISO speed for maximum image quality. You can also worry less about the shutter speed you need to use when your camera is stable and steady on a tripod.
- Filters – use a polariser if you want deeper blues and fewer reflections from leaves and water, graduated filters are great for darkening the bright skies but leaving the rest of your image unaltered. If you want even longer exposures, then an ND filter will be needed.
- Clothing – weather appropriate apparel is just as essential as your camera, as you may spend hours walking around to find the best viewpoint or waiting for the light to hit your scene just the right way.
Landscape photography is all about light, location and composition. Where you place objects or how you frame the scene before you are key components, but also what camera settings you use, play an important part in getting a sharp, detailed shot.
Remember the elements that make up your exposure: aperture, shutter speed, and ISO speed, as there are some recommendations here that will help you when shooting landscape photography. If you need a refresher, have a look at our guide to exposure.
Here are the 4 main camera settings to pay attention to in landscape photography:
- Aperture
- ISO speed
- Shutter speed
- Focus

Close-up of the lens, showing aperture blades. Credit: Dimitri Otis, Getty Images
Aperture and depth-of-field
Depth-of-field – to ensure you get a lot of the scene in focus, with as much as possible sharp and in focus, with plenty of detail, you’re going to want to use a smaller aperture. Closing the lens aperture down to f/8 – f/16 will help you get more of the scene in focus from the front of the image (things close to you) to the back of the image (things furthest away). This is known as pan-focus (Canon), where everything in the image is in focus.
But beware of diffraction – if you stop the aperture down too far, such as f/18-f/22 or more you’re going to suffer from diffraction, and get softer images. When diffraction becomes an issue depends on your camera sensor size – see our macro photography guide if you missed our definition of diffraction.
Side note: Diffraction tends to kick in at f/11 on Micro Four Thirds, f/16 on APS-C, and f/22 on Full-frame cameras.
ISO speed
As we’ve said previously, the lowest ISO speed available will give you the best results (with the most detail, and lowest noise), however, be aware that the camera you use may have a different low ISO speed to another camera.
On most, the lowest ISO speed is ISO100, but on some the lowest is ISO200. If you are tempted to use a “LOW” or (L) ISO speed on your camera, be aware that this is often an “extended” ISO speed, and results in reduced dynamic range.
So check what your actual low ISO speed is on your camera, if you’re not sure where to find this information, have a look at our review of your camera as it will say what the standard ISO range is, and what the extended ISO range is. Normally you want to avoid using the extended ISO range.
On many Olympus and Panasonic cameras, the low ISO speed is ISO200, and ISO100 is extended, which is shown as “Low” or L.100. You’ll also need to check on Fujifilm cameras, as some of these have the lowest (native, non-extended) ISO speed as ISO160.

A slower shutter speed has helped smooth the waterfall in this scene, Gljufrabui waterfall, Iceland. Credit: (C) Marco Bottigelli, Getty Images
Shutter speed
With a tripod, you can use slower shutter speeds, and by using the self-timer you don’t need to worry about camera shake when pressing the shutter release button, alternatively you can connect your camera to your smartphone and use it as a remote control. Another thing to be aware of is your camera strap – if this is big, then this could cause the camera to move if it’s a windy day. If you use slower shutter speeds, you can blur the water, but with a slower shutter, any movement (in trees or scenery) will become blurred. If you want to get really slow shutter speeds on brighter days, then you’ll need to use an ND filter.

Portugal, Azores archipelago, Flores island, hike to Poço da Ribeira do Ferreiro waterfalls (or Poço da Alagoinha or Lagoa das Patas) – This image shows the location in focus from the front to the back. Credit: Francesco Riccardo Locomino, Getty Images
Focus and front-to-back focus
To keep things simple, by using one focus point, you can control and know where you are focusing in your image. You will want to focus so that you can get as much as possible from the front of the image to the back of the image in focus. Newer cameras often include “focus peaking” a useful tool that shows which elements of your scene are in focus by highlighting the edges with a bright colour. Don’t worry too much if you don’t achieve perfection but try and focus on the main area of interest in the frame.
What makes for good landscape photography?
Light and location play a massive part in landscape photography, but are not the only aspects to think about when shooting landscapes. Thinking about what you include in your image can take your landscape photography from average to spectacular.
Here are 6 main things to consider when composing your shot:
- Light (and weather)
- Location
- Points-of-interest
- Leading lines
- Level (Horizon)
- Composition

Stob Ban in Glen Nevis taken from Sgurr a’Mhaim with mid-Autumn sun illuminating the glen below with layers of Glencoe mountains in the background. Credit: Scott Robertson, Getty Images
Light, weather
Shooting in the “golden hour” (the hour before sunset or dusk, and the first hour after sunrise, dawn) will give you a warm golden looking landscape, on the other hand “blue hour” after the sun has set or before the sun has risen, will give you images with a blue tone. Just before or just after sunrise or sunset is also a great time to shoot, as the sky changes different colours. For more examples have a look at our guide to outdoor light with David Noton.
Weather can dramatically change the light in the scene, as well as the look of a landscape image, so don’t be afraid of shooting when there is mist, fog, or even during or after a rain shower. A break in the clouds can turn a dull image into a striking image as can be seen in the example above. If your camera and lens are not weather-sealed, make sure you have a waterproof backpack or plastic bag to offer some protection for your kit in the worst of the weather.
…and Location
Shoot somewhere dull, and even with the best lighting possible, the best camera possible, and the best settings, you’ll still most likely end up with a dull photo. Landscape photography tends to include travel, and finding the most pleasant-looking locations and landscapes is part of the exciting appeal of landscape photography, whether that’s near you, or further away.

Distant figure against mountain sunset – Brecon Beacons national park, Wales, Credit: WLDavies, Getty Images
Points-of-interest
To include people or not? By including people you can give a sense of scale, as well as potentially date the photograph to a certain period – depending on how visible the subject’s clothing/style/fashion is. The same goes for any other man-made objects included, such as buildings or vehicles. By including a subject or a person in the shot you add an additional element and give a sense of balance to the image.

Neist Point Lighthouse, Isle of Skye, Glendale – June 9, 2019: The last sunbeam at Neist Point Lighthouse. Credit: Juan Maria Coy Vergara, Getty Images – Following the coastline your eye ends on the lighthouse.
Leading lines
If you think of the elements in an image as guiding the viewer through the frame, you can look for leading lines in your scene, such as a road leading towards an impressive mountain range, a river leading to a waterfall, or even the formation of rocks and land leading you through the image.

Lavender field in Valensole, Haute Provence, France. Credit: Matteo Colombo, Getty Images
On the level?
Watch for the horizon and keep the camera level – use the camera’s built-in axis or dual-axis level if it has this, or look for the spirit level built into your tripod. If you don’t have these features, then you could pick up a simple spirit-level hot-shoe attachment for not much money. Alternatively, you can switch on an on-screen grid display if your camera has this feature. If you don’t manage to get it perfect in-camera, then you can always edit the image later to straighten up the image. Some modern cameras have a built-in horizon correction feature, so check your manual to see if yours has this.
Composition
All of these factors play a part in how you compose and frame your image, and how you place the elements in front of you into the photograph. If you’re just starting out in landscape photography, then using the “Rule of thirds” is a great place to start, but don’t be afraid to experiment with different framing. See our guide to the art of photography and composition for more ideas.
Other things to think about: You don’t always have to shoot vast landscapes, instead you could zoom in to look at the finer detail, and this is where a macro or telephoto zoom lens could come in useful. If there is water in the scene, then look for reflections.
Aerial landscape photography: If you have access to a drone, then shooting from a high-angle can give a totally different look to your images. See our guide to aerial landscape photography for more information.
Intimate landscapes: Landscape photography doesn’t have to just be wide-angle, sweeping vistas. Try honing in on a smaller part of a scene for a more interesting alternative. See this guide to Intimate landscape photography.
Square landscapes: Landscape photos also do not have to be taken in landscape orientation. Changing to portrait or even square format can make an interesting composition. Transform your landscapes with square format here.
Ink Wash Mountains

Create an ethereal and dreamy landscape using the ink wash technique. Ink wash is a unique drawing technique that straddles the line between drawing and painting. The medium is wet when applied, which is why many consider ink wash to be a form of painting.
Circular Mountain Landscape Painting

As someone who loves all things nature and art, there’s nothing quite like a beautiful mountain landscape painting. Add in a cozy cabin nestled among the trees and a glistening lake nearby, and you’ve got a piece that practically transports you to the great outdoors.
Winter Landscape Oil Painting

There’s something about a winter landscape that just makes me feel all warm and fuzzy. I’ve been itching to try my hand at some watercolor mountain painting ideas lately, and I think a winter landscape would be the perfect place to start.
The breathtaking beauty of mountain landscapes can be captured through these inspiring paintings. Whether you are looking for a calming escape or a unique piece of artwork to add to your collection, this array of mountain paintings is sure to provide something you will love.
More Posts You May Like:
- 20 Watercolor Rose Paintings To Inspire You
- 20 Easy Watercolor Fruit Painting Ideas
- 28 Flower Paintings Using Acrylic Paint On Canvas
Tiffany Griffin
I’m Tiffany, author of the 30-Day Drawing Challenge Workbook. I’m a crafting expert and writer with over 12 years of experience. I love sharing my passion for crafting, which includes crocheting, drawing, painting, and nail art.


