(If you’re curious about colors and color theory as it relates to acrylic pouring, head on over to my post about Choosing Colors for Acrylic Pouring and grab your FREE printable Color Wheel and Color Scheme Guides below!)
How to Paint a Cherry Blossom
If you’ve always wanted to learn to paint, this super easy, fun and free painting tutorial is a perfect place to start!
This video tutorial will walk you through step by step how to paint a Cherry Blossom. Perfect for beginners and new artists and anyone wanting to build their creative confidence.
You’ll learn some basic painting techniques, enjoy a relaxing creative session and you’ll finish with a bright cheerful painting that will look great hanging on your wall!
WHAT YOU’LL NEED:
- at least one small to medium bristle brush and a small liner brush.
- paint: magenta, blue, light green, dark green, red, yellow, brown, black and white
- something to paint on!
- a small jar or cup of water (to wash your brush)
- paper towels or an old rag (to dry your brush)
- (optional) hairdryer to speed up the drying process
Don’t worry if you don’t have the exact supplies, you can use anything you like. In fact this is a great one to try in different colours! Try oranges, reds and yellow for an autumn painting, or greens and yellows. You can get as creative as you like.
Once you have all your supplies click the video image below to watch, paint, learn and have fun!
Still need to shop for art supplies but not sure what to get? I’ve got an incredible FREE shopping list of essential art supplies just for you. This comprehensive list includes tips on where to find the best prices. Say goodbye to wasting money on the wrong materials – this guide will make buying your art supplies and getting set up with the right materials quick and easy . Click here to grab your free shopping list now.
Want to learn more about painting?
Sign up to our mailing list and get regular updates about new free painting tutorials and tips so you can learn new painting techniques and improve your creative skills. CLICK HERE TO JOIN
Grab any of my easy to follow step by step painting tutorials so you can have fun learning new painting skills and create your own masterpiece! See all my Online Painting Tutorials and create your own painting now!
WANT STEP-BY-STEP GUIDANCE TO LEARN TO PAINT , along with inspiration and support from an incredible community of like-minded individuals? Look no further! Introducing Paint Club, our monthly online painting membership. Join a community of aspiring artists and gain access to a proven system that will help you paint with confidence and joy, creating beautiful art you’ll be proud of. Don’t miss out on this opportunity to elevate your painting skills and be part of an amazing artistic journey. Click here to check out Paint Club and unlock your artistic potential
EP56- ‘Mt Fuji & Cherry Blossoms’

Spring will soon be here, so let’s welcome it this week with an easy and fun cherry blossom painting tutorial featuring Mt. Fuji. This step-by-step painting tutorial is easy for beginners to follow along, and a great romantic activity to do for a Valentine’s Day paint party, or any time of year!
The colors that we will need for this painting are:
- Cobalt blue: https://amzn.to/2E7Yvy3
- Cadmium Orange: https://amzn.to/3glu2cL
- Crimson red: https://amzn.to/33EiFtA
- Black: https://amzn.to/2XHCGfk
- White: https://amzn.to/3a6ZTfC
And you will need three standard types of brushes that I use in most classes:
- A 1-inch wash brush: https://amzn.to/3aa5D8z
- A medium-sized, round brush: https://amzn.to/39z51bh
- A tiny round brush too, like this: https://amzn.to/2VRkCPC
To see a full list of materials that you need to paint along each week, click here: https://skyepratt.com/materials/
Subscribe for easy, step by step acrylic painting tutorials posted every Saturday! If you are new to acrylic painting, this is the place for you! I post a new video, always a step-by-step acrylic tutorial for beginners, every Saturday. So subscribe if you would like to learn how to paint with acrylics step-by-step! This video is designed for artists at home to be able to paint along with this real-time acrylic painting tutorial for beginners. It’s also a super fun idea to offer an in-home art party with all of your friends! Let me know what you thought of today’s acrylic painting tutorial in the comments section. Free easy acrylic painting classes are offered every Saturday, right here, so make sure to subscribe!
About the artist: I’ve taught acrylic painting for beginners for almost 10 years on a freelance basis through a number of different studios. I also have been offering “pop up” in-home paint parties for private groups. I LOVE teaching painting, and my favorite thing is when my students unlock a love or a knack for creative expression because of taking my classes. I started this Youtube show at the end of the year in 2019, with the hope of offering my “beautiful but do-able” paintings and step-by-step instructions with a worldwide audience. I hope you enjoyed today’s step by step acrylic painting tutorial for beginners. Let me know what you thought of today’s easy acrylic painting tutorial in the comments section! Check out the shop, stock up on art supplies, and until next time, stay creative!
*note, some links above are affiliate links. Purchasing through these affiliate links does not raise the cost for the consumer.
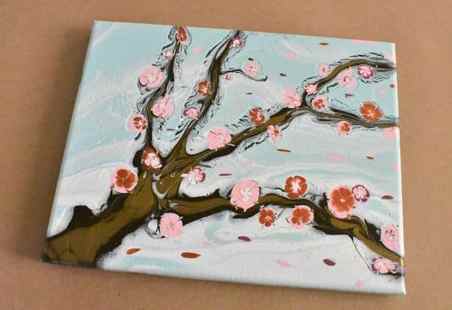
Materials You Will Need to Paint a Cherry Blossom Painting with Acrylic Pouring
This post contains affiliate links, which I earn a small comission from. These are provided for your convenience, and the price isn’t increased at all.
Paints:
- Artist’s Loft Copper
- Liquitex Basics Quinacridone Magenta
- Master’s Touch Crimson
- Master’s Touch Titanium White
- Artist’s Loft Metallic Bronze
- Ultra Pure White Base Behr Interior Matte /Exterior Flat Stain-blocking Paint & Primer Marquee Color Sample – Teal color*
- Artist’s Loft Light Blue
All of my colors were mixed from the paints above. If you want to learn how to mix colors, be sure to grab your free color wheel printables and snag the helpful printable pack as well.
*I don’t know the exact color of this because I purchased them in the “oops” section of Home Depot as well as from the HabiStore, but I noted as much identifying info as I have. I also have listed some similar acrylic paint colors below these.
Pouring Medium:
Tools:
Canvas:
- 8in x 10in canvas
How to Paint a Cherry Blossom Painting Video Tutorial
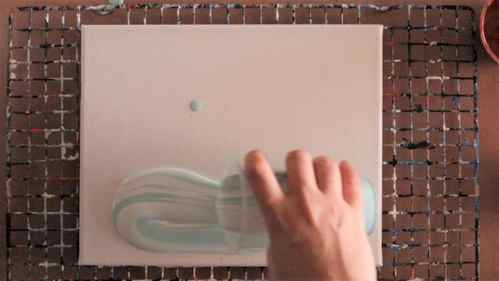
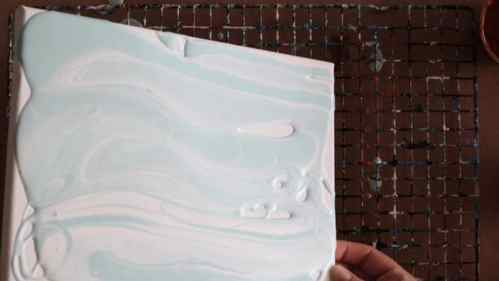
As I said above, I wanted to make a beautiful spring sky for the background of my cherry blossom painting. So I did a dirty pour with a light blue/teal color and white to evoke the look of clouds.
- Pour your background colors into your pouring cup as you would for a dirty-cup pour.
- Pour the paint out in horizontal bands across the canvas, covering as much of the canvas as possible.
- Tilt the canvas until the entire canvas is covered and you are happy with the look of the background.
Branches


- Sketch out the branches with umber paint using a popsicle stick.
- Fill in your branches by pouring the paint along the lines that you sketched out.
- Pull out some thinner branches from your thicker branches.
- I pulled some of my background colors into the branches for texture, totally optional.
- Add some highlights into the branches to give them dimension, pattern, and texture. I used metallic bronze.
Flowers
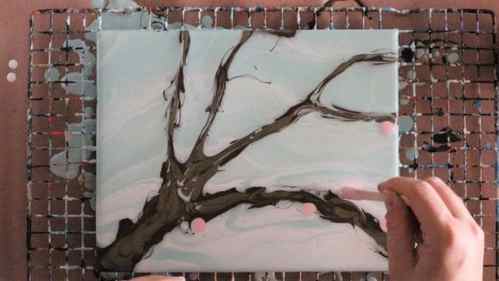
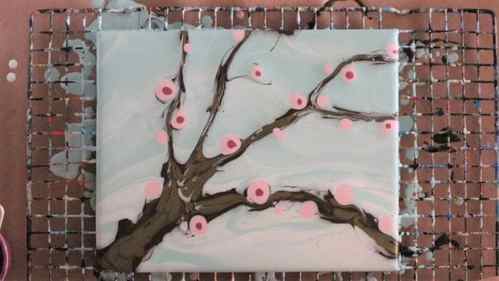
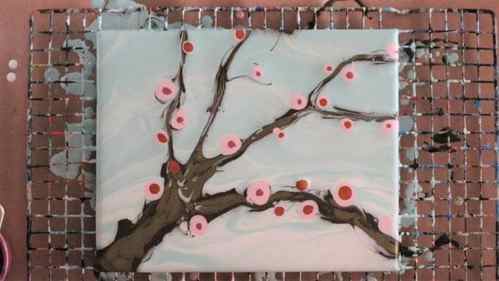

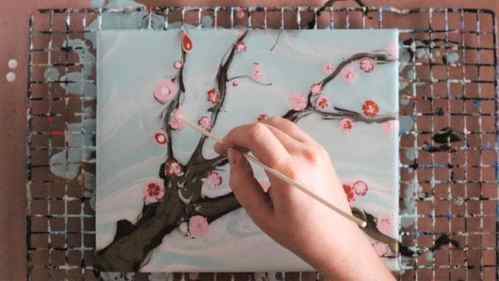
Now it’s time to have some fun and paint some cherry blossoms on your tree! I used four colors total for my blossoms: light pink made from crimson and white, white, copper, darker pink made from magenta and white.
- Using one color at a time, use a popsicle stick (or if you’re having trouble getting the paint where you want it, you can use a pipette) to drop circles of paint onto your branches. I suggest using one color at a time so you can get a feel for color balance so that you don’t have a bunch of flowers of one color in one part and none of that color in another area.
- Continue layering your colors onto your flowers. I used two colors for each flower and white in the center of each one.
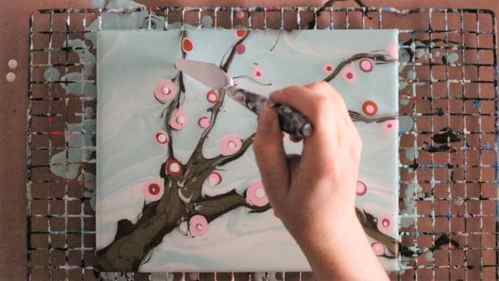
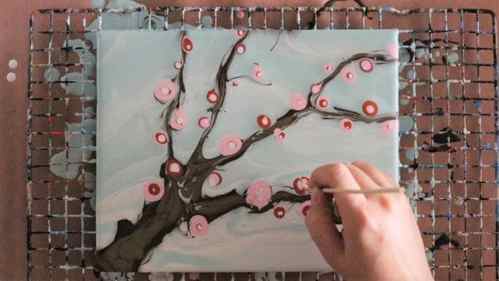
- Create the cherry blossom shape by using your skewer to pull your background paint from the edge of your circle into the center. Do this five times around each circle. I think the center looked nicest when I did a tiny spiral motion with the skewer on the last line in. Do this for each flower.
Extra Petals
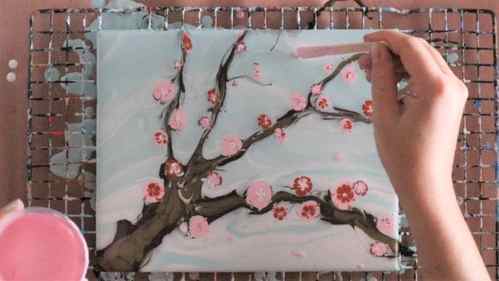
I wanted to add some petals that were blowing in the wind. So I dotted the petal colors only to the right of the flowers and in an elongated way to give the feeling of them being carried by the wind.
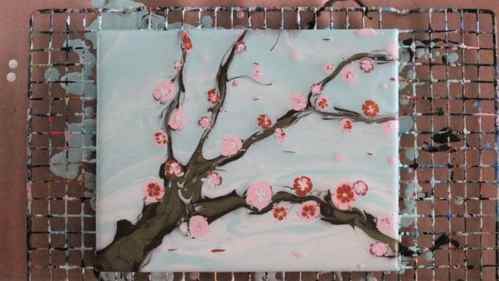
Go Forth and Pour!
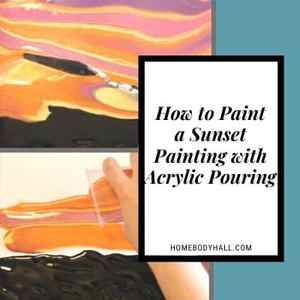
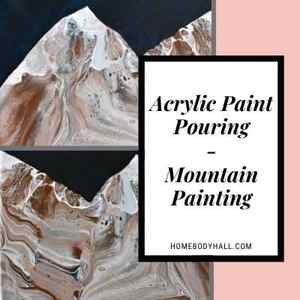
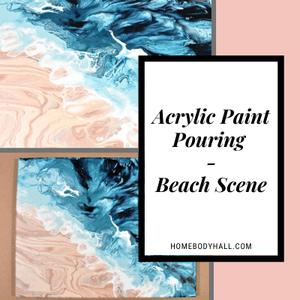
That’s how I created a simple acrylic pouring cherry blossom painting. If you like painting landscapes, you might also be interested in my ocean sunset, sunset painting, mountain painting, and beach painting projects.
As always, check out my updates on Facebook and Instagram and feel free to peruse Homebody Hall for more fluid art tips, tricks, and tutorials! Also head over to Youtube and subscribe to get my videos sent to you as soon as they come out!!


