As mentioned above, there are a few other ways to preserve leaves that you can try. Learn how to preserve leaves with beeswax with Donni at The Magic Onions, or preserve fall leaves with glycerin or wax paper with Chelsey on Buggy and Buddy.
Step-by-step guide for painting autumn leaves

In this step-by-step guide, Ill show you how to capture the vibrant colours and textured form to some beautiful Autumn leaves – I’ve focused on one leaf in this mini study- the beautiful maple leaf as I love the shape and vibrant colours at this time of year.
It’s a great way to observe and work from real life!
I’ve been getting really inspired by the colours of Autumn lately and how this change in the season is so impressive! I just love to walk in the crisp golden leaves with touches of vibrant reds.
We’re going to colour match our hues to the leaves before creating them in our sketchbook or piece of paper. I’ve even included painted shadows underneath my leaves as if they are really sitting on the paper. I will show you how..

What you’ll need:
Observing your own leaves, try to colour match and explore your paints to identify the colours your leaves are. If you’d like to follow mine, I have the equipment listed below for you:
- Some leaves from your garden or from your autumn walks/or reference photo as your reference.
- Mop paintbrush – Rosemary & Co Size 3/0
- Daisy palette (for mixing watery paints)
- Water bowl
- Paper towel
- Watercolour paper (I recommend Arches cold pressed paper) Or any sketchbook paper.
- Paints (see colour list below). I use Winsor and Newton paints.
Paint colours needed:
- A red colour (I used Alizarin Crimson)
- A green colour (I used Olive Green)
- An earthy vibrant yellow (I used Hansa Yellow)
- A light yellow – (I used winsor lemon)
- Burnt sienna
- Burnt Umber
- Optional lamp black to create the shadows.
- Step 1: Place your leaves close by (or reference image) as near as you can to your paper. This will help you to get as close up as possible to observe the shapes of colour and tonal variations as you paint.


Step 1: Using this single leaf as my main study, I focused on the lightest colours first. I used winsor lemon to create the outline shape to my leaf. To capture the shape more accurately, you can even draw around your leaf if you’d like. I then filled the colour in completely with very watery paint.
Step 2: Into this watery wash, quickly drop a thicker mix of the Alizarin Crimson (e.g. red/pink colour) into the areas where you want to create depth in your leaf. Watch how the colour disperses into the wet lighter paint underneath. At the same time, begin to introduce some burnt sienna and burnt umber to the tips of your leaf shape and the stem to define these areas. With these painted, it’s time to let this base colour fully dry.
Step 3: Once your leaf has dried, take your time to add in extra layers of colour and textured edges. Look really closely at your real life leaves to decide where they should go. I used Hansa yellow to quickly add more depth and vibrancy to create the golden glow to my leaf. Repeat the process of letting each layer drying before applying the next colour.
*TIP* when you’re using watery washes whilst you paint, you may see ‘watermarks’ appear around the edges of the wet area, where the pigment can’t travel any further. These are to be welcomed. They’ll all add to the textural effects of your loose watercolour leaf*
Step 4: If you would like to, you can use your lamp black colour at a very light consistency to create the shadows underneath your leaf. I found this really fun to do and made my leaf ‘pop’ off the paper with those 3D effects! Simply observe your sitting leaf and to where the natural shadows fall around it.


Step 5: As a finishing touch, use the tip of your brush to gently create the vein details to your leaf. You can include as much or as little detail to your painting – it’s fun to experiment!
I couldn’t resist painting some more after my first experiment! As you can see, I loved using my red paint, so I further introduced more leaves to my piece of paper dropping this wonderful vibrant pigment into the watery yellow paint. Below are some further studies or acorns and acorn leaves – What do you think?


I hope this mini step-by-step guide has helped inspire you to paint your own Autumn leaves and given you the confidence to observe and experiment with your hues in watercolour.
If you paint your own autumn leaves, I’d love to see your results, so tag me on Instagram and use the hashtag #jenniferrosegallery so I can see how you got on. You can also find me on Facebook
Make sure you hear about my latest step-by-step guides, video mini-classes and inspiration journal entries – all for free – by signing up to my newsletter.
How to Preserve Leaves
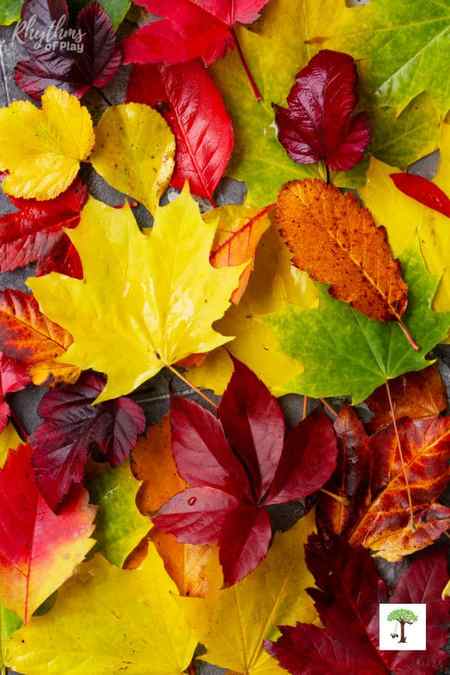
As autumn’s vibrant foliage blankets the world in a rich tapestry of reds, yellows, and oranges, many of us are captivated by the fleeting beauty of changing leaves. But what if you could capture and preserve a piece of this natural spectacle to enjoy year-round at home or in the classroom?
The art of preserving leaves has been a cherished tradition for nature enthusiasts, crafters, and botanists alike. It’s a fascinating journey into the delicate balance between science and art, where we unlock the secrets of nature’s intricate designs and discover easy ways to immortalize their beauty. You might also enjoy this list of fall art projects and painting ideas.
In this exploration of leaf preservation, we’ll delve into various methods and creative applications that allow us to extend the life of these delicate botanical marvels, keeping the spirit of fall alive in our homes and hearts. So, whether you’re a seasoned leaf presser or a newcomer to this captivating nature craft, join us in uncovering the wonders of preserving leaves, a pursuit that transcends seasons and offers a window into the world of nature’s exquisite masterpieces.
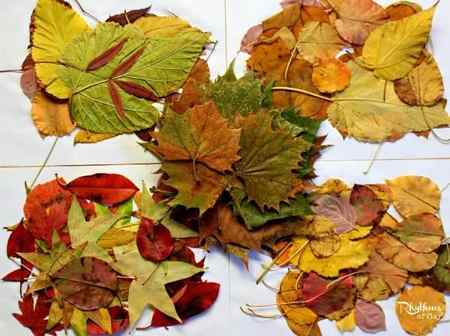
Collect, Press, and Preserve Leaves for Nature Crafts and Art Projects
Do you like to hunt for and collect colorful, beautiful leaves in the fall? Searching for gorgeous autumn leaves is one of my daughter’s favorite fall activities. We both enjoy creating new nature crafts and art projects with the gorgeous array of fall leaves we find.
The problem is that they will turn brown, shrivel up, and break into pieces if you cannot use them immediately. Today, we will share what to do with fall leaves after you collect them so you can use them for nature crafts and art projects later. Once finished, you can use your preserved leaves for leaf lacing, leaf crafts, leaf art projects, and much more!
It’s important to remember that preserving leaves is an inexact science with varied results. It is impossible to preserve leaves to look as bright and remain supple as the day you found them. This makes it best to approach each leaf preservation technique like a scientist and choose one or two you like best! You might also enjoy 10 Ways to Play and Learn with Fall Leaves.
Craft Supplies Needed to Preserve Autumn Leaves
There are several ways to preserve leaves. The method described here uses a leaf press and Mod Podge or a slightly watered-down PVC or white glue .
To preserve autumn-colored or green leaves, You can also use beeswax , glycerin , waxed paper , or a laminator to preserve autumn and green leaves. Scroll down to look at the resources at the bottom of this post for more information about how to preserve leaves using the other methods mentioned above.
- Fall Leaves or fresh green leaves
- Medium leaf press , large plant press , a microwave plant press , ORcardstock , and a stack of heavy books.
- Mod Podge or white glue mixed with water
- Foam brush
- Newspaper, an old sheet, or wax paper
- An old magazine or catalog
How to Preserve Fall Leaves: Step-by-Step Instructions
These simple step-by-step instructions teach how to preserve leaves to make fall arts and crafts with beautiful autumn colors. Please read the instructions before getting started so you know the steps involved and what to expect.
1. Collect Fall Leaves
To preserve leaves, you first need to get outside to collect them. One of our favorite fall activities is going on a nature hunt to look for vibrant, fresh fallen leaves to bring home to create nature crafts or press and preserve for later. My daughter gets excited every time she races for a pretty leaf!

2. Clean and Dry Leaves
- After you collect a few gorgeous autumn leaves, it’s time to clean and press them.
- It is important that the autumn leaves (or green leaves) are clean and dry before pressing them, or they can grow mold and peel.
- So, rinse the leaves with water and give them time to dry before pressing and preserving them.
3. Press Leaves
- After cleaning and drying the leaves, use a leaf press to press and flatten them. (The craft supplies above suggest a few more leaf presses you can use.)
- Or press and flatten the leaves with sheets of cardstock and heavy books.
- Place the autumn leaves into a leaf press, or place a few fall leaves onto a piece of cardstock and follow the directions below.
How to Press Leaves with Cardstock and Books:
- Place several clean, dry leaves on top of a sheet of cardstock paper.
- Put another sheet of cardstock on top of the leaves.
- Ensure the fall leaves lay flat under the cardstock.
- If you have more leaves to preserve, place them on top of the second sheet of cardstock.
- Next, put another sheet of cardstock on top of those leaves to press them.
- Repeat these steps until all the leaves you want to press are inside the stack between each sheet of paper.
- Place large, heavy books, binders, or other heavy objects on top of the stack of leaves between sheets of cardstock.
- Press fall leaves for 12 – 24 hours.
- Don’t press autumn leaves too long; they can lose their colors or grow mold.
4. Preserve Leaves
- After you have pressed the autumn leaves you collected, it’s time to preserve them.
- The DIY leaf preservation technique below describes how to paint Mod Podge (or a slightly watered-down white PVA glue.) onto autumn leaves to preserve them.
- Applying Mod Podge to a fall leaf is almost impossible without getting it all over the surrounding area. So, we have developed a super-easy leaf-preserving hack described below to help you get it done without making a huge mess!
- Other methods to preserve leaves are listed at the bottom of this article.
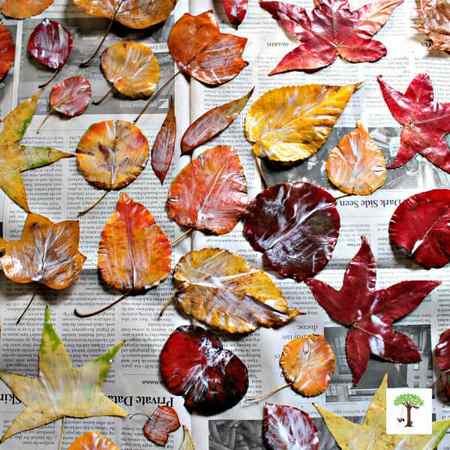
How to Preserve Leaves with Mod Podge or White Glue:
- Cover a table or surface large enough to dry the fall leaves you collected with a newspaper, an old sheet, or waxed paper.
- Gather pressed fall leaves, Mod Podge , a foam brush , and an old magazine or catalog. (Or use PVA or white glue mixed with water so it’s easy to paint but not too runny.)
- Grab an old magazine or catalog to give yourself a surface to apply the Mod Podge quickly without concern.
- Open it to the first page and use your foam brush to apply Mod Podge to one side of a fall leaf.
- Lay the autumn leaf down on the covered surface with the Mod Podge side facing up.
- Repeat the steps above.
- After using the first page of your catalog to paint a few leaves with Mod Podge, it will be nice and sticky, am I right? Turn the page to have a new, clean surface to work on–tada! No muss-no fuss! Yes, you will slowly glue the catalog pages together as you work. This is why using a magazine or catalog you don’t care about is important.
- Repeat the steps above until all the leaves you want to preserve have been painted with Mod Podge or watered-down white PVA glue.
- Give the preserved fall leaves time to dry.
- Once the autumn leaves are dry, apply Mod Podge to the other side of each leaf if desired. This final step is optional; see our tips below for more information.
Please scroll down for more of our best leaf preservation tips, and see how our preserved fall leaves look after a year!