–>
Trees: stump removal and treatment
When trees are felled or fall, their stumps should be removed to prevent suckering and fungal root rots. Although often large and heavy, stumps can be removed with the right equipment and technique, or removed by weedkiller.
Digging out a stump. Credit: RHS/John Trenholm.
Quick facts
Suitable for Tree stumps
Timing Any time; weedkillers must be applied immediately after felling
Difficulty Moderate to difficult
Jump to
- Suitable for.
- When to remove a stump
- How to remove a stump
- How to apply stump killers
- Problems
This is the best solution. Ideally the stump should be removed entirely, but if this is not possible alternative methods usually give satisfactory results. For smaller trees the stumps can be pulled out with a winch. These can be hired by gardeners with the knowledge to use them safely. For leverage it is necessary to leave a good sized stub on the stump (up to 1.2m (4ft) high) rather than cutting it off at ground level. Grubbing out by hand or mechanical mini-excavator removes the majority of the root system. Removal is easiest if trees are cut down so that a significant length of trunk remains to give leverage to help in removal. Landscape contractors are often skilled at stump removal, but you can hire mini-excavators and operators separately.
Alternatively, machines known as stump grinders will mechanically grind out the main root plate, leaving fine sawdust. Although stump grinders can be hired, they are potentially hazardous and are only for gardeners confident that they can use machinery safely. Some roots will inevitably be left in the ground but the majority should eventually rot down. It is worth specifying how deep you would like the stump ground to. Shallow grinding, 20-25cm (8-10in), is normally sufficient for laying turf, but you should allow for deeper, 30cm (1ft), or more if replanting or landscaping. Also think about what you want to do with the sawdust. It can be left to fill in the hole, used as mulch in other areas of the garden, or taken away by the contractors. Specify which of these you would prefer before the work is started and be sure to have any diseased wood removed completely. Should you like to replant the area it is best to remove the bulk of the sawdust and fill the hole created by stump grinding with topsoil. If a large amount of sawdust was accidentally mixed with the existing soil it is usually worth adding nitrogenous fertiliser prior to planting to counteract possible problems with nutrient lockup. For example, consider mixing in chicken manure pellets or sulphate of ammonia.
Methods to avoid
- Always follow the manufacturer’s preferred method. This may involve treating the entire cut surface of the stump, drilling holes around the living edge of the stump to pour the granules into, or using a chisel or axe to make wedge-shaped incursions around the edge of the bark (often used for standing trees). These notches can then be filled with granules or brushed with the liquid weedkiller
- The best time to apply stump killers is from autumn to winter. Avoid treatment in spring and early summer when the sap is rising
- Apply a weedkiller directly to the stump, concentrating it in the outer ring of live tissue just beneath the bark
- Weedkiller is best applied to fresh stumps, as live tissue is needed for its uptake. If the stump is only a few weeks old, you may be able to expose live tissue by cutting the top off to expose a fresh-cut surface
- Finally, cover the whole top of the stump with a plastic sheet to keep off the rain and secure in place
Inclusion of a weedkiller product does not indicate a recommendation or endorsement by the RHS. It is a list of products currently available to the home gardener.
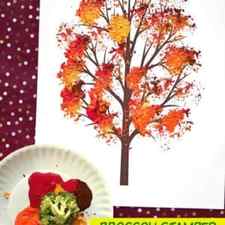
Broccoli Stamped Fall Tree Craft Idea
When engaging in craft activities, it is important for young children to have adult supervision. It is also recommended to use supplies that are suitable for your child’s age. Feel free to modify materials or steps to meet your specific requirements.
Get your little ones in the autumn spirit with this fun and creative broccoli stamped fall tree craft!
You can make an awesome craft for fall with just a piece of broccoli, craft paint and paper! That’s it! Keep scrolling for our Broccoli Stamped Fall Tree kid craft idea and score the free printable, as well!
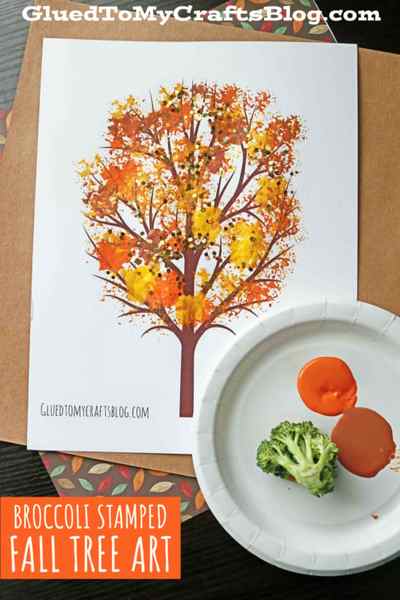
Broccoli Stamped Autumn Tree Craft Idea For Kids
Today I’m sharing another kids of all ages craft idea that is made with a material YOU would NEVER expect! BROCCOLI!
At Glued To My Crafts, we want YOU to celebrate the BEAUTIFUL colored autumn trees outside with today’s Broccoli Stamped Fall Tree craft tutorial. Just like using a craft sponge, a simple piece of fresh broccoli can be easily turned into a stamp that makes for great textured leaves on a tree!
So what are you waiting for? Save a few pieces of dinner tonight and craft this beauty up in the morning!
Happy crafting and creating beautiful artwork pieces with your child, my friend! Don’t forget to share a few pictures of your fall art projects on our Facebook page! Can’t wait to see your beautiful sponge painted trees! #gluedtomycrafts

Who said crafting had to be boring? Let your inner artist out and add a unique touch to your fall decorations with this fun broccoli stamped tree craft idea! Get creative and show off your fall masterpiece with us!
Craft Supplies:
- Tree Branch Printable
- White Cardstock Paper
- Color Printer
- Brown Craft Paint
- Red Craft Paint
- Yellow Craft Paint
- Orange Craft Paint
- Fresh RAW Broccoli Florets
- Small Paper Plate
- First things first – grab our FREE TREE BRANCH PRINTABLE, listed above in the supply list.
- Find it on your computer and print it on a single sheet of white cardstock. You only need ONE print per fall tree craft.
- Now grab your paper plate and various colors of craft paint.
- Squirt all the fall colors on the paper plate.
- Now have your child grab their piece of broccoli. Using it like a sponge, have them dip it in the paint, then on the branches of the tree to make leaves
- Repeat until the leaves/tree starts to look full.
- When your child have the design they like, set it aside the finished product to let it dry completely before displaying proudly on the fridge.
- Don’t forget to share pictures of your broccoli stamped fall tree creations on your various social media sites! #gluedtomycrafts

If you are looking for even more craft ideas to make this fall season, be sure to check out the fun posts listed below. All of which would pair nicely with today’s autumnal craft!
And if you decide to make today’s Broccoli Stamped Fall Tree Craft Idea or any of our inspiring crafts found on the blog – be sure to share a picture on our Facebook page for all of us to see! #gluedtomycrafts
- Leaf Turkey Craft
- Paper Plate Fall Tree
- Toilet Paper Roll Corn Cob
- Leaf Owls
- Silly Leaf Hair Craft
- Terra Cotta Pot Scarecrow
- Candy Corn Gnome
- Cupcake Liner Pumpkin Wreath
Primary Sidebar
- Art in the Park
- Art lessons
- Art workshops
- CreARTive Tutorials
- Donations
- Drop-in Art Centre
- Events at SCYAP
- Murals
- Newsletter Archive
- Print n’ Make
- Quick Crafts
- SCYAP Art Gallery
- SCYAP Staff Sketches
- Step By Step Paintings
- Youth Engagement
- Even a small amount can make a difference
- Art Lessons | Winter/Spring 2023
- Felted Canadian Landscapes by Emily Kreuckl
- November 2022 Drop-In Activities
- Easy Pumpkin Craft Tutorial | Quick Crafts


