Using the black acrylic paint and the wide tip brush, paint the background around the Sugar skull face. You can also paint the 4 sides of the canvas for a nice final rendering. Leave to dry.
DIY sugar skull tutorial

We love this sugar skull DIY from Emily of MushTushy. We are excited to share this with you in time for fall, Halloween and Dia de los Muertos. This tutorial is so fun.
The cool thing about this project is that you can pick anything to paint, whether you want to use a piggy bank, an animal statue or even salt and pepper shakers such as the ones we used here. The options are limitless. For this tutorial, I bought little ceramic salt and pepper shakers from Target for $3 each. The only other supplies you will need are:
– paint pens (my personal favorites are fine point Sharpie oil based ones from Michael’s or JoAnn’s; be sure to use your coupons too!)
– flat white spray paint primer (my favorite is Rustoleum painters touch 2x cover from Walmart or Home Depot)
– pencil/eraser
– gloss varnish (my favorite is Liquitex gloss medium and varnish from JoAnn’s)

I always suggest priming your store-bought statues in order to get the paint to properly adhere. So even if you have a white object, be sure to prime it first, unless it’s flat matte white. Be sure to use one thin coat in order to avoid drips, peeling paint and longer dry time. I always try to wait at least a few hours or even overnight before attempting the next steps.

Once your statue is dry, you can begin drawing your shapes and patterns. The only part I draw on is anything that I want to stay white. For example, for sugar skull patterns with bones, I outline the bones. If you feel more comfortable drawing out your entire design, feel free to do so. But remember the pencil will likely show through your lighter paint colors. Pencil can be erased from the primed surface, so don’t be afraid to experiment with designs before using the paint pens.

Look up sugar skull designs, henna patterns, mandala art or any patterns. You can even add words to customize your project. The options for decorating are only limited to your imagination. After I block in the white areas with pencil, I draw my patterns and shapes with the markers.

Once all your white is outlined and you’ve filled in the colors, the tedious work begins. Be sure to have a steady hand, and maybe don’t attempt this after your 5th coffee of the day. Haha! Use the fine point black Sharpie and start outlining all the shapes with black, and then go back in with the thicker black Sharpie to fill in the remaining background. Once all the black is drawn on, touch up any color areas that have white splotches and then brush on the clear varnish. Don’t put it on too thick and don’t brush repeatedly in the same areas or color can pull off and the clear may dry a cloudy white.
After it dries, you have your beautiful hand-painted statue ready for display on your mantle, desk, entryway, etc. I hope you have enjoyed this tutorial. Please feel free to follow me on Instagram and share photos of your completed projects!
What colors do you need to paint sugar skull art?
You can use any color that you want for sugar skull art because sugar skulls traditionally are very colorful. And in fact they often reflect the personality and taste of people who have passed in our lives. They can also be given to people around Dia De Los Muertos (Day of the Dead) who are special to you who have yet to pass and be decorated to suit them.
I chose to use traditional Dia De Los Muertos colors for my sugar skull art. I did some research and reading about what the colors are and what they meant and found the information below at Old Town San Diego’s Dia De Los Muertos and Flavors of the Sun.
- Pink: “celebration, joy”
- Purple: “pain, suffering, grief, and mourning”
- Yellow and Orange: “the brilliance of the sun and a new day, Cempazuchitl are marigolds that symbolize death. Petals are used to make a trail so that the spirits can see the path to their altars.”
- White: “purity, promise, and hope”
- Red: “the blood of life which sustains not only the body but the soul and a symbol of sacrifice”
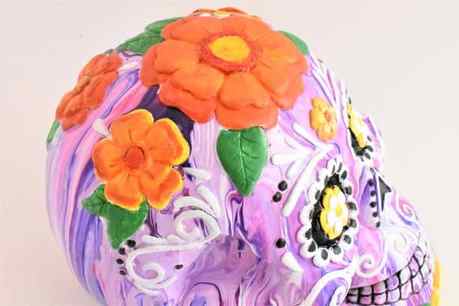
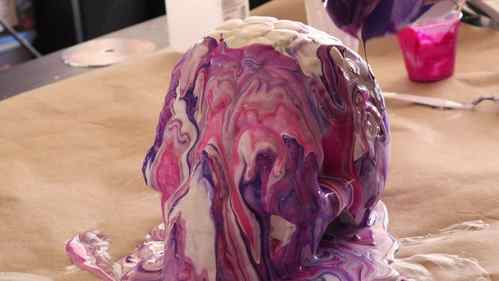
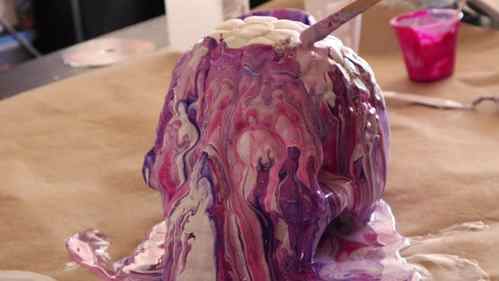
I chose to keep this sugar skull feminine by doing the pink and purple in the background, and then I painted the flowers to mimic the traditional marigolds. I kept the color palette for the embellishments limited because the background is so busy from the pour.
(If you’re curious about colors and color theory as it relates to acrylic pouring, head on over to my post about Choosing Colors for Acrylic Pouring and grab your FREE printable Color Wheel and Color Scheme Guides!)
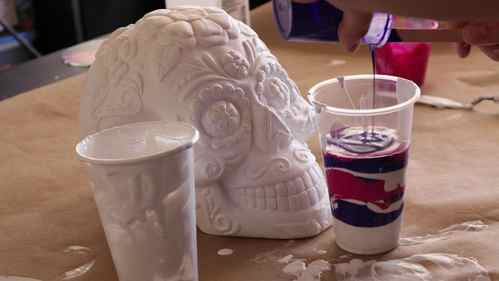
Materials You Will Need to Paint a Plaster Sugar Skull with Acrylic Pouring
This post contains affiliate links, which I earn a small comission from. These are provided for your convenience, and the price isn’t increased at all.
Paints:
- Artist’s Loft Deep Yellow
- Master’s Touch Yellow Med (Buy at Hobby Lobby / Amazon)
- Master’s Touch Crimson (Buy at Hobby Lobby / Amazon)
- Master’s Touch Titanium White
- Artist’s Loft Brilliant Blue (mixed with yellow to make green for the leaves)
- Liquitex Basics Quinacridone Magenta (mixed with white to make the pink I used)
- Master’s Touch Permanent Black
- Master’s Touch Ultramarine (this was mixed with the magenta to make the violet I used) (Buy on Hobby Lobby / Amazon)
Pouring Medium:
Tools:
Canvas:
- Plaster Sugar Skull (Since this is a seasonal item, Michael’s doesn’t currently have theirs listed, hopefully you’ll be able to find them this fall. But here are some other options that I found.)
- Etsy
- Amazon
- Amazon
- Amazon
Sugar Skull Art Video Tutorial


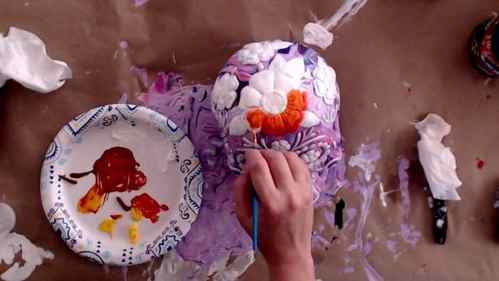
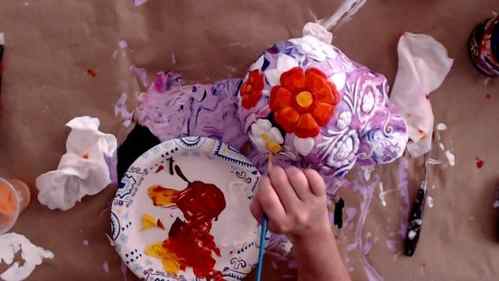
Hand-paint the Details of your Sugar Skull Art
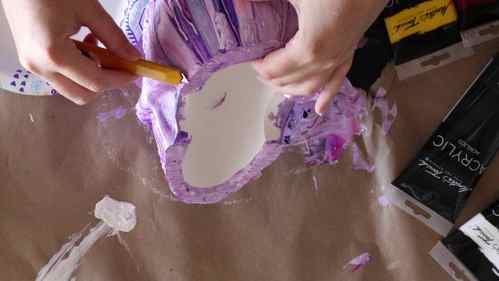
- I dried my sugar skull art on parchment paper, so there was a little bit of excess paint that I had to trim off of the edges with an exacto knife.
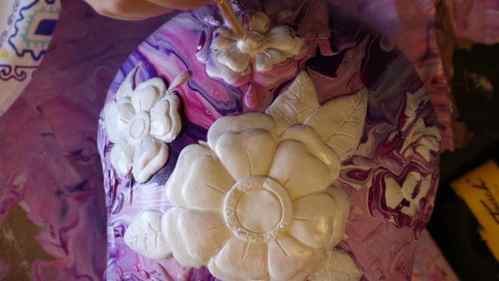
- Titanium white is an opaque paint, so it’s great for covering other colors. Use white to paint the embossed decorations or to sketch out the decorations you want on your skull if it doesn’t have the decorations already on there.
- Paint your sugar skull however you want! Have fun, get creative and go for it!
If you want to make this part easier, the embossed skulls are the way to go. If you want a little more freedom, go for the plain ones. The other thing you could do if you’re not big on hand-painting is grab some paint pens and fill in the details that way! This would also be a simple way to do it with kids.
What you’ll need

Daler-Rowney Simply Acrylic Paints are a perfect starting point for artists and hobbyists looking to experiment with acrylics. These soft-body water-based colours can be used straight from the tube, wet easily onto the surface, and can be thinned with water. VIEW

Simply Acrylic Brushes
Daler-Rowney Simply Acrylic brushes are made with golden Taklon that is a synthetic material formulated to exhibit the qualities of the finest hair brushes. VIEW

Simply Charcoal
Daler-Rowney Simply Charcoal produces a smooth and intense mark, making it an excellent sketching tool for artists and hobbyist willing to experiment this technique. VIEW
The painter Amylee Paris tirelessly finds her inspiration in colour and nature. Her abstract blooms and portraits shine in several art galleries in the UK.


