Watch visual artist & educator, Jedidiah Dore, creating a ‘dynamic’ drawing using Derwent Inktense, Line Makers and Paint Pens. Learn to draw with perspective and use bold colour effects in your drawings.
Scenes
Scenes are where you work with content in Unity. They are assets that contain all or part of a game or application. For example, you might build a simple game in a single scene, while for a more complex game, you might use one scene per level, each with its own environments, characters, obstacles, decorations, and UI (User Interface) Allows a user to interact with your application. Unity currently supports three UI systems. More info
See in Glossary . You can create any number of scenes in a project.
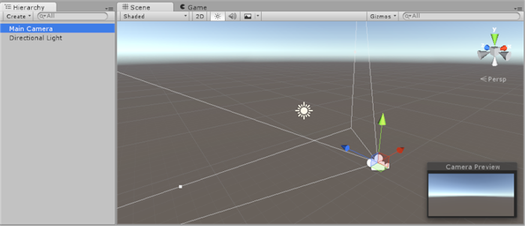
When you create a new project and open it for the first time, Unity opens a sample scene that contains only a Camera A component which creates an image of a particular viewpoint in your scene. The output is either drawn to the screen or captured as a texture. More info
See in Glossary and a Light.
For information about working with scenes, see Creating, loading, and saving scenes.
Scene Templates
Unity uses scene templates to create new scenes. Scene templates are assets that are stored in a project. They are similar to scenes, but are designed to be copied rather than used directly.
For information about creating and using scene templates, see Scene templates.
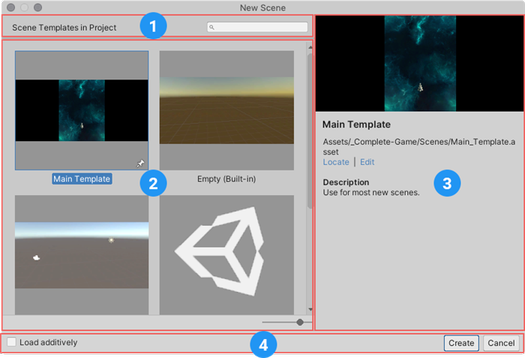
The New Scene dialog
The New Scene dialog opens when you create a new scene from the File menu: (File > New Scene) or the Ctrl/Cmd + n shortcut. Use it to create new scenes from specific scene templates in your project, and get information about existing templates.
The New Scene dialog
- Search field: find available scene templates by name.
- Templates: a list of all available templates in the project.
- Template details: displays information about the currently selected template.
- Command bar: provides commands and options for creating a new scene from the selected template.
Creating a new scene
To create a new scene from the New Scene dialog, select a template from the templates list, and click Create. For a detailed description of creating a scene this way, see Creating a new scene from the New Scene dialog.
Pinning templates
Pinned templates appear before other templates in the New Scene dialog’s template list. The last template pinned appears at the top of the list.
Click any template’s pin icon to pin it.

You can also pin a template when you edit its properties. In the scene template Inspector A Unity window that displays information about the currently selected GameObject, asset or project settings, allowing you to inspect and edit the values. More info
See in Glossary , enable the Pin in New Scene Dialog option.
Locating and editing templates
When you select a template in the New Scene dialog, the details pane displays the path to the template (1 in the image below).
To highlight the template in the Project window A window that shows the contents of your Assets folder (Project tab) More info
See in Glossary , select the Locate link (2 in the image below).
To open the template in an Inspector window and edit its properties, select the Edit link (3 in the image below).

Spring Pansies
Follow artist Judith Selcuk as she takes you through how to paint Spring Pansies using our Inktense Paint Pan Sets. Materials list and Pansies outline are linked in the video description.
Watch Spring Pansies Tutorial
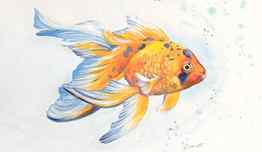
Metallic and Inktense Goldfish
Add some shimmering colour to your artwork with artist Kerry Bennett, as she takes you through creating a gorgeous and vibrant goldfish using Inktense and Metallic Paint.
Download Goldfish Step By Step

Kingfisher Paint-a-Long
Follow artist Judith Selcuk as she takes you through how to paint a vibrant Kingfisher using our Inktense Paint Pan Sets. Materials list and Kingfisher outline are linked in the video description.
Watch Inktense Kingfisher Tutorial
Vases
With vases, you can get really creative! You can use daily household items for vases, such as mason jars. You can paint your own ceramic vase first before adding in an arrangement of fresh florals. If you’re hosting an upcoming gathering or party, use something out of the ordinary for your vase, such as a piece of fruit. Mix and match your vases at your next event to cultivate an animated and playful atmosphere.


Color Combinations
Go for bold color combos that you don’t see everyday. Choose vibrant hues that will really make your arrangements stand out against a subtle backdrop. On the opposite side of the spectrum, opt for a more natural, earthy tone to your arrangement by using only whites, greens, and blues. Additionally, use loose, flowing greenery that will add a mystical ambience to your arrangement.


Adding Non-Floral Elements
Don’t be afraid to add in non-floral elements to your arrangements to add a pop of fun and eccentricity. Use things that are also found in nature, such as fruits and vegetables, to keep your decor cohesive. Utilize animated and quirky elements such as candy to create a cheerful arrangement that guests at your next dinner party will definitely want to snap a pic of!

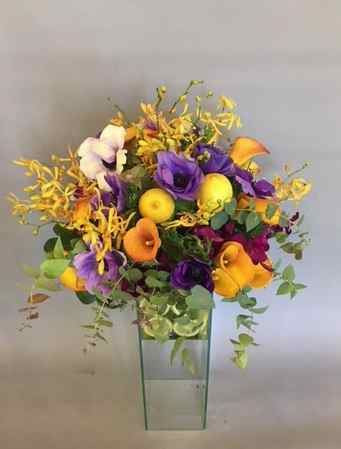

No matter what color combo or vase you use, embrace your spring floral arrangement to the max. Incorporate colors that brighten up your room and use greenery that can bring a refreshing lift of spirits to your household. Making your own spring floral arrangement can be fun for your whole family, or even with a group of girlfriends for a new take on a GNO. Learn new styles and try new tricks, and don’t be afraid to be bold!


