This was a great tutorial for a beginner looking for a bit of a challenge. Nolan is, as always, very clear and provides you with all the necessary techniques. I learned a great deal.
Barbara Forehan
Zealous Art
This is an easy fun step by step acrylic painting instructional video! Includes the stencil! Easy fun and beautiful!
No experience required I’ll guide you step by step
Want to paint, disconnect from reality and just have fun with a paint brush? This painting is fun easy, even if you think you can’t draw a stickman! Painting at home allows you to create for yourself a fun, peaceful non judgemental environment to paint in. Invite friends to join you or enjoy a little ‘me’ time!

Course curriculum
***All you need is acrylic/craft paint, a few brushes and a canvas!***
Supplies
Art Supplies
Art Studio Set-up
Step by step guide
Step by step video
Traceable Stencil

About this course
- $12.00
- 4 lessons
- 0.5 hours of video content
To see other’s Sunflowers and to post yours go here:
$12.00
$12.00 Easy, fun, step by step tutorial – Sunflower
Easy, fun step by step painting video with a stencil (included in the membership)
$25.00 / month
$25.00 / month Paint Night at home – Membership
Instant access to 100+ paintings including the sunflower painting. Cancel anytime. Netflix of paint night videos!
Learn to paint through following along, relaxing and having fun!
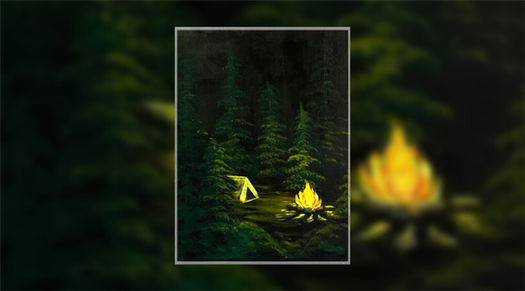
Easy, fun, step by step tutorial – Camping – A night scene

Unwind on the weekend
Bundle

Easy, fun, step by step tutorial – Spring has Sprung
Course

Easy, fun, step by step tutorial – Gossip Girls!
Course


Want access to more paintings instantly?
Sign up for the Paint Night Membership! This is what you will get:
- 24/7 access to all classes
- Pause, go back or move forward as you please
- Easy step by step instructions
- Great for all ages and skill levels
- Fun themes and styles
- Access to all videos in the library immediately
- Minimum of 3 new step by step paintings a month
- Traceable templates where required
- Supply suggestions
- Bonus content


Class Description
Sunflowers are very popular subjects to paint so today we will learn how to do just that.
During the class you will learn:
1) How to approach complex petal structures
2) How to paint the seeds
3) How to paint the leaves
Latest Reviews

This was a great tutorial for a beginner looking for a bit of a challenge. Nolan is, as always, very clear and provides you with all the necessary techniques. I learned a great deal.
Barbara Forehan

Unlock the Follow Along Class HERE
Short Class Video
Paint the background
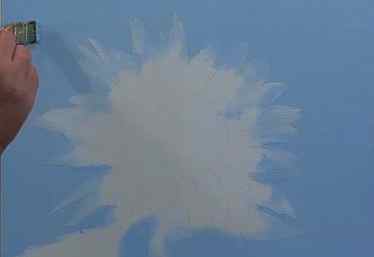
I start off by drawing the silhouette of the sunflower and masking it off using clear cover.
This allows me to quickly paint the background while maintaining perfect edges around the sunflower.
For the background I use Cerulean Blue and Titanium White and a criss-cross stroke to ensure I cover the weave of the canvas.
Once blocked in however I smooth the paint with light horizontal strokes across the entire canvas to give the sky a smooth look.
I then remove the mask. Can you see how beautiful and crisp my edges are because of the mask?
If you have time I recommend leaving the painting to dry as that will avoid accidentally getting any sky colour into your sunflower area.
Paint the basic shape of the petals
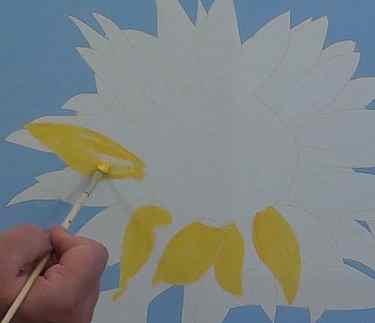
As you can see the sunflower has a ton of petals so you need to be patient when painting them.
I like to paint them in a two step process.
I first paint the basic shapes and shading of each petal and then return to paint the details.
When painting the shadings and shapes of each petal, I am looking for the basic colour of the petal first.
You find this by looking at the overall colour of the petal while ignoring the details.
If you have trouble doing this then look at your reference photo by squinting your eyes so that you are looking through your eyelashes.
This has the effect of flattening out the detail so you can only see the basic shape and shading.
Paint the tonal values of the petals
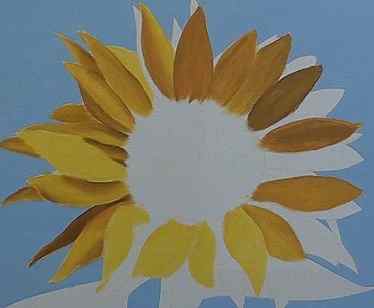
The colours I’ve used for my petals are Cadmium Yellow, Cadmium Orange, Titanium White and Raw Umber.
Once you have blocked in the basic colours of the petal then add shadings to indicate it’s curve.
As you move from one petal to the next you are also trying to indicate that there is distance between them.
You show this in three ways.
The first and most important is the change in colour and tonal value between adjacent to petals.
This contrast and colour change is often very subtle so you will have to look very carefully to spot it. I will often use my artist licence to add a small amount of contrast where I see none.
The second way you indicate the separation is to ensure that the edge of each petal is a nice and crisp found a line.
A found line always indicates distance or a change in angle.
The third method is to paint in the shadows cast by the one petal onto the other.
A shadow always indicates height and provides the Illusion of depth that you need to make your painting look three dimensional.
A fabulous place to show distance between the petals is by painting the really dark contrast in the triangular shaped gaps between the petals where they meet the centre of the flower.
Once all the basic shadings are complete you can either leave the painting to dry or carefully continue.
If you leave the painting to dry you will be able to get very fine detail into each petal later.
If, like me, you decide to continue and paint Alla Prima then you will end with a more impressionistic style painting.
To add detail to the petals I use contrasting tonal values. I will use a lighter paint on a dark petal and dark paint on a light petal.
The detail is added using a soft filbert brush and a quick slashing motion.
When adding the details don’t just and a bunch of random stripes onto the petal. Look at the petal and note in which direction the strokes must go.
The directions indicate the shape of the petals so by curving the lines you can even show that a petal curls over.
You must also look out for areas on the petal where the stripes are more prominent and add more prominent stripes in that area.
Remember that each stripe you add is a wrinkle on the petal so by loading less or more paint onto your brush you can create the illusion of deeper or shallower wrinkles.


