Flower Colour Sorting Materials needed: egg carton variety colours of paint coloured ice cream stick pre-print flowers petal pen knife hot gun I bought.
Steps for painting a flower petal
We’ve all had it happen. We’re busy working a gig, happily painting 6-year-old mermaids, and a teenage girl apprehensively sits in your chair. She wants to join in the fun but is far too sophisticated for a full-face kitty cat or butterfly. She asks you for… (cue dramatic music) something cool! What do you paint?!
The fancy eye design is hugely popular with this (and every) age group. Add this to your portfolio and you’ll quickly see an influx in older clientele. Enjoy!
Materials:
- Metallic white “Silver White Shimmer” 140 by Superstar
- Light pink “Baby Pink” shimmer by Superstar
- Neon orange Neon Orange by TAG
- Petal sponge
- Stencil BAM 1035 “Heart Swirls”
- Purple for stencil & lips “Berry Shimmer” by Superstar
- Peaches ‘N Cream from the Nature Palette by Fusion Body Art & Natalee Davies – darkest edge is also used for line work
- 1/2” angle brush
- Mama Clown Orange Burst glitter
- “Snow White” by PartyXplosion for double dip & dots
- Purple for double dip “Imperial Purple 338” by Superstar
- KingArt Round brush #6 (for double dip flowers)
- KingArt Round brush #3 (previously named Loew-Cornell)
- KingArt Round brush #1
- Pastel Lavender glitter by Paradise on lips

To learn more about face painting supplies and where to buy them, visit our Best Face Painting Kits Guide, which provides detailed information and recommendations for Professionals or Beginners who want a professional start.
Step 1
For this eye design, I made a soft base with metallic white, light pink and neon orange on a sponge. To give it added interest, I added a light stencil pattern with purple.

Because I want this design to be feminine with an ‘open look’, I have to keep in mind that lines, teardrops or swirls coming from the outer corner of the eye are going upwards first, and never down.
The upper part of the design shouldn’t go beneath the line from nostril to the outer corner of the eye.
This helps the design to say well-balanced and pleasing to the eye.

Step 2
Keeping that invisible line in mind, I add a few one-stroke flower petals with a split cake (Silly Farm, Peaches N’ Cream Natalee Davies’ collection) and a ½ inch angle brush. Before the petals dry, I apply glitter on top of the petals (Silly Farm, Mama Clown’s Orange Burst).
Next, I add some simple double-dip flower petals using purple as my second color. I try to establish flow by giving all the small petals a direction pointing towards the central focal point (the upper petals) and chin focal points (the petals on the cheek).
If you find you are having a hard time with double dip petals, don’t worry! Our article “Tools for Perfect Double Dip Flowers ” will have you cranking out perfect petals in no time!

Painting with Flower Petals

They had been learning about how to reduce, reuse, and recycle at Little Blossoms Day Care Nursery LTD. With this in mind, the class had some leftover flowers a teacher had been given as a gift and used them as a tool for painting! You can easily do this with your class too by following these steps.
- Flower Theme And Activities
- Painting Activities
- Stamping

Materials needed for this craft
To do this craft you will need the following:
*Paint (acrylic or tempera works well)
*Paper to paint upon

How to do this craft
To make your own painting with flower petals you can follow these steps:
1. Take your flowers and while holding the stems dip the petals in your paint.
2. Spread the paint that is upon your petals on the paper.
3. Keep dipping petals and spreading paint until you feel you are done painting.
4. Wait for your paint to dry.
5. Show everyone your creation!
Related Posts:

Flower Origami This morning, my kids made their origami. They enjoyed folding papers that was made into a tulip flower afterwards. They are.
Preschool Flower Name Activities This is suitable for preschoolers, to teach them on name recognition. Prepare a simple drawing either place the flower in pot.
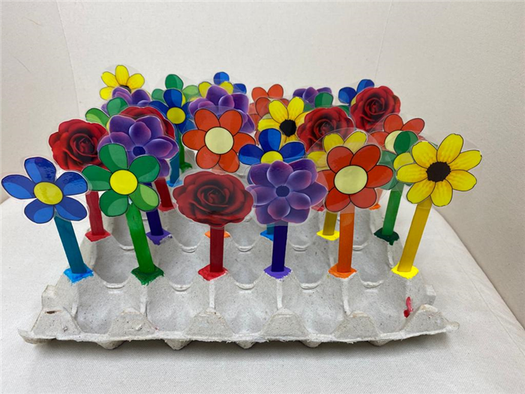
Flower Colour Sorting Materials needed: egg carton variety colours of paint coloured ice cream stick pre-print flowers petal pen knife hot gun I bought.
Handprint Flower Craft Flowers often bloom in Spring and Summer and this handprint flower craft fits the theme perfectly. They did it at Aleph Bet Preschool and.
Flower Pounding Art Activity At the University of Delaware Laboratory Preschool, they did a creative and fun art activity! They used child-safe mallets and hammers.
Hand Flower Craft At Joyce Preschool they had fun making this hand flower craft! You can write the name of a special person you want to, “Wave,” at on it.

Fraction Flower Craft At Peace of Mind Early Education Center, they learned about fractions in a neat way! They used construction paper to create flowers that.

Mini Cookie Flower Returning to reality has been a less than fun experience thanks to mother nature’s inability to decipher April as spring and not winter.

Fine Motor Flower Painting At Easter Preschool, they di a fine motor painting activity where they made the kinds of flowers you see during the Spring and current.
- Themes
- Flower Theme And Activities
- Painting Activities
- Stamping
How to Paint an Acrylic Poinsettia
In this tutorial, I will walk through the steps to painting a poinsettia flower with acrylic paint. This acrylic poinsettia would make a wonderful addition to your holiday decor, or you could gift it to a loved one this holiday season!
I’ll be sharing how to paint this on a canvas, but there are lots of ways you can create your poinsettia! You could follow along with this tutorial to make hand-painted holiday cards or even an ornament! There are so many festive options!
This painting is all about layers and movement. We’ll be painting a lot of layers to give the painting depth and interest. And we’ll add flourishes and brushstrokes to add a sense of movement to the petals. By the end of the tutorial, your painting will look something like this!

Note: This tutorial is for your personal enjoyment. This image is copyrighted and cannot be recreated or sold for profit.
Before you dive in, know that you have complete creative freedom with this piece. I’m giving you a structure, but you’re free to make it your own! In fact, I encourage you to do so! If you want to use different colors than me or different accent paint strokes, go for it! I can’t wait to see what you paint!
I’ll be using a canvas in the tutorial, but you can recreate this on an ornament, card, or whatever you want!
You don’t need to get anything fancy here! I prefer the Simply Simmons brushes like this one. You’ll just want to make sure that you have a large, medium, and small brush.
These are optional, but they’re great for adding details and flourishes at the end of the piece. My favorite brand to use is Posca!
Step 1: Mix Your Colors
Before you begin, you’ll want to mix your paint. Most of the colors we’ll use in this tutorial are straight out of the tube, but you’ll need to mix a mint green for the background of this piece.
To do that, use six parts Titanium White, one part Cadmium Yellow and one part Turquoise. You want to make sure to add the yellow and turquoise little by little so not to overpower the mint color.
If you are totally new to paint mixing and color theory, I’d encourage you to check out this post first, and then come back so you’ll be more familiar with the process!
Here’s how my mint looked mixed.


