5. Color in the shape of your mountain, using more saturated color near the top and using more water and less paint towards the bottom. The top edge of your mountain should be a stronger blue and the bottom should be more watery. This creates the illusion that the mountain is far away! Using the tip of your brush, make the bottom edge of Camel’s Hump bumpy, for the tops of the middle ground trees.
Ready To Paint In 30 Minutes Mountain Scenes In Watercolour Book
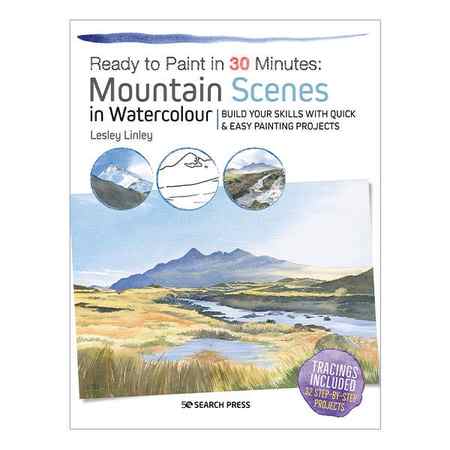
The Ready To Paint In 30 Minutes Mountain Scenes In Watercolour Book guides the complete novice to develop their skills with 32 simple step-by-step exercises. Contains tracing paper outlines for each project.
More
bulky
This product is classified as Bulky and requires extra handling and takes longer to transport to all parts of Australia. If your order contains bulky goods, it will be eligible for Bulky/Hazardous shipping option only. To find out more, please click here.
hazardous
This item contains hazardous materials and is subject to special shipping considerations. If your order contains hazardous goods, it will be eligible for Bulky/Hazardous shipping option only. To find out more, please click here.
The Ready To Paint In 30 Minutes Mountain Scenes In Watercolour Book guides the complete novice to watercolour painting to develop their skills with simple step-by-step exercises. Unlike other watercolour books on the market, The Ready To Paint In 30 Minutes Mountain Scenes In Watercolour provides tracing paper outlines for each project, enabling you to practise with minimal drawing skills.
Each painting exercise is only 15cm x 10cm in size with a suggested thirty minutes to complete. Giving you a feel for working with watercolour paint but is less daunting than painting on a larger scale. The 32 exercises in the book cover a variety of mountain scenes with a focus on skies, rocks, water, snow and trees ensuring you don’t get overwhelmed painting complex scenes.
Ready To Paint In 30 Minutes Mountain Scenes In Watercolour will inspire to develop your drawing and observation skills and create your own watercolour style. Contains 96 pages.
| Application | Watercolour Painting |
|---|---|
| Product Type | Book |
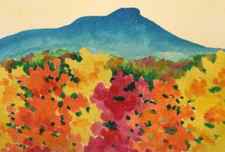
Paint Camel’s Hump, Step by Step


There are many ways that folks like to connect to the outdoors. My favorite way is by painting it! Gather up your supplies, and let’s paint Camel’s Hump mountain together! I chose this beautiful fall view to usher in the season. The instructions below are a guideline to create your own version of this scene. If you want to switch something up, do it! Your painting will look a little different from mine no matter what, so embrace your individuality and let your creativity take the lead. Suggested supplies are below, but use whatever you have around — colored pencils, markers, or other types of paint will work too!
Paint Camel’s Hump: Written instructions
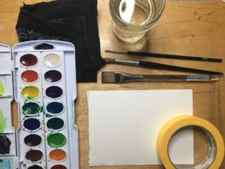
Suggested supplies:
- Watercolor paint
- Watercolor paper (At least 140lb weight for minimal buckling)
- Three brushes- small, medium, and large
- Painters tape- tape the edges of your paper to keep it flat, and leave a clean edge
- Rag for blotting your brushes
- Water jar
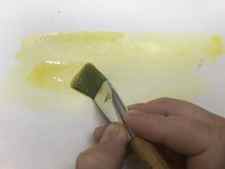
1. Using your largest brush, paint your entire paper with watered-down yellow paint. Try not to leave any puddles on your paper- it will take longer to dry.
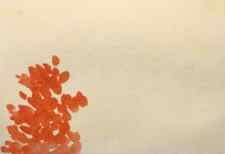
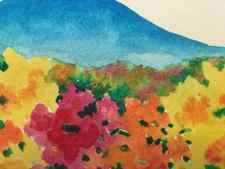
2. Let your background dry, then start adding the colorful trees to the foreground. Using your medium brush and orange paint, make a cluster of dabs, overlapping the dabs as you go. Rotate your wrist to get marks that go in different directions. Making your tree shape a little uneven will make it look more lifelike than if it were perfectly round! I also like to leave a few spaces in between leaves here and there to let the background show through.
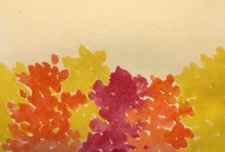
3. Make more trees! They should take up a little more than half of your painting. To make your painting more interesting, your trees should be slightly different heights and shapes from each other. I started with the orange trees, then the red, and yellow last. This allowed the marks time to dry before adding colors next to other colors.
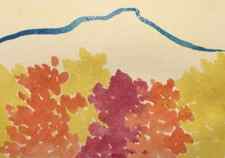
4. Using your medium brush and blue paint, sketch out the shape of Camel’s Hump. Start on the left about an inch above your trees with a line that gradually goes up and to the right. Near the middle, go up a little more steeply then flatten out, then go up steeply and flatten out once again. Make almost a right angle straight down for the peak, then let the line wander down gradually to the right side of your page finishing just above your last tree.
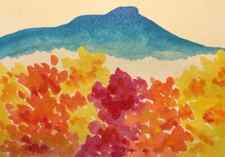
5. Color in the shape of your mountain, using more saturated color near the top and using more water and less paint towards the bottom. The top edge of your mountain should be a stronger blue and the bottom should be more watery. This creates the illusion that the mountain is far away! Using the tip of your brush, make the bottom edge of Camel’s Hump bumpy, for the tops of the middle ground trees.
6. Using the same leaf-dabby technique as before, add some of the other two colors into each of your trees. It’s ok if your trees aren’t completely dry- as the paint bleeds, it might make some interesting marks!
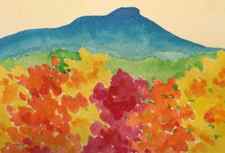
7. Use your medium brush and light green paint, and fill in the middle ground space, and some of the spaces you left between your leaves.
8. Sprinkle dabs of red, orange, and yellow into the light green while it’s still wet. This is called wet-into-wet technique, and it makes the trees farther away look softer. Dab some dark green near the edges of your trees to make them stand out a bit more from the background.
8a. Notice how the dark green has bled up into the light green- it almost looks like tree branches!
9. Use your small brush and black paint, make two small floppy “V” shapes to create some birds flying overhead – the middles of your “V”s should be thicker than the tapered edges of the wings.
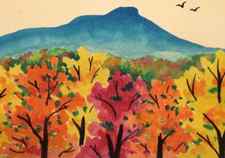
10. Make some tree trunks and branches with your small brush and black paint. I like to make some disconnected lines- thicker and in the middle of the tree for trunks, and thinner and more flowy for the branches. Some of these branches are behind leaves and so aren’t visible; that’s why I don’t connect all of my lines.
11. When you’re done, s ign your painting, peel off the tape, and show off your beautiful artwork!
Did you try your hand at Kati’s fall scene? Share it with us! Tag us on social media (@greenmountainclub, @watercolorwanderer) or email us a photo of your painting. We will pick a random submission by November 1 to send some GMC goodies!


