While your Santa’s hat is thoroughly drying, you can use a thin brush to paint on small snowflakes around the hat.
For the snowflakes start by drawing a cross (try to make the thin as possible to have an illusion of a small snowflake) and then draw on little lines of the edge of the cross (see photo for reference).
Steps for painting a santa face
5:45 pm by [email protected] & filed under Uncategorized.
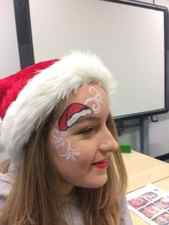
T o create your Santa’s Hat design you will need:
- White diamond FX
- Red Snazaroo (https://www.snazaroo.com/uk/)
- Black Snazaroo paint
- Thin brush
- Glitter
Step 1 for a Santa’s Hat
Using a petal shape sponge, dip into white paint and fan over the eye. For the edged to be less harsh, use a clean sponge to blend them out.
TIP: If you want to make your design a little bit more festive. Spray glitter on top while the paint is still slightly damp on the face.
Step 2
Secondly, using a thin brush dipped in white. Draw above the eyebrow arch a cloud-like shape and fill in, this will mimic the fluff around the bottom of the Santa’s hat. Use the white diamond FX paint to get a rich white pigmentation.
Take the medium size brush and paint on a triangle where the tip is slightly curved towards one side (just like a lopsided triangle). Then go ahead and fill in the red triangle. You should begin to see the formation of Santa’s hat.
Steps for painting a santa face
Login
Sign In
Sign in to earn & redeem your points!
Enter your email address and we’ll send you a link to reset your password.
By clicking any of the social login buttons you agree to the terms of privacy policy.
Sign In
Sign in to earn & redeem your points!
Enter your email address and we’ll send you a link to reset your password.
By clicking any of the social login buttons you agree to the terms of privacy policy.
cart
wishlist
✨ Save 15% Off with Code: GET15 !
Not sure how to start? Take the quiz.
Featured Categories
- Batman™
- ©DC
- Harry Potter™
- Inspector Gadget™
- Looney Tunes™
- ©Marvel
- Nickelodeon™
- Powerpuff Girls™
- Scooby Doo™
- Sesame Street®
- SpongeBob™
- Star Trek™
- Strawberry Shortcake™
- Superman™
- Teletubbies™
- TMNT™
- Tom and Jerry™
- ©WB
- Wildbrain
- Wonder Woman™
- Shop All Diamond Art
- New Arrivals
- Best Sellers
- Beginner Kits
- Back in Stock
- Low Stock
- Accessories
- Sale
- Pending Restock
- What is Diamond Art Painting
- New to Diamond Art?
- Step by Step Instructions
- Round or Square Diamonds?
- Our Artists
- Contact Us
- Insider Rewards Program
- Wishlist
- Not sure How To Start? Take The Quiz!
Become a Diamond Art Club Insider member for FREE and start your journey into calming creativity!
How to Draw Santa
Santa is a holiday icon and there’s so many fun ways to draw the jolly old elf. To help with seasonal art, I thought I’d share how to draw Santa with step by step instructions. It’s an easy drawing tutorial for kids to try at home or in the classroom, or use it as inspiration for your own unique Santa art instead.
It might seem complicated at first, but anyone can draw Santa Claus with a little bit of practice. Remember: it’s the imperfections that make your art unique; he doesn’t have to be perfect!

How to Draw Santa Step by Step
Follow these steps to learn how to draw Santa! This easy Santa drawing tutorial was designed to be simple enough for beginners and kids to follow.
-
Start with the eyes and eyebrows. You can give your Santa drawing any style of eyes you want. I went for a cute, simple design with eyelashes, but you could also do simple dots, closed eyes, or kawaii eyes too. Don’t forget to outline some bushy eyebrows; these will be left white later.


From there, draw the cheeks and join them about halfway into each side of the mustache. This will give Santa a face.
Finally, add the rest of the hat shape and finish it off with a puffy ball pom-pom to the top of the hat.


Draw one slightly slanted line on each side, then join at the bottom to create a bell shape for his belly. Add a second thinner curved line rectangle underneath. This will be the trim on Santa’s suit.
Give Santa some legs and boots. Sticking again to basic shapes, start from the bottom of Santa’s coat to draw two legs for his lower body. The legs should be slanted inward, basically a reverse from the larger shape you drew for the body. Give the legs a flat line on the bottom.
Next, draw the boot shape with a curve on the outer side. Finally, add another line just above each boot on the leg for the pant’s fur trim.

Add a belt. Now that we have Santa’s basic shape done, it’s time to add his belt. To draw the buckle, first start with a rectangle in the middle of Santa’s body just above the coat trim. Next, add the smaller rectangle inside to give the belt buckle definition.

Finally, attach the belt to each side with two parallel lines. The lines should be curved slightly to follow the shape of Santa’s body to make it look wrapped around. An easy way to do this is to just maintain the same distance between the trim and the belt.
Give him arms. The only thing missing now is Santa’s arms! I did one up and one down so it looks like he’s waving, but you can pose your Santa any way you want.
To draw the arms, add two parallel lines on the upper body in the direction you want Santa’s arm to go. I like to start them a bit wider at the shoulder and add a slight curve to both the arm shape and the end of the sleeve.
Once you have your arms drawn, add an extra line on the sleeves to define the coat’s white fur, just like we did for the pants.

Santa is always wearing mittens, which is great for beginner artists because they’re a lot easier to draw than fingers. The gloves with a thumb are still a bit tricky, though, so may want to practice the shape on a scrap piece of paper first. Or omit the thumb altogether, if you prefer.
Color him in Once you’re happy with your Santa drawing it’s time to color him in! Fill Santa with any shades and art supplies you like, or use this example as inspiration to practise your art shading technique.

To make the lines pop, I recommend tracing over them again in black once you’re done.
Ways to Use Your Santa Drawing
Now that you’ve learned how to draw Santa, why not try some of these other seasonal art and craft ideas?
Homemade Wrapping Paper
You can add your Santa drawings to plain paper to create your very own, DIY custom wrapping paper! Try drawing Santa in different poses or coloring him differently each time. This is a great activity to make gift giving more personalized around the holidays.
Create a North Pole Themed Picture
Santa is looking a bit lonely, isn’t he? Give him some friends and create your very own North Pole themed picture! If you don’t want to draw any more characters, try drawing a room around him or creating a fun background design instead.
Make Santa Painted Rocks
I love painting on rocks! Instead of drawing on paper, draw your Santa design on a large rock in pencil instead. Then paint him using your go-to rock painting technique and supplies for a cute Christmas decoration or gift idea.


