For the POSCA method, I drew actual light shapes, leaving a gap between the light and the string.
How To Paint A Cute Rudolph
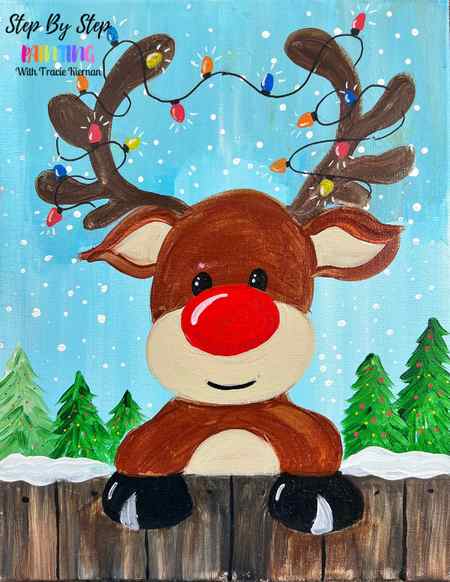
This is an adorable Rudolph The Red Nose Reindeer painting you can do with your kids or as an addition to all your Christmas canvas paintings!

Learn how to draw this Rudolph OR use my traceable! Then paint the design using my step by step guide.
I used quite a few colors in this one! A few were only used sparingly because of the lights. Also on one trial I did the lights with a 10/0 liner and acrylic paint.
Then I did another trial with the POSCA paint pens. I found the paint pens easier for these small details.

Enjoy and happy painting!!
Materials
Yield: One 11” x 14” Canvas

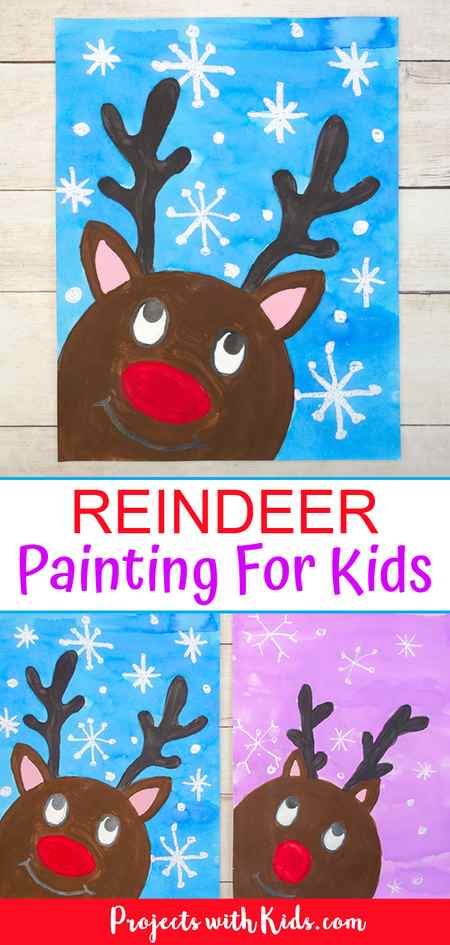
This adorable Rudolph painting is very easy and fun for the whole family and the kids! Learn how to draw the Rudolph step by step or use my provided traceable. Then paint it in using my step by step directions.
Prep Time 1 hour 30 minutes
Total Time 1 hour 30 minutes
Difficulty Easy, Kid Friendly
Materials
- Canvas 11 x 14
- Acrylic Paint
- Brushes
- Graphite Paper
- Traceable
- Paint Pens (optional)
Colors
- Light Blue Permanent
- Titanium White
- Mars Black
- Burnt Umber
- Burnt Sienna
- Unbleached Titanium
- Pyrrole Red
- Hookers Green
- (Optional colors for lights) Cad Orange, Cad Yellow & Primary Blue
Brushes
- 3/4 wash
- 12 Bright
- 4 Round
- 10/0 Liner (Or Paint Pens)
Create your own reindeer painting
This post contains affiliate links. As an Amazon Associate, I earn from qualifying purchases. If you would like more information please review my privacy & disclosure policy.

Supplies
- Reindeer printable (optional)
- White cardstock
- Acrylic paint in brown, black, white, pink and red
- Watercolor paint – we used liquid watercolors but you can use whatever type of watercolors you have
- White oil pastel
- Pencil
- Paintbrushes
- Paint palette
Instructions to make your reindeer art
1. First, decide if you are going to use one of the templates for your reindeer painting. Print the template out onto white cardstock. You will need to print it out smaller so that everything fits on the paper. Simply extend the lines for the head of the reindeer to the bottom of your paper after it’s printed.
Skip down to step 2 if you are using the fully drawn template.
If kids want to draw their own reindeer, then you will need a large plastic lid or cardboard circle template to start.

How to draw your own reindeer
Use a large plastic lid as a guide to draw the reindeer head in the bottom left corner of your paper. You want the head to look likes it’s only partway on the paper like in the photo above.
Next draw in the eyes looking up, a big red nose, a mouth, and the ears. Remember to draw the inside of the ears that will be painted pink.
Finally, draw in the antlers.
Start your reindeer painting
2. Use a white oil pastel to draw snowflakes and falling snow on your paper. Remind kids to press hard with their pastel, this will produce the best results.

3. Mix up your watercolor paint for the background. We used liquid watercolors for this step, I love how bright they are. Kids can choose any color background they like.
Using a flat brush, paint the background with your watercolor to reveal your snowflakes! Try and paint around your reindeer as much as you can, but it’s ok if some of the paint gets into the reindeer, the brown paint will cover everything up.
Let the paint dry before moving on.

4. Using a smaller round brush, paint the head of the reindeer with brown acrylic paint. To make things easier, outline the head and face with the brown first and then paint everything in like in the photo above.
Let the brown paint dry completely.

5. Paint the reindeer’s eyes with white paint, using a very small detail brush. Two coats of white paint may be needed depending on the type of paint you have. Once the white is dry, add in the black detail of the eyes.
Adding the black detail to the eyes could also be done using a black sharpie or paint pen to make things a bit easier for younger kids (or even older kids!).
6. Use bright red acrylic paint for the nose and pale pink for the inside of the ears.

7. The pencil drawing of the mouth most likely was covered up by paint, so draw in another mouth with a pencil. Paint the mouth with black paint using a very small detail brush or try using a black sharpie or paint pen.
8. Finally, paint in the antlers. We used black paint mixed with a bit of dark brown for the antlers.

This reindeer painting is so cute and was so fun to make! I love that it can be adapted for younger kids if you use one of the templates. Each reindeer will be unique!
We have made a couple of paintings in this same style for different holidays and seasons. Take a look at this sweet Easter bunny painting, this adorable Valentine’s Day panda art project, and this fun polar bear winter painting for more fun ideas!
Fill in the form below to gain access to my printable resource library!
After signing up you will receive a welcome email with all of the sign-in details.
Free Printable Resource Library!
Sign up for my email list and get exclusive access to my FREE printable templates!
Thank you!
You have successfully joined our subscriber list.
More art projects kids will love


Follow me on Pinterest for more amazing project ideas.
Pin this Christmas art for later
Yield: 1 reindeer painting
Step By Step Christmas Reindeer Painting
I was trying to think of something fun to paint for Christmas. I thought of Santa and snowmen and then I thought of cute reindeer. A reindeer was the winner…this time. Stay tuned for more Christmas step by step paintings in the near future.
Supply list:

- Canvas or card stock paper (at least 8×10)
- Pencil
- Paint brushes (med, & detail)
- Acrylic paints in the following colors
- Brown
- Tan
- Black
- White
- Red
- Green
- Lime green
- Bright blue
- Yellow
I like to start with a sketch so I can keep the proportions right.


We’re going to start with brown first. Paint the upper portion of his head around his eyes and the outer part of the ears. I like to outline the area I’m painting and then fill it in. I just find that easier.

Later on I realized I forgot to paint his neck brown too.

Next we are going to use our tan acrylic paint. Paint the inside of the ears and mouth area. Avoid the nose, but it’s okay to go over his mouth because it’s so thin.

Fill in the antlers with tan. I remembered to go back with the brown and paint the neck also.

Time to get the pretty, Christmasy red paint out! Paint the big nose, and holly berries red.

Next, you need a bright green to fill in the holly leaves. You can use a small detail brush for better control.

You can start filling in your Christmas lightbulbs. I used a lime green, red, bright blue and yellow for my bulbs, but feel free to use what you like.

Once I got my bulbs painted I filled the eyes in with black. Don’t worry we will make them pop later!

See?! Take the end of your small detail brush and dip it in the white paint. Make a big dot in the upper corner and a smaller dot in the opposite corner.

Now we can start with my favorite part, the highlights! Don’t worry about being perfect, just have fun! Dip your detail brush lightly in the white and highlight your lightbulbs, the antlers, the ears, holly berries and leaves and his cheeks.

Two things here, I painted the mouth back in using the brown paint and detail brush. Then I created a gray color by adding a little bit of white to the black paint and filling in the collar.

Now take that same gray color and fill in the bottom of the lightbulbs. Then we can finish up with the black paint. Take your black and paint your lightbulb wire and tiny lines on the bottom of the lightbulb screw-in part.

Take your black paint and start adding in the lowlights with your detail brush. Lightly outlining the head/face, neck, leaves, berries, bulbs, nose, ears and antlers.

I felt like it needed one more thing so I add the tiniest amount of the bright blue paint to the white paint to create a barely there blue. Take the very light blue and with your medium brush paint all of the empty space trying carefully not to actually touch the sides of anything. I thought it gave it more of a whimsical feel.

All done! I hope you love it as much as I do! Thanks for painting with me! Find my favorite craft paint to use here. Find paint brushes here.
Stop by again soon for more craft and decor ideas, kid’s crafts and step by step paintings!


