“A true historical painter . is one who paints the life he sees about him, and so makes a record of his own epoch”. This principle, voiced by the Impressionist Childe Hassam, was heeded by the artists whose contributions are the focus of this volume: the American Impressionists and the Realists of the generation that succeeded them. The authors of the book, which accompanies a major exhibition, illuminate the continuities and differences between American Impressionism and Realism, two movements that are traditionally viewed as merely opposed. They explore the roots of American Impressionism in European art, especially in the French Impressionists’ engagement with the contemporary scene. Also elucidated are the evolving responses of both the American Impressionists and Realists to the changing realities of life in the United States at the turn of the century, as the nation shifted rapidly from an agrarian to an increasingly industrialized urban society. In an examination of paintings that represent the country, the city, and the home – the triad of subjects that engaged the artists – these responses are shown to reflect a tension between enthusiasm for the new and a sense of loss of the rural past. Studying a wide range of painters, including John Singer Sargent, William Merritt Chase, Childe Hassam, John Sloan, William Glackens, and George Bellows, the authors offer new insights into the threads of nationalism, optimism, euphemism, and nostalgia that link the two movements. They demonstrate that these painters of modern life endowed their European-rooted art with a distinctly American inflection and produced a selective register of an energetic nation, revealing a complex commitmentto Robert Henri’s assertion that “painting is the giving of evidence”. The volume brings a new approach to this area of American art history, which has tended to be more descriptive than interpretive: it offers detailed historical and social contexts for the works and movements under consideration as well as penetrating stylistic analyses. Lavish illustrations of the paintings in the exhibition, comparative works and period photographs, a biography of each of the twenty-six artists in the exhibition, a selected bibliography, and an index are included.
18 Adorable Easter Crafts for Creative Kids
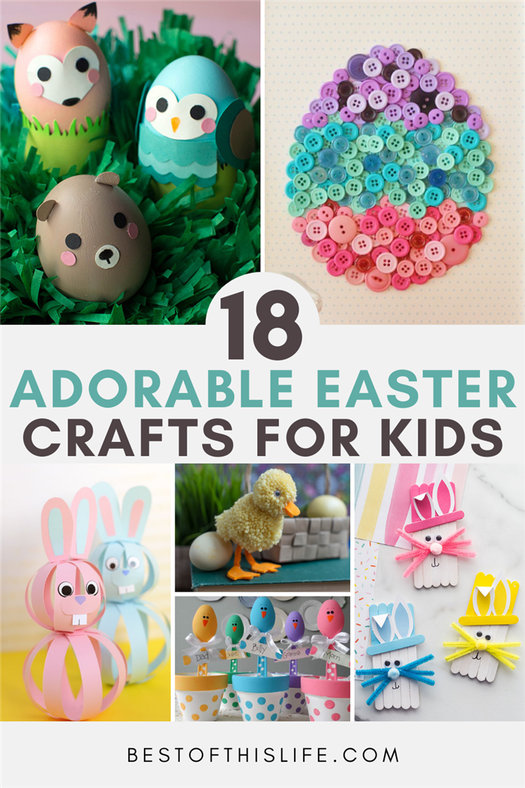
It’s that time of year again! The Easter Bunny is going to be hopping through our homes soon. Dropping off baskets full of goodies and hiding treat-filled eggs for our kids to indulge in!
But what are you going to do with your kids to get them excited and keep them busy on the days leading up to this fun-filled holiday? We think you should get your craft on, of course!
Make These Adorable Easter Crafts for Kids
To get you and your kids inspired for a carefree time of crafting we have listed 18 Adorable Easter Crafts for Creative Kids that you must try!

Easy Paper Bunny Craft
Photo Credit: www.easypeasyandfun.com
These bunnies are so simple and cheap to make, you probably have all of the supplies in your craft drawer.
Make It

Peek-a-boo Clothespin Eggs
Photo Credit: onelittleproject.com
In less than 5 minutes your child can have their very own surprise chick to play with!
Make It

Woodland Animal Easter Eggs
Photo Credit: liagriffith.com
Don’t worry if you don’t have the tools this tutorial recommends – the facial details are so straightforward they can easily be shaped with scissors.
Make It

Cardboard Tube Bunny Rabbit Family
Photo Credit: craftsbyamanda.com
Your kids can get as imaginative as they want when creating their own little families. Colours, facial expressions, accessories. the possibilities are endless!
Make It

Popsicle Stick Easter Craft
Photo Credit: www.thebestideasforkids.com
Kids everywhere will love making these adorable bunnies just as much as they enjoy eating the delicious frozen treats to get their main supply to make this craft!
Make It

Sock Bunny Easter Craft for Kids
Photo Credit: apumpkinandaprincess.com
If you’re looking for a cute and easy handmade Easter gift this tutorial is for you!
Make It

DIY Easter Bunny Candy Jars
Photo Credit: lifefamilyfun.com
Make these adorable little jars with your kids or surprise them on Easter morning and fill them with their favourite treats!
Make It

Happy Bunny in Egg Pouch Easter Craft
Photo Credit: www.sparklestosprinkles.com
This has got to be the most loveable little felt craft I’ve ever seen! How can you not look at that face and just melt?!
Make It

Toilet Roll Peeps Craft
Photo Credit: happyhooligans.ca
Everyone has toilet paper rolls lying around their house, I mean I can’t be the only one whose kids never throw them away, right? Put them to good use and make these colourful sugar-free peeps with your toddlers and preschoolers.
Make It

DIY Easter Egg Button Craft
Photo Credit: acultivatednest.com
This lovely picture-framed DIY Easter art could add the finishing touches to the spring decor in any of your rooms.
Make It

Bunny Canvas Easter Craft
Photo Credit: modpodgerocksblog.com
Make this simple decoupage project your own by personalizing it with any colour of leftover tissue paper you already have and whichever bunny silhouette you prefer.
Make It

Easy T-Shirt Yarn Bunny
Photo Credit: www.redtedart.com
Upcycle your old t-shirts to make these charming little bunnies!
Make It

How to Make a Bunny Puppet
Photo Credit: www.skiptomylou.org
This beginner sewing project will bring hours of imaginative fun to your child’s day!
Make It

Easter Gingerbread Peeps House
Photo Credit: www.itsalwaysautumn.com
Looking for an edible Easter craft your kids can make? If so, these graham cracker Peeps houses are right up your alley!
Make It

Easy Painted Easter Egg Rocks
Photo Credit: www.projectswithkids.com
Rock painting is all the craze right now – there are even local Facebook groups which means it must be serious! Paint these rocks with your kids and hide them in your area to make someone’s day extra special!
Make It
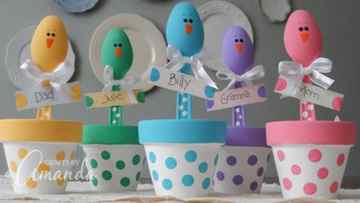
Plastic Spoon Chicks for Easter
Photo Credit: craftsbyamanda.com
These colourful plastic spoon craft can be personalized for a cute DIY Easter placeholder that your guests can take home with them.
Make It

Egg Carton Bunny
Photo Credit: www.thebestideasforkids.com
Your kids will love not only painting egg cartons, but they will also love knowing that they are helping the environment using recycled materials.
Make It

Yarn Pom Pom Animals Kids Craft
Photo Credit: liagriffith.com
Keep your kids occupied with these adorable yarn farm animals that just so happen to be the prominent symbols of Easter.
Make It
Follow me
Contributor at The Best of This Life
Amanda Komoski enjoys cooking, crafting,photography and writing. She was born and raised in Winnipeg and has since moved to a small town in Manitoba with her husband and two wild boys. She is a coffee drinker by day and wine drinker by night who loves connecting with others and inspiring their creativity by sharing delicious recipes, clever crafts and DIY projects that you are going to love!
Follow me
- 17 Elegant New Year’s Eve Cocktail Recipes – December 28, 2021
- Easy Christmas Cookie Recipes to Try This Holiday Season – November 20, 2021
- 19 Homemade Christmas Gifts You Can Make with Your Cricut – November 10, 2021
Storing Sugar Cookies
- To prepare dough in advance: Prepare dough, form into disks, and wrap with plastic wrap. Refrigerate for up to 4 days, or freeze up to two months. Thaw in the refrigerator overnight before rolling.
- Storing baked sugar cookies: Store cookies in an airtight container at room temperature for up to one week. Freeze for longer storage.
- 3 cups all-purpose flour
- 1 tsp. baking powder
- 1/4 tsp. kosher salt
- 1 cup unsalted butter, softened
- 1 cup granulated sugar
- 2 eggs, at room temperature
- 1 tsp. vanilla extract
- 1 tsp. almond extract
Directions
Combine dry ingredients:
In a medium-sized bowl, combine flour, baking powder, and salt. Set aside.
Make dough:
Using an electric stand mixer, beat butter and sugar until smooth and creamy, about 2 minutes. Add eggs one a time, beating to combine between each addition, vanilla extract, and almond extract; beat until combined. Reduce mixer speed and gradually spoon flour mixture in with butter mixture, beating on low speed until dough is smooth and well-blended.
Chill dough disks:
Turn dough out on work surface. Cut dough in half and shape each portion into a compact disk. Wrap separately in plastic wrap and chill for 30 minutes to 2 hours.
Cut out cookies:
Preheat oven to 375°F. Unwrap 1 dough disk and roll on lightly-floured work surface to 1/4-inch thickness (lightly coat rolling pin with flour to prevent sticking). Cut into chosen shapes and place cookies 2 inches apart on parchment paper-lined baking sheets. Refrigerate cookies on baking sheets for 5 to 10 minutes to help them keep their shape when baked.
Bake cookies:
Bake in preheated oven for 8 to 10 minutes, or until cookies just start to turn golden around the edges, rotating halfway through baking. Cool cookies completely on wire racks, about 20 minutes. Repeat process with remaining dough.
Frequently Asked Questions
Why is my sugar cookie dough sticky or crumbly?
If your dough is crumbly, you may have added too much flour (be sure to spoon and level for accurate measuring). If your dough is sticky, your butter may have been too warm before mixing, or you may have mis-measured your dry ingredients. Chill your dough for additional time until firm before rolling on a floured surface.
Can I add other flavorings to sugar cookies?
Zests, spices, and extracts can all be added to sugar cookie dough for additional flavor. Try pumpkin spice in the fall or peppermint extract around the holidays. Cocoa can also be added in the place of some of the flour for a chocolate sugar cookie.
What’s the difference between sugar cookies and butter cookies?
Butter cookies and sugar cookies both make for buttery cookies with a tender crumb and crisp edge. Butter cookies typically contain a higher percentage of butter per recipe.


