How to Paint a Portrait: 38 Portrait Painting Tips

If you’ve been searching for free lessons on how to paint a portrait, Artists Network has you covered! Discover 38 portrait painting techniques, explained in specific, sequential steps you can remember and repeat. From the positioning of the figure to the details of the background, this easy-to-follow process on how to paint a portrait will give you the discipline and focus that the difficult art of portraiture demands. See your portrait paintings come to life with the help of this free portrait painting techniques ebook. From the empty canvas to your completed masterpiece, this downloadable guide of watercolor portrait and oil portrait instruction is perfect for the aspiring portrait artist, whether beginner or experienced.
What’s inside this free art lesson on how to paint a portrait?

Learn key techniques to create stunning painted portraits from two expert portrait painters in this beautiful eBook.
Whether you are a veteran at painting portraits, or simply want some basic oil portrait or watercolor tips, this free lesson is one you’ll turn to again and again. Discover why thousands of artists have followed both Rogers’ and Sanden’s guidance on how to pose and lighten their subject, and paint an accurate and satisfying painted portrait. The value of these instructions is in the way they systematically guide artists through the entire process.
Portrait Painting Demonstration
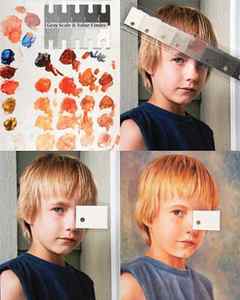
- Sanden begins by establishing the size and placement of the figure’s head on a stretched canvas, and then he draws the elements of the model’s face.
- Once he is confident about his drawing, he masses in the warm shadows in the hair, along the side of the face, and in the neck area, gradually giving life to his oil portrait.
- He then paints the shadows in the lower third of the face.
- Sanden lightens the value of the flesh color and paints the middle third of the face; then he uses an even lighter color to block in the forehead.
- Before refining the painting of the face, the portrait painter blocks in the background and blouse to have references with which to judge the relative value and color temperature of the flesh tones.
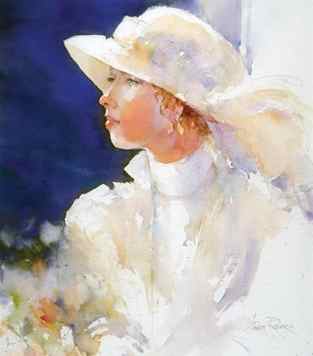
Watercolor portrait artist Janet Rogers makes the process of painting watercolor seem almost effortless in that she captures the likeness and personality of her subjects without laboring over all the details. She incorporates gestured strokes of transparent color, natural blends of warm and cool pigments and just enough detail to capture a person’s individual appearance. Rogers has developed advanced watercolor techniques, yet still understands what the rest of us are trying to learn and how much encouragement we need.
Although Rogers’ techniques are not so easy to master, her demonstrations make it clear she can teach almost anyone to improve their skills in watercolor portrait painting. She emphasizes the need to practice, to start over when things fail, and to develop strong drawing skills. She connects with students by confessing that she shares the same need to constantly remind herself about the important steps that must be taken when painting portraits.
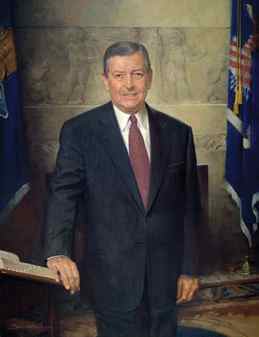
Fellow artist John Howard Sanden as he breaks the process of oil portrait painting into detailed stages of development. Learn where to begin and how to prepare for achieving a masterpiece. Learn to capture the likeness of a person’s facial structure and features with hard edges that bring attention to the most important areas of the painting. What better way to learn than from following the steps of one of the most experienced portrait artists? Download your copy of these painting portrait techniques today and learn how to create painted portraits that are sure to get attention.
Sanden’s career as a portrait artist has spanned three decades. He is widely regarded as one of the foremost teachers of professional oil painting methods, and he has toured the nation teaching his ideas and painting oil techniques to thousands of artists. He has been commissioned to paint more than 500 public officials, business leaders, and private individuals, and he is represented by several major brokers. In 1994, ASPA presented Sanden with their first John Singer Sargent Medal for Lifetime Achievement.
This is just the beginning…
This free oil and watercolor lesson walks you through specific steps to make portrait oil painting and watercolor portrait painting easier. In addition to 38 total portrait painting techniques, you’ll also receive visual insight from top portrait artists to guide you through how to paint a portrait.
Follow the steps of generations of painters who have launched their careers by reading Sanden’s and Rogers’ advice. Learn these painting oil techniques, and expert insight to develop your own painted portraits. Can’t wait to start your lessons on painting oil portraits and watercolor portraits? Get your free eBook now!
Submit The Form To Download
*By providing your email address you will begin to receive our newsletters, special offers and more free content from Artists Network.
Download Your Free Guide on How to Paint a Portrait Today!
Have a technical question?
Join the Conversation!
[…] eyes follow you no matter where you stand in the room. The eyes in the image below are from a portrait painting of John’s, The Street Musician, Venice. Visitors to the studio often remark that the figure […]
[…] many self-portraits, the artist’s status can come into play. Centuries ago, Diego Velázquez famously depicted […]
Comments are closed.
Techniques for painting a face on canvas
The paintings of the Old Masters fill us with awe due to their colours. But the pictures we see today in our art galleries, safely preserved for the modern age, differ from what the artist’s contemporaries would have beheld.
One of the characteristics of oil paintings is that they change over time. This is influenced by the paints selected by the artist, the technique used, the finish applied to the work and the conditions in which it is stored. And that’s to say nothing of the tiny mistakes that a talented master may have made while experimenting with new techniques. It’s for this reason that what we see on the canvas may, over time, start to differ from the original work.

Nightwatch by Rembrandt van Rijn
The Old Masters’ Painting Style
Oil painting is a technique that comes with a huge advantage: the artist can spend years painting the picture, gradually shaping the outline and painting in the details with thin layers of paint (a glaze). Corpus-based painting, whereby artists try to give their painting an air of completion straight away, is not, therefore, typical of the classic oil painting style. Deliberately applying the paint in layers makes it possible to achieve remarkable hues and effects, since, during glazing, each previous layer is visible underneath the next one.
The Flemish painting technique, so beloved by Leonardo da Vinci, involved the following stages:
– On a light ground, a sketch was drawn using one colour, with the outlines in sepia and the main shades;
– A thin underpainting was then painted, with the contours of volume;
– The final stage was the application of several glazed layers of overtones and the detail.
Over time, however, Leonardo’s dark-brown outline began, in spite of the thin layer, to show through beneath the painted image, making the painting turn darker in the shaded areas. In the main layer he often used burnt umber, yellow ochre, Prussian blue, cadmium yellow and burnt sienna. The final layer of paint that he applied was so thin that it was impossible to see with the naked eye. The sfumato (‘toning down’) method that he himself devised enabled him to do this with ease. The secret to it is to use a very watery paint and a dry brush.

Mona Lisa by Leonardo Da Vinci
Rubens, Velazquez and Titian all used the Italian method. It involves the following stages:
– Applying a coloured ground to the canvas (with any pigment added);
– Transferring the outline of the image onto the ground using chalk or crayon and rendering it with a suitable paint;
– An underpainting, thick in places, particularly in the areas of the painting that are illuminated, and completely absent elsewhere – with the colour of the ground left as it is;
– The final work with 1 or 2 semi-glazes, or, less commonly, with thin glazes. In the case of Rembrandt, the layers in his paintings could be up to a centimetre thick in total, but he was an exception.
In this technique, special attention was paid to applying additional covering shades, which made it possible to neutralize the saturated ground in places. For example, a red ground could be neutralized using a grey-green underpainting. This technique was faster than the Flemish method, so clients commissioning paintings preferred it. If the wrong pigment colour and final-layer shade were chosen, however, the painting could be ruined.

The Portrait of Paus Innocentius X by Diego Velazquez
The colours of the painting
To make a painting harmonious, the power of overtones and complementary colours is brought to the fore. There are also some little tricks that can be used, such as applying a coloured ground, as is customary in the Italian method, or covering the painting with a pigmented varnish.
Coloured grounds can be glue-based, emulsions or oil-based. Oil-based grounds are a pasteous layer of oil paint of the required colour. While a white primer creates a glow effect, a dark one lends depth to the colours.
Rembrandt painted on a dark-grey ground; Rubens used the English red and umber pigments. A darkening of the canvas was the fate that awaited anyone using too many earthy colours (sienna, umber, dark ochre, etc.).

The Union of Earth and Water by Rubens
Varnishing
Besides earthy colours which grow dark over time, resin-based finishing varnishes (rosin, copal, amber) also alter the brightness of the painting, lending it yellow hues. In order to age a canvas artificially, ochre pigments, or any similar ones, are specially added to the varnish. Over-zealous attempts to make the canvas darker will probably result in there being too much oil in the work, however. They could also lead to cracks appearing. This ‘craquelure’ effect, however, is usually associated with the use of half-wet paint, which cannot be used in oil painting: artists only paint on a layer that has dried out or one that is still wet, otherwise it will need to scraped off and painted again.


