I melted the isomalt in tiny silicone baking cups in the microwave. This allowed me to make tiny batches for the itty bitty details, and after the isomalt hardened the cup released the hardened sugar easily! Here’s where I got them:
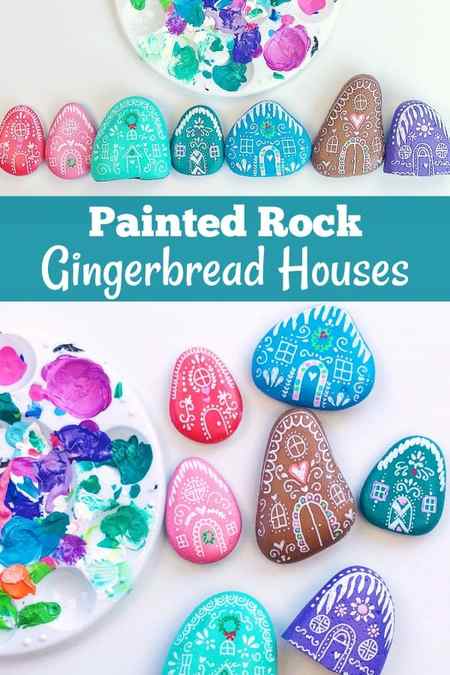
Painted Rock Gingerbread Houses

I love decorating gingerbread houses at Christmas time so I thought it might be just as fun to create painted rock gingerbread houses as a fun Christmas rock painting craft. You could use this same concept and also turn your houses into painted rock fairy houses as another great option. Not only do these painted rock gingerbread houses make for fun decoration around the holidays, but they are great keepsakes to include with your gifts in place of a regular card.
Painted Rock Gingerbread Houses Supplies
- Rocks – Amazon has some great options for rocks if you are having trouble finding smooth rocks to paint on.
- Grey smooth stones
- Light colored smooth rocks
- 3″-5″ smooth stones
- 2″-3″ smooth rocks.
- FolkArt Acrylic Paint
- Martha Stewart Living Acrylic Paint
- I used this Posca ultra fine paint pen in white for the gingerbread house details and then used colors from this extra fine Posca Paint pen set for the details. You could also use this smaller Posca paint pen set for the colored details. I use these markers quite often on painted rocks as well as on my mason jar crafts and have even used them to decorate furniture.
- I also really like this paint marker set by Artistro as another option.

How to Make Painted Rock Gingerbread Houses
They look complicated but these gingerbread house painted rocks are actually really easy to make! Check out the video to see how I made them. Or if you’d rather written instructions, there’s a full step by step tutorial with pictures below.
Watch the video and then see the instructions below:
Painted Rock Gingerbread Houses Directions
1. Paint the Rocks With Primer
You can apply acrylic paint directly to the rock however I prefer to first spray the rocks with this flat white paint and primer. It makes it MUCH easier to paint colors onto the rock when you start with a white base. It also makes the colors brighter and bolder.

2. Add a Base Color
When selecting your base paint colors, have fun with the color sections! Don’t feel like you have to only use the typical gingerbread house colors. Make sure you let it dry before you move on.

3. Draw the Gingerbread House
Using a white paint pen, add in the details of the gingerbread house.
4. Add Details
Using colored paint markers, add additional house details like wreaths, candy accents, hearts and more.


5. Apply Sealant
Once your rocks are finished and completely dry, spray them with a protective sealant.

Give your finished gingerbread house painted rocks to friends and loved ones or leave them around town for someone to find. They are a great way to spread holiday cheer. And don’t forget to come share with me a picture of your painted rock gingerbread houses on Instagram or Facebook! I love showing examples of my tutorials being made!
Tips for Painting Gingerbread Houses
Use the door as your focal point and create your design around it. You don’t have to be an amazing artist to draw the cute designs and swirls that make these gingerbread house painted rocks so unique.
Don’t forget to add windows to make it really look like a house!
Get My Rock Painting Book
Want more rock painting and decorating ideas? Order my latest book, The Rock Art Handbook on Amazon. It has over 30 different rock art tutorials featuring dot painting, marbling, embellishments, decoupaging and much more. In the book I go in-depth on different art supplies that you can use on rocks and provide a ton of tutorials to get your creativity flowing.
Introduction: Food Art Tips for Makers – Epic Gingerbread Condo
By TechnoChic Go to TechnoChic.net! Follow
More by the author:


About: Hi! I’m Natasha. I’m a Tech-Crafter, Maker, and the Designer of TechnoChic DIY Tech-Craft Kits. Technology should be chic! More About TechnoChic »
You can’t always get what you want, but you CAN make it! This gingerbread house is a replica of our real-life renovation that was canceled. We wanted to see the plans come to life anyway!
I hadn’t worked with food before, and I was pleasantly surprised that many of my maker skills translated to food sculpture quite easily. I’ll share what I learned below!
Here’s a 7-minute timelapse of the 7-day Gingerbread House build:
Here’s the full story behind the renovation and design:
Add Tip Ask Question Comment Download
Supplies
Fairy String Addressable LED Lights with controller: https://amzn.to/37y4Ukl
Wilton Texture 2-Piece Mold Set, Cobblestone/Wood: https://amzn.to/35SPmr3
Reusable Silicone Baking Cups: https://amzn.to/3KQskQl
Judee’s Complete Meringue Powder Mix: https://amzn.to/3ic6A56
Add Tip Ask Question Comment Download
Step 1: Make an “Easy Scale” Drawing
- I enlarged my floorplan drawing so that 1 inch = 1 mm. This gave me a manageable scale and made it easy to translate measurements for furniture, appliances, and other items without doing any math.
- I printed out the floorplan, laid it over two sheets of foam core, trimmed it to size, and covered it with packing tape to make it waterproof.
Add Tip Ask Question Comment Download


