Avg Rating :
Shark ! easy rock painting tutorial – rock 11.

This one was painted as I live on the coast of the Great Barrier Reef. We are known for great White Sharks in Australia.
This is such a fun rock to be hidden in our area as we have many tourists who absolutely love finding a shark rock hidden along their walkways.


Draw the Shark image onto your rock, there are many ways to do this but I would like to share my method with you.
I first draw my image on to the rock using a HB mechanical Pencil , When I am happy I go over the image with Fineline acrylic paint pens .
If you would like to follow this method exactly here is the tutorial LINK that shows you how, such a simple step to help get your image on to the rock.

Check your outline is touch dry … this is important as you do not want your pens / paint to bleed.
Colour in the image using your acrylic paint or acrylic paint pens. Start with one thin layer and let it dry. Add another layer for coverage if it is needed.
#TIP you will always get an even finish building up the layers. This is for Acrylic Paint or Acrylic Paint Pens

Grab your black fineliner Paint Pen (available here) and draw in all the outlines on your image.
Now is the time to draw in the face details as well. Wait for the colours to dry, then draw in the lines then there is less chance of your pen bleeding.
Let the previous paint lines dry, now add in some highlights and decorations.
With the white, add some highlights to your shark to create little areas of light that have landed on your Shark. This is done with some smaller shapes, dots and dashes. Add in the teeth and using a light blue add some waves to the water.
Have you joined us on Social Media? We would love to hang out with you there, jump on these links & come introduce yourself.


Click on our “Let’s Learn Links” below to learn some great techniques.


Below are some awesome products we used to create this tutorial and many others. If you need supplies, consider buying through us. The seller pays a small commission (not you) and this contributes to the costs of sharing tutorials. More products can be found here SHOP NOW
How to Paint a Shark in Oil

Avg Rating :
Silver Level or Higher Class
- Class Description
- Read Class Reviews
Class Description
In this class we will paint a great white shark.
During the class you will learn:
1) How to change the colours from the photo to liven up your painting
2) How to paint the shark
3) How to make the teeth look fierce
4) How to paint the water surface
5) How to paint the water reflections on the shark
For the class you will need:
1) 400mmx 300mm canvas (roughly 16″ x 12″)
2) Titanium White, French Ultramarine & Cadmium Orange
3) Set of bristle brushes
4) Fine liner
Latest Reviews
No Reviews Yet
Unlock the Follow Along Class HERE
Finding the correct ocean colour mix

To achieve the varying colours of the water, experiment with French ultramarine blue and gradually add white to it (pulling the blue down in a column and running the white up the column). Blend them lightly with the paint knife to give a tonal-range effect. Do the same with Prussian blue and white; cobalt blue and white; phtalo blue and white; and cerulean blue and white. The French ultramarine blue seemed to be the closest match and will be the one used to paint the ocean once the shark is painted.
Mixing the paints for the shark
To create the shark’s gray colour, start with a mixture of ultramarine blue and a bit of orange to use as the darkest tone. To that mixture, work with some white and a bit of blue to make three other tones, gradually lighter and lighter.
Preparing to paint

Use your preferred method to transfer the shape of the shark to the canvas.
Painting the shark’s head – roughly
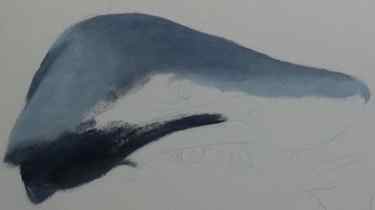
Begin by painting the dark gilled area of the shark and the dark ridge over the mouth. Then paint the next lighter patches and continue on to the lightest area on the top of the shark. Roughly blend them together. Move to the nose area and follow the same technique back to the eye area. Roughly blend that section.

Next, begin lightly blocking in the underside, starting with the lightest colour. Add the light patch over the mouth. Follow your reference photo for the correct application of darks and lights at this point. Do rough blendings as needed. Be sure to clean your brush when working with the lights.

Use a fine liner brush to paint the nostril and the various tones around it.

Begin lightly painting the tonal ranges around the mouth and below it. Use the same technique to paint the tones just beyond the eye area. Blend.

Using a soft filbert brush and the second darkest colour, paint the top of the shark to give the illusion of rounding away to the other side. Blend it in.
Painting the details on the shark’s head

Begin by painting the white spot at the tip of the shark’s nose. Keep referring to your reference photo and add bits of paint where needed to correct any areas that are either too light or too dark. Do more precise blendings.
Painting the eye
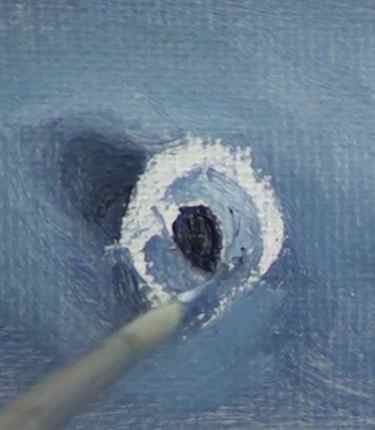
Lay down the darkest shade to the left of the eye. Blend the lighter colours around it. Get a small fine liner brush and paint the very oval-shaped center (pupil) of the eye. Work in small semi-circular tonal changes as you move away from the center. Keep checking your reference photo. Dab on some white highlights and add the dark shadows. Continue making highlights next to shadows.
Painting the dorsal fin

Using a bristle brush, begin painting the dark colour on the right edge of the dorsal fin. Work your way to the lightest colour. Use a soft filbert brush to do the blending. Finish up the fin with some neat white to create a highlight along the left side.
Back fins

Using the bristle brush, lightly block in the darkest colour and use the lighter shades as you move closer to the body. Go back to the dark shade with a soft filbert or fine liner brush to blend and add the details.

The small triangular section of fin can be done with the same brush, painting it all in with the darkest shade. Do the same for the small fin at the bottom back of the shark.
Pectoral fins

Use your second lightest shade to start painting this fin. Note the technique Nolan uses for creating distance between the fin and the body on the right, then how it attaches to the body in the center. Blend. Add highlights.
Painting the gills

Block in the darkest colour first. Paint the shape of the gills. Extend the lightest colour under the gills out to the edge of the shark. Blend as you go. Add the darks, clearly defining the gills with a soft filbert brush.
Painting the teeth

Begin by blocking in the darkest shade around the teeth, darker at the top of the mouth where there is less light. Use the second darkest shade for the left bottom side of the mouth, and the second lightest shade on the right side. Alternate lights and darks as needed to finish filling in the right corner of the mouth. Use the same technique to fill in the remainder of the mouth. Add highlights and shadows as needed.
Using a soft filbert and your second darkest colour, fill in the area to the left side of the mouth. Add other darks and lights as seen in the reference photo to complete that section. Blend to create a rounding effect.
Painting the background

Move the remaining shark colours off to the side of the palette and clean your brushes.
Remember that in painting the ocean, the water will appear lighter at the top and darker as it gets deeper.
Use ultramarine blue straight out of the tube for the water at the ocean bottom. Add white to create lighter and lighter shades as you come up to the surface. Block in the water, leaving a small gap along the edge of the shark. Use a smaller brush to go back and carefully fill in up to the edge of the shark.
Then go back and make all brush strokes horizontal.


