- A small sea moss twig.
- A pair of small scissors to shape the twig.
- A pin vise with a 0.8mm bit to drill a hole in the ‘trunk’ and to insert a piece of wire for added stability.
- A piece of very thin wire or a needle.
- Plastidip to cover the entire ‘Meerschaum’ twig for added stability.
- Wood filler to create a realistic bark texture and to give the sea moss more strength.
- Acrylic paints: Black, grey and white to paint the bark.
- Fast setting glue, I use Insta-Cure+ to fix the foliage net in place.
- MiniNatur foliage net. The birch nets come in spring, summer or autumn varieties. I used half of a small sheet.
- A broad brush and a very fine brush.
Embellish Any Acrylic Pour With Easy Painted Birch Trees
I love to draw and I love to paint. When I was introduced to acrylic pouring, it had a significant impact on my life. Primarily, it renewed my interest and desire to get back in the studio and create. Then when I discovered how fun it is, I was hooked—well, fine, addicted (see my last article).
Within months, I was looking at some of my pours and wondering “what else” I could do with them. So I attempted painting trees over one pour, then another and another.
I decided to experiment with birch trees because they were white and would really show up nicely on a dark pour, of which I had many. Finally, when I finished one I really liked, I posted it on the Acrylic Pouring Facebook group.
Supplies I Used
Well, I got a lot of favorable feedback, and you know me—that just encouraged the narcissist in me to do more. Tell me you like what I do and you’ll eventually have to tell me to STOP, because, like Forrest Gump, I’ll just keep going and going!
One such encouraging bit of feedback came from Maggie Schirmer. She has her own Facebook group called Ready, Steady Pour—out of Australia. Maggie and I have been exchanging praise and admiration for one another’s work for a few months now, and one day she sent me this private message:
“Hi Patricia, I love your articles you write for AcrylicPouring.com, especially the first one. I was wondering if you’ve thought of writing one showing how you do a basic tree embellishment—post pour? Just a basic silhouette in black so beginners can follow along easily. More advanced skilled people will know how to add the detail. Just a thought. What else are you thinking of writing?”
Man, you should have seen my head; it was HUGE. I was so thrilled to receive the compliments and to be asked to demonstrate my technique so others could do what I’ve done. I told her that I would get right on it. It was gratifying, so naturally, I took her request to heart and here we are.
I sat down at my art table in my studio (a.k.a., the desk in the middle of my living room) and began to collect all my supplies and prepare my tripod (newly purchased) and iPhone so I could share my embellishment skills with the world.
I visualized tens of thousands of artists sitting in front of their canvases while constantly checking their Facebook feeds for my newest article. Okay, maybe not tens of thousands, but it was fun to joke with my husband about my fans “waiting on me.” I’m a 57-year-old grandma; it doesn’t take much to float my boat.

I took this request quite seriously because I wanted to make my new friend Maggie proud. I recorded myself painting the most lovely birch trees. They were probably the most beautiful ones I’ve ever done.
It took me most of the day to record because I kept the lesson slow, methodical, and very detailed so that basically anyone could pause the video at any time and recreate what I had just done. I was quite proud of myself.
When the painting was completed, I attempted to upload the video to my editor at AcrylicPouring.com, only to learn that I had one segment that was too long. I mean like The Gettysburg Address too long. I couldn’t upload it to save my life.
I had three small segments at the beginning and two at the end. This particular segment was the bulk of the flippin’ lesson. I called my daughter in Russia (she’s very smart) to ask for her advice—no luck.
I downloaded an app that said it could help me trim and slice (no pournography jokes, please) a video—no luck. Well, I’m sure someone with some technology savvy could, but it was way over my head. I struggled for four or five days attempting to upload this monstrosity, to no avail. I finally decided my sanity was more important than salvaging this #7@BLEEP%*-ing video.
So I deleted it and sulked for a day…well, maybe three. When I finally got tired of feeling sorry for myself, I went back to the studio and tried again. This time with notes and timers all over the place to remind me to keep checking the camera and ensure I did not go over 10 minutes per segment.
I must admit, my heart was not as committed this time, as I had put my everything into the first attempt. I had to really work hard to make this video friendly and light, because emotionally I was just exhausted from my lost 28-minute video and the past two weeks of total failure.
My re-creation was much shorter, but I did teach how I make birch trees. I hope you’ll find this informative and that it will jump-start you on the path to making your own embellishments “after the pour.”
If you have a question about this particular lesson or about acrylic pouring in general, please let me know in the comments. I really do love painting these beauties and hope you will, too.

A couple of last “take aways” for you:
- Pay it forward. If you like an artist’s work, tell them. Whether it’s on Facebook or in real life—at your neighbor’s home, at festivals, wherever. Sure, buying someone’s work is great—exceptional, really—but a genuine compliment goes a long way.
- If someone takes the time to praise your work, don’t throw the compliment away (“Aw, no it isn’t”) or (“Well, I’m just a beginner”). Simply be gracious and say thank you.
- If you don’t know how to use electronics properly, don’t give up. Ask a 10-year-old. They will hook you up.
- If you are recording yourself, try to keep the video under 10 minutes per segment.
- Keep on painting!
Born in France, Patricia now calls Palm Coast, Florida, home, where she runs Oceans Apart Studios. She’s had the pleasure of raising two daughters and nineteen medical foster children. Now she specializes in watercolor, acrylic pouring, and custom jewelry taken from the run off of her paintings. Her pieces aim to capture the differences that make each woman uniquely beautiful. Check them out on Etsy.
Some facts about birch trees
Birches are broad-leaved deciduous hardwood trees of the genus Betula, in the family Betulaceae. Given there are a number of varieties we first have to decide which species we would like to depict. Not all birch trees feature the black and white bark one usually associates with them. Given this feature really makes them stand out, I decided to make a silver birch (betula pendula). This species is native to Europe and can thus be used for many periods of time and regions. In southern Europe it can only be found in higher altitudes, so it might not be your first choice if you want to give your table a mediterranean feel.


The twigs of the silver birch are slender and often pendulous, the leaves roughly triangular with doubly serrated margins. Comes autumn they turn yellow before they fall off and create a beautiful contrast with the white and black bark. On a related note, model builders and gamers love the seed pods of birch trees. They provide perfectly shaped 28mm scale ‘leaves’ for decorating bases.

Sea moss – practical considerations
If we look at the sea moss branches out of the box their natural shape works well to depict the silhouette of a silver birch. One small twig is enough for a medium-sized birch tree in 15mm scale. If you intend to make birch trees for 28mm, you need a wire armature that you can add to using the sea moss. However, for 15mm all we need to do now is to shape the branch, add some bark texture and finally drape a foliage net over it.
The entire process without drying time takes about an hour. The tree holds up well to the trials and tribulations of the gaming table, but you cannot just toss them in a box and hope the best. They will break if handled without care, even though the Plastidip and filler add some strength.
What you need

- A small sea moss twig.
- A pair of small scissors to shape the twig.
- A pin vise with a 0.8mm bit to drill a hole in the ‘trunk’ and to insert a piece of wire for added stability.
- A piece of very thin wire or a needle.
- Plastidip to cover the entire ‘Meerschaum’ twig for added stability.
- Wood filler to create a realistic bark texture and to give the sea moss more strength.
- Acrylic paints: Black, grey and white to paint the bark.
- Fast setting glue, I use Insta-Cure+ to fix the foliage net in place.
- MiniNatur foliage net. The birch nets come in spring, summer or autumn varieties. I used half of a small sheet.
- A broad brush and a very fine brush.
Remove any dry leaves from the twig and clean up the lower section, carefully removing some of the fine twigs to achieve a clearly distinguishable trunk section. Mount the twig on a piece of styrofoam, but don’t drill a hole in the trunk yet.
Cover the entire twig in Plastidip. This pretty much rubberizes it. You can use the aerosol spray can for this step or decant some of it and use a brush. You might need several coats to achieve a flexible and durable coating. Let cure.
With the help of some wood filler add some texture to the trunk and other twigs in the lower parts of the tree. This also adds some thickness. You can also use caulking for this step if you want to preserve the flexibility of the rubber coating.
Painting the birch
Mix pale grey and paint the entire twig. If the natural colour shines through in some areas this will add some nice colour variations. Now mix a dark grey and add some irregular patches to the trunk and thicker twigs. With some more thinned down shades of dark grey you can add the characteristic horizontal dark lines birch bark has. Finally, with a very thin wash of grey add some colour variation to the lower sections of the trunk.
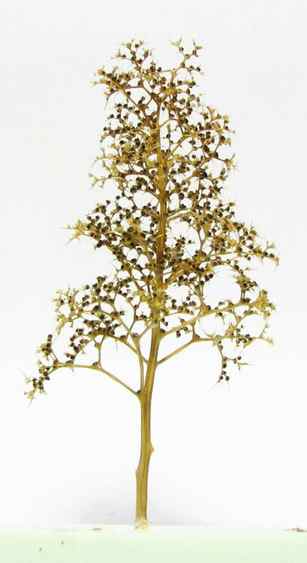


Adding the foliage
MiniNatur products come in sheets, so you have to cut the sheet to size and tease it carefully apart to make the shape more irregular. Apply some fast setting glue and attach the foliage to the twig. Less is more, as you want the tree to look light and airy.
After the netting is applied, remove the tree from the styrofoam base and drill a hole in the trunk. Insert a piece of wire and secure with glue. Now you can pin it to your gaming table and easily change its position or you could make a base for the tree featuring a magnet to make transport easier.

I hope you enjoyed this tutorial and please comment down below if you have suggestions or would like to share your own techniques to achieve realistic trees.


