Simply just paint on small circles for the mouth and eyes then hot glue larger buttons onto the belly of the snowman.
Tips for painting a snowman on wood
Do you let your students make gifts for their families? This is something that I truly enjoy doing. My students enjoy it too!
This post contains affiliate links for your shopping convenience. I earn a small commission each time someone makes a purchase through one of my links. For more information about my Disclosure Policy, please visit this link.
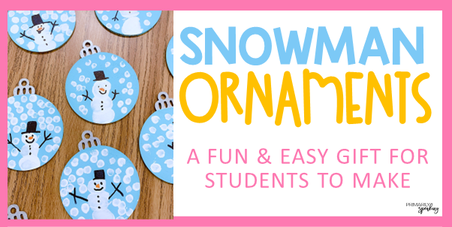
Several years back, I made a wood slice snowman ornament with my class. It was a hit and I’ve made this same ornament ever since. This year, I am making the same ornament, only this time, I will be using a different kind of wood.
These precut wooden ornaments are absolutely darling, and perfect for this project. Best of all, they come in bulk and now I have enough ornaments for the next several years! But, I’m getting ahead of myself. Keep reading for ALL the details. 🙂

What You’ll Need
- wooden ornaments
- blue acrylic paint
- silver acrylic paint
- white acrylic paint
- black paint markers or Sharpies (at least two)
- orange paint markers or Sharpies (at least two)
- q-tips
- Mod Podge
You can find the precut ornaments on Amazon. The set includes 120 ornaments for an amazing price!

If you like the idea of sealing your students artwork, then a coat (or two) of Mod Podge is necessary. You can find this at any craft store, Walmart, and Amazon.

Here’s What You Need to Do
Step 1
Paint the ornaments blue and silver (see pic below in step 2). I’ve found it to be a huge time saver with this project when I paint the ornament ahead of time. Also, acrylic paint does not wash out of clothing, so it’s probably best that you do the bulk of the painting.
Step 2
Pull two students at a time and get crafty! To create the snowman, paint your students’ thumbs. They will make three thumbprints stacked on top of one another to create a snowman body.
I have my students turn their thumb so that they are making “sideways thumbprints.” I also add more white paint to their thumb in between each thumbprint. Let these dry overnight before adding details.
Keep some baby wipes nearby so they can immediately wipe their thumbs clean.

Step 3
Once again, pull two students at a time to add details to the ornaments. Use paint markers or Sharpies (or a combo of both) to create the details.
Have students use the black marker to draw a hat, two eyes, a mouth, three buttons, and two arms. Then, have them add a carrot nose with the orange marker.

I like to pull the kids a few at a time because it is something that can easily take place while the rest of the class is working independently on a task. I don’t have to set aside a designated time to create the ornaments because I pull them over in twos. This also allows me to explain the task, show a sample, and closely monitor them since paint is involved.
Step 4
Next, use a q-tip to add snowflakes. Simply dip the q-tip in white acrylic paint and make dots around the snowman.

Step 5
Finally, seal the ornament with Mod Podge. Again, this is optional, but it does add a protective layer, and Mod Podge does a great job of making things look more vibrant.

Step 6
You’ll need to tie a piece of twine so that the ornament can hang. If you think your students can handle this independently, have them do it, otherwise, I suggest saving your sanity and just do it yourself.

Now the ornament is ready to send home! I like to package mine up in little kraft bags. I let the kids make a label to attach (sometimes I just use labels from the gift wrapping section at Target). I like these bags from Amazon. I also use them for my birthday bags.

I hope you are able to use this idea! It’s sure to become a keepsake with your students’ families. 🙂
Making a Scrap Wood Snowman
To make a wooden snowman, first cut 2x4s to length for each snowman then sanded them down. The taller snowman that I made is about 10 inches tall and the smaller snowman is about 7 inches tall. These can be made to any height and they stand on their own.
After sanding the snowman I gave them a light brown stain and let the stain dry overnight. Once the stain was dry, I went over the stain with white wash to give the snowmen a rustic look.
How to Make White Wash
To make your own white wash, simply select a white paint and a cup then mix a little bit of water at a time.
Slowly add water into the paint until you have the right consistency. You do not want the paint to be too watery or too thick, so aim for a milky consistency.
To apply the whitewash, use a brush or a dabber and lightly brush the whitewash onto the wood. Then quickly wipe the whitewash off of the wood before the paint dries.
Decorating Scrap Wood Snowmen
Once your wooden snowman has been painted and dried, it is time to add a hat and scarf. To make the hat, I cut black felt to size and wrap it around the top of the wood.
Then I upcycled an old bridesmaid dress by cutting the ribbon off of the dress for the snowmen hat.
I wore this bridesmaids dress when I was 9 months pregnant, so there was no way I was wearing this thing again.
Then I wrapped ribbon around the hat before attaching a small piece of black felt on the front of the hat.


