There is no one perfect way to paint leaves. Some artists might use a wet-on-wet technique, while others may use dry brush strokes. The most important thing is to study the shape and color of leaves so that you can create an accurate representation. When painting leaves, it’s important to remember that they come in all shapes and sizes. You should start by sketching out the basic outline of the leaf, then add in the details. Be sure to use different colors and shades to create depth and realism.
How to paint leaves using watercolors or acrylics
Learn an easy technique for painting realistic looking leaves using either watercolor or acrylic paints.
It is essential that you learn to paint leaves if you want to paint flowers and I want to share my tips for making simple yet beautiful leaves to add to your paintings.
Start by watching the video above. You will learn a really simple technique for creating nice basic leaves using any of the paint color mixes below.
Paint Color Options
- Ultramarine blue and Light Yellow (Acrylics)
- Indanthrene Blue and Transparent Yellow (Winsor & Newton Watercolor)
- Shadow Green (Mission Gold Watercolor)
- Prussian Blue and Transparent Yellow (Winsor & Newton Watercolor)
- Burnt sienna Antwerp Blue (Winsor & Newton Watercolor)
- Ultra Marine Blue and New Gamboge (Winsor & Newton Watercolor)
- Winsor Green and Alizarin Crimson (Winsor & Newton Watercolor)
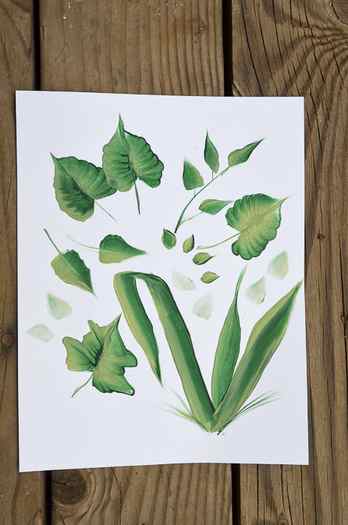
Practice these leaves.
Now that you have a basic understanding of how to paint a leaf you can create any shape and size you need to include in your painting.
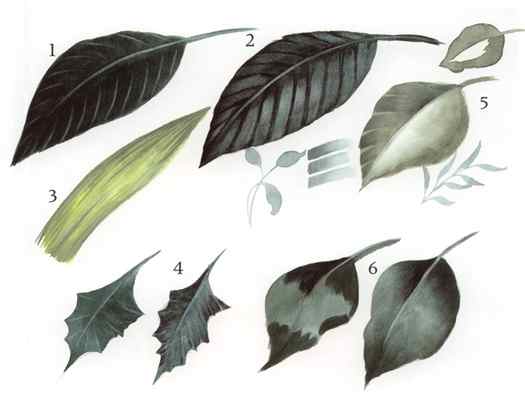
Below are some tips for painting the leaves pictured above.
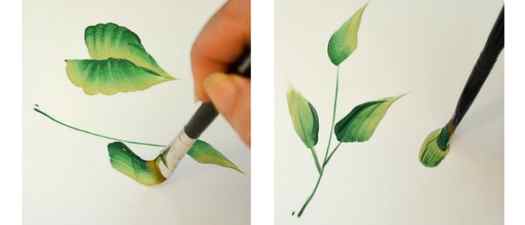
- Leaf #1
- Draw a light outline of your leaf using a pencil onto your watercolor paper.
- Wet the top portion of the leaf.
- Paint the top of the leaf and stem using a thick and juicy mix of any of the paint combinations listed above or use Shadow Green straight out of the tube.
- When the paint dries you can wet and paint the lower portion of the leaf.
- Allow the entire leaf to dry then use the chisel edge of a damp, flat brush to lift out the veins.
- Use a damp, flat brush to lift out the color.
- Start at the outside edge of the leaf and work toward the vein area.
- Lift the color and wipe the excess off of your brush.
- Base the leaf with your yellow paint.
- With the chisel edge of a no. 20 flat brush, paint in a dark mix of Antwerp Blue and Burnt Sienna or any paint color you’ve chosen to use.
- Chisel color to the top and bottom.
- Quickly rinse the brush and remove most of the water until it is a damp brush.
- Pull the color or direct it lengthwise on the leaf.
- The holly leaf on the left was based dark and the veins lifted out.
- The one on the right was based the same and the dark was sideloaded in.
- The front side (right side) had the color applied to the outside edge and the transition line was blended.
- I left a light area to create a roundness or roll to the leaf (see above right).
- The back (left) side had some dark painted in the area above the vein. This was dried.
- The vein look on this was created by sideloading darker pigment. Start at the outside edge of the leaf and walk the brush over toward the vein. There are three strokes next to the leaf showing paint added to the area above the vein.
- Illustration 6 shows the procedure for creating form in the leaf.
- Base the leaf and dry it.
- Paint on the colors as you see them placed—one at a time—and blend out the transition line.
- This is the form that I most often use. It is very basic.
You may choose to use tints and accents as well as stems, tears, flips, and veins.
You will use these techniques when you learn to paint beautiful flowers in any of my online painting classes.
If you love this technique and want to learn more about painting beautiful florals, landscapes, or still lifes with Louise, you can purchase individual painting classes below. Click on the images to see a large image of the full painting along with a picture of the free bonus painting packet.

Pink Hollyhocks
Red Violet Wildflowers Packet
How to Paint Leaves
For the best effect, start with a light color and then add darker colors to the leaf’s edges. First, use a light to medium brown color for the body of the leaf. Then, use a darker green color to paint the leaf’s edges. Finally, add some highlights with a light yellow or beige color.
Getting Started
To paint leaves realistically, it’s important to remember that they aren’t all the same shape and size. Try to vary the size and shape of your leaves as you go along, and also pay attention to the way light affects them differently depending on their position. Add in some details like veins and texture to really make your leaves look real.
How to Paint Leaves on Wall
To paint leaves on a wall, you will need to start by creating a stencil. You can do this by tracing a leaf shape onto some paper and then cutting it out. Once you have your stencil, you will need to paint it with some green paint. Once the paint is dry, you can use a stencil brush to add some details to the leaves. Finally, let the paint dry and enjoy your new wall decoration!
Which Paint is Used for Leaf Painting
The best paint to use for leaf painting is acrylic paint. This type of paint dries quickly and is very easy to work with. You can also use oil-based paints, but they can be a bit more difficult to work with.
We recommend using acrylic paint for this project.
How to Paint Leaves in Acrylic
1. Pick up the Colors
To get started, you will need to gather your supplies. For this project, you will need some green acrylic paint, a stencil brush, and a piece of paper. Once you have all of your supplies, it’s time to start painting!
2. Make a Stencil
To make your stencil, you will need to trace the outline of a leaf onto a piece of paper. Once you have the outline of the leaf, cut it out with a sharp knife.
3. Paint the Leaf
Now that you have your leaf stencil, it’s time to start painting! Dip your brush into the green paint and then begin stenciling the leaf onto your wall. Start from the top of the leaf and work your way down.
Make sure to fill in the entire stencil so that the leaf is completely covered in paint.
4. Remove the Stencil
Once you have finished painting the leaf, carefully remove the stencil from the wall. You should now have a beautiful green leaf on your wall!
5. Repeat
Repeat steps two through five until you have created a whole forest of leaves on your wall!
6. Add Details
Once the paint is dry, you can add some finishing touches to your leaves. Using a black paint pen or a thin brush, add veins to the leaves.
You can also add some dots of yellow paint to create a more realistic-looking leaf.
How to Paint Leaves on a Tree Acrylic
1. Sketch It Out
To begin, you will need to sketch your tree onto the wall. You can use a pencil or a pen to do this. If you want to be extra precise, use a ruler. Draw the trunk of the tree first. Then, add the branches. Finally, add the leaves.
2. Paint the Trunk and Branches
Once you have sketched out your tree, it’s time to start painting. Begin with the trunk and branches. Use brown or black paint to do this. If you want, you can mix some green into brown paint to create a more realistic color.
3. Paint the Leaves
Now, it’s time to add the leaves. Use green paint to do this. You can add as many or as few leaves as you want. Once you are finished painting the leaves, allow the paint to dry.
4. Add the Finishing Touches
Once the paint is dry, you can add some finishing touches to your tree. Use white paint to add some highlights. You can also use dark brown or black paint to add some shadows. Finally, use green paint to add some grass at the base of the tree.
How to Paint Leaves in Watercolor on Canvas
There are a few things to keep in mind when painting leaves in watercolor on canvas. The first is to make sure you are using good-quality watercolor paper. The second is to use light washes of color and build up the layers gradually.
Third, make sure to capture the veins and textures of the leaves realistically. And finally, practice, practice, practice! With a little bit of practice, you’ll be able to create beautiful paintings of leaves in watercolor on canvas.
Painting Leaves on Canvas
1. Prepare Your Canvas
To begin, you will need to stretch your watercolor paper onto a frame or canvas. This will help to keep the paper from buckling when it gets wet.
2. Prime Your Canvas
Once your paper is stretched, you will need to prime it with a layer of gesso. This will help the paint to adhere to the paper and create a smooth surface.
3. Draw Your Leaves
Once your canvas is primed and ready to go, you can start drawing your leaves. You can use a pencil or a pen to do this.
If you are using a pencil, make sure to use a light touch so you can easily erase any mistakes.
4. Paint your Leaves
Now it’s time to start painting! Begin by adding a light wash of color to your leaves. You can use any color you like, but green is a good choice for most leaves.
Once the first layer of color is dry, you can add another layer. This time, you can add a bit more color, or you can add some highlights and shadows.
5. Add the Final Details
To finish your painting, you can add some final details like veins and texture. You can also add a bit of color to the background if you like.
How Do You Paint a Leaf Shape
1. Sketch the Shape
To start, you will need to lightly sketch the shape of the leaf. You can do this with a light pencil or pen. If you are using a pencil, you will need to go over the lines with a pen after you are finished.
2. Paint the Background
Once you have the basic shape of the leaf sketched out, you can begin painting the background. For this step, you will want to use a light color. A light green or blue one works well. Begin by painting the entire background of the leaf.
3. Paint the Veins
After the background is complete, you can begin painting the veins of the leaf. For this step, you will want to use a darker color. A dark green or brown works well. Begin by painting the main veins of the leaf. Then, you can add smaller veins as well.
4. Paint the Outer Edge
The last step is to paint the outer edge of the leaf. For this, you will want to use a dark color. A dark green or brown works well. Begin by painting the outer edge of the leaf. Then, you can add inner edges as well.
Get Started painting leaves
Start with your brush. In this tutorial I am using a #12 flat brush but you would use the size you need to create the size leaf you wish.
A good set of brushes to get started with are the One Stroke set.Double load your brush with a dark green and a lighter green.
Make a v by tapping your chisel edge of the brush on your practice piece.
To begin your stroke place the chisel edge on one half of the V then press down on your brush, wiggle as you drag the brush along to create a half heart shape.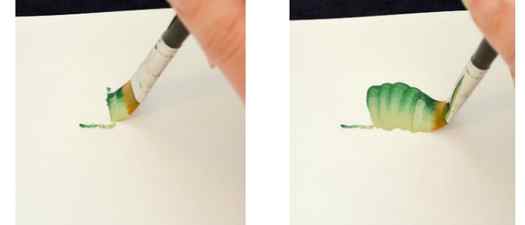
Let your brush lift to a point as you reach the tip.
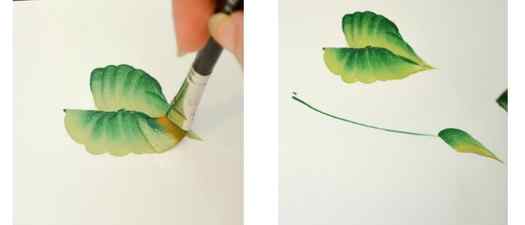
Now start on the other half of the V and do the same thing, try and make the tips meet so you do not have two leaf tips.
I frequently get two tips and just go over that bit to correct.
Don’t flip the brush, but you probably should reload with paint.
Keep the dark side of the brush next to the light when beginning the next stroke.
Do it the same way you did the first stroke and let your brush spring back to a chisel edge.
And there you have a leaf.
Paint Slider Leaf or Petal Stroke leaf
On to the slider leaf.
With the chisel edge of your brush draw a stem.
This is merely for placement, you can draw it in later if you wish.Press your brush onto the surface at an angle from the step, not straight down.
We are trying to avoid a broad flat base to the leaf. In the video I show it better.
You can also use a filbert brush, you will get a more rounded base of the leaf.
Touch, press and lift to a point by turn the brush as you stroke.
I use this one a lot for small filler leaves.How to paint Long Leaves
To make a longer leaf, just drag the paint brush out further.
The video includes more leaves including some shadow leaves which work well for in the background.
Feel Free to PIN & Share

Please enjoy and share!


