Hi everyone! It’s Tammy from Rustic Orchard Home! Who’s ready for all things Christmas?! Today, I’m going to share how to create a DIY Santa Sign! Let’s get started.
Painted Santa Stones
Transform a smooth beach stone into an adorable Santa stone with acrylic craft paint. If you can paint a straight line and dot paint with a handle of a paint brush, you can totally make these! 10 Ways to use your stones are suggested in the post below.
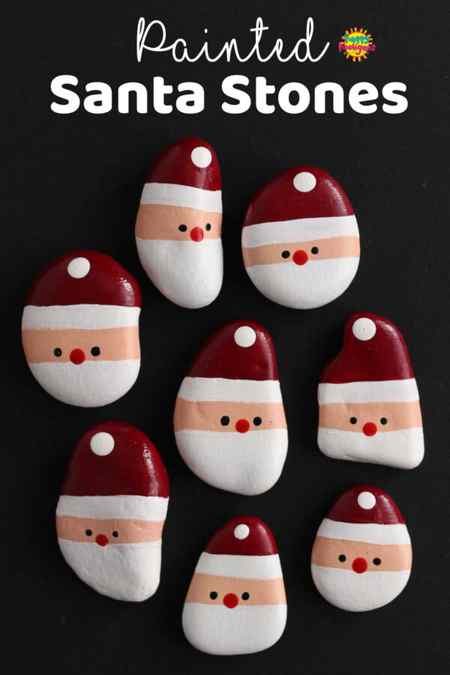
I always have a stash of smooth beach stones on hand because my daycare Hooligans love painting them. They’ve made all kinds of paper weights and various other stone crafts over the years. The other day, I thought it would be fun to paint some of our stones for a Christmas art activity.
I came up with Santas, penguins and snowmen and they all turned out cuter than I ever could’ve imagined I’ll share the penguins and snowmen with you another day, but today I’ll show you how to make the Santa stones.
I kept them really easy so kids could make them, but grownups will love this Christmas art activity too.
What can you do with your Santa Stones?
You may be wondering what you can do with these stones after you’ve painted them, so I’ve come up with a few suggestions for you. I’m sure you and your kids can put your thinking caps on and come up with a few more of your own too.
- Write a message with a Sharpie on the back and put one in the toe of a Christmas stocking
- Put one at each place setting on your Christmas dinner table
- Hide and seek Santa – hide the stones around your house and have the kids hunt for them
- Find the Santa countdown to Christmas – Hide one stone per day for your child to find in the days or weeks before Christmas
- Weight down a stack of Christmas napkins
- Use large stones as Christmas paper weights and door stoppers
- Hide/Distribute them throughout your neighbourhood/community
- Sell them at a church or school holiday fundraiser
- Include with gifts/treats that you give to neighbours, friends, teachers etc. at Christmas
- Use for counting, sorting, stacking activities with toddlers/preschoolers
Ok, let’s paint some Santa Stones!
Painted Santa Stones Instructions:
For your conviencience, this post contains affiliate links. As an Amazon associate, I earn from qualifying purchases.
- smooth beach stones
- Gesso or a similar primer (this will give you better coverage)
- acrylic craft paint (red, skin tone, white and black)
- paint brushes
- satin craft varnish (protects paint and adds vibrance/sheen)
How to Paint Santa Stones

- Wash and Dry Stones Scrub stones to remove any grit and debris and let them dry. This will ensure the paint adheres properly to the stones.
Your stones will dry quickly in a warm, sunny spot, but you can speed up the drying process with a hairdryer. - Prime Stones Paint the stones with a coat of Gesso or a similar craft primer. If you don’t have primer, that’s ok, but you may need several coats of paint to get full coverage.
- Paint bands of colour on stone Using the photo below as a guide paint bands of red, skin-tone and white on your stone: red for the hat, white for the trim of the hat, skin-tone for the face and white for the beard.
Allow your paint to dry.
For the back of the stone: You can leave the back of your Santa stones unpainted, or you can paint them in a solid colour or with a second Santa face. - 2nd coat Give each band of colour a second coat of paint and allow to dry.
- Dot on details Dip the handle of a paintbrush into some paint to dot on Santa’s pom pom, eyes and nose.
I used the fattest paintbrush handle I had for the pom pom on Santa’s hat, and a couple of medium sized paint brushes to dot on the eyes and nose. - Varnish your stones Once your Santa stones are completely dry, brush them with a coat of satin craft varnish to protect your paint and to intensify your colours and add sheen.

I hope you’re as delighted with the results of your Santa stones as we are.
If you think up some creative ways to use them, that weren’t mentioned in the list above, please let us know!
- Yarn and Cardboard Santa Ornaments for Kids to Make
- Wine Cork Santas Ornament
- Paper Plate Popcorn Santa Craft
- Popsicle Stick Santa, Elf and Reindeer Ornaments
Get the 3-5 Playful Preschool e-Book!
25+ Preschool activities by 25 bloggers, 10 printables, PLUS 50 links to activities not featured in the book.
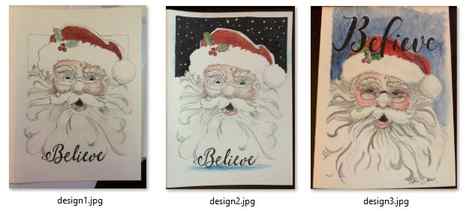
Supplies Needed to Complete This Card:
For your convenience, there are links to some of these supplies in the Resources section below.
- Strathmore watercolor card, 5×7 size
- Sheet of watercolor paper (optional)
- Painter’s or masking tape
- Pencil and kneaded eraser
- Graphite paper or a light table
- Watercolor paint and/or watercolor pencils in these colors: Light pink, dark pink, pine or sap green, a cool red, a warm scarlet red, flesh pink, light gray, dark gray, black, Dr. Ph Martin’s bleed proof white, or white gouache, or thinned white acrylic paint.
- Watercolor brushes (any medium sized round with a point that you like will work)
- Clean jar of water
- Permanent Sakura Micron or other similar brand of markers to draw and darken lettering.
- Larger permanent black or navy blue marker for design with dark background. I used an Arteza Everblend marker, but any kind would work.
How to Paint This Handmade Christmas card
Below are the general steps to complete this handmade Christmas card. Download the complete kit for detailed instructions and traceable drawings.
- Choose the design you like from the download file. Print out that page on your printer, making sure to set the page size to actual size.
- Using either graphite paper or a light trace device, trace the image onto the front of a 5”x7” watercolor card.
- Once the image is on the card, tape the card down to a sturdy surface to minimize buckling when you paint.
- Using the kneaded eraser, lighten your pencil drawing so it won’t show through the transparent watercolor paint.
- Paint or color the image in the stages discussed below. Make sure to allow for the drying time in between stages.
- To start, paint or color in a light shade of red over Santa’s cap, making sure to leave the “furry” markings of the white trim and puff ball visible.
- Next, paint or color Santa’s face with a very light wash of pink or flesh pink. Allow the card to dry.
- Then using light gray, color in the beard markings to give an illusion of shading in the beard. Use light gray to edge around the white trim and puff ball on the hat, making sure to leave the ‘furriness” apparent.
- Allow the card to dry completely. Paint in Santa’s eyes and glasses. Use light gray to give his eyes a little shadowing at the top of the eyeball.
- Now paint in the holly leaves, using a darker green for one side of each leaf. Allow the card to dry.
- Paint in the holly berries with scarlet red, leaving a lighter center circle to denote a highlight. Allow the card to dry.
- Once the card is dry, use the Micron markers and follow the pencil marks to draw in and darken the lettering.
- Allow the ink to dry completely, then use the kneaded eraser to remove any pencil marks left.
- Include any finishing touches you desire.
Once you are done, remove the tape around the card. Voilà, you have a finished Christmas card, ready to send!
And If you like the card you create, you can have copies made at Vistaprint! Click the logo below to check out this great company. I buy my business cards and postcards from Vistaprint and the service is great.
Resources
- Tracing using graphite paper: https://www.insidewatercolor.com/graphite-paper.html
- Choosing colors: https://www.insidewatercolor.com/mixing-colors.html
- Graphite paper on Amazon
- Strathmore cards on Amazon
- Sakura Micron markers on Amazon
- Kneaded erasers on Amazon
*As an Amazon Associate I earn from qualifying purchases.
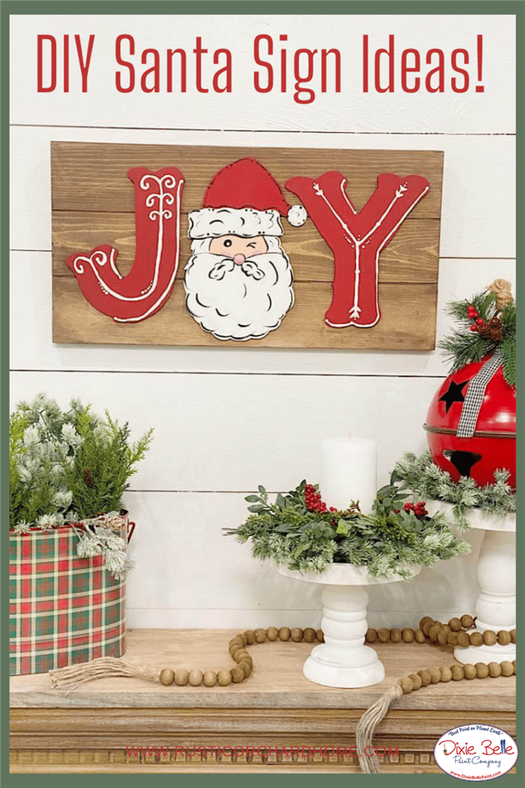
Materials List:
- JOY Sign Kit with Santa Head as the “O”
- Santa Head Cutout
- Faux Shiplap Sign Blank
- Unfinished Split Wood Balls
- Whitecap Silk All-In-One Mineral Paint
- Apricot Dixie Belle Chalk Mineral Paint
- Anchor Silk All-In-One Mineral Paint
- Barn Red Dixie Belle Chalk Mineral Paint
- Tobacco Road Voodoo Gel Stain
- Paint Brushes
- Small Squeegee
- Gorilla Super Glue
Step 1:
Begin by using a pencil to sketch out Santa’s face. The pencil marks will help you stay on track with the detail when painting.
Step 2:
Next, paint on all of the white details using Silk All-In-One Mineral Paint in the color Whitecap. The white details include Santa’s beard, hair, his open eye, the brim of his hat, and the ball on the end of his hat. After that, use the color Apricot to paint on his face. Then, mix a bit of the Barn Red and Whitecap to create a light pink to paint the split wooden ball detail that will be used for his nose.

Step 3:
Next, use the color Barn Red to paint on his hat. Finally, use the color Anchor to add details that will give Santa some dimension. Also, be sure to finish off his eyes and cheeks. I used the same mix of Barn Red and Whitecap as I used for his nose on the cheek details. I added the appearance of “fluff” to his beard and hat, dots with the end of my paintbrush, and outlined to the entire piece where needed.

To read the rest of this festive tutorial, hop on over to Rustic Orchard Home here!
Author: Rustic Orchard Home
Tammy is the creator of Rustic Orchard Home. She loves decorating and creating all things farmhouse, vintage, and sparkly. Tammy wants to share this passion to inspire others to create, paint and decorate a beautiful home on a budget.


