Be sure to handle the pressed flowers carefully in this step. In fact, you may find it easier to dab the glue stick directly onto the paper and then press the petals or leaves into those spots. That will reduce the risk of tearing in this process.
TUTORIAL: “How To Paint An Iris Flower In Watercolor” by Ardak Kassenova

Irises are such lovely flowers and make for the perfect choice when looking to paint flowers with vibrant colors, dynamic petal formations, and beautiful visibly linear textures. They are quite popular in Japanese floral arrangements and are said to be the flowers that have been stylized into the decorative fleur-de-lis design that is the royal standard of the French. This is the first time I’m painting one and I’m quite surprised that I’m only doing this now as they really make for an interesting subject choice. It’s actually one of my favorite flowers. There were irises in my summer house back in my home country, Kazakhstan. The beauty of irises is that they’re perennial, you just plant them once and they grow on their own. They don’t need a lot of special care either. I’ll definitely be doing more iris flower paintings from here on out. I hope you’ll find them as interesting and inspiring to paint as I do. Here’s a step-by-step guide with an accompanying video tutorial at the end into how to paint an iris flower in watercolor. The first thing to do is to collect the materials you need before you start. I’ll be listing down the materials I used.
Materials
Watercolor paints – I used the Espresso Palette from ZenART Supplies
Watercolor brushes – I used the water brush pen that comes with both our Allegro and Sereno Palettes, and some round brushes from our Turner Collection
Watercolor paper – I created a DIY accordion sketchbook from a watercolor paper I bought (I made this tutorial just recently and I am currently traveling in St. Petersburg, so I had to pack light and just brought the bare minimum number of art materials)
Mixing plate – I just used the inner side of the lid of my watercolor palette
Jar of water for rinsing and painting
Absorbent material for absorbing excess water/pigment – paper towel, tissue, sponge, or any other preferred absorbent material
Your reference photo or if you’re lucky enough to have the actual flower right before you
Flowers in general are very forgiving subjects to paint. Petals can be irregularly shaped and are more often than not in varying shapes and sizes even in just a single flower. So don’t overthink it and just enjoy the flow and the magical process of watercolor painting.
Step 1

Draw the flower to serve as your guide when painting. I just lightly drew mine so they won’t be visible in the finished painting. You don’t have to draw all the minute details, just draw the basic shapes and outlines.
Step 2
First identify the colors you’ll be using. Try mixing the colors you think you’ll be needing, and swatch them out beforehand. This way you can plan out your colors and see if you like what you’ve planned out, one less thing to worry about while painting. It’s also a great way to keep a record of your color palette which will come in useful the next time you paint the same kind of iris. Below I’ve identified the colors I used from my compact Espresso Palette from ZenART Supplies. Experiment with the colors from your own palette to find out which ones you’ll be using. 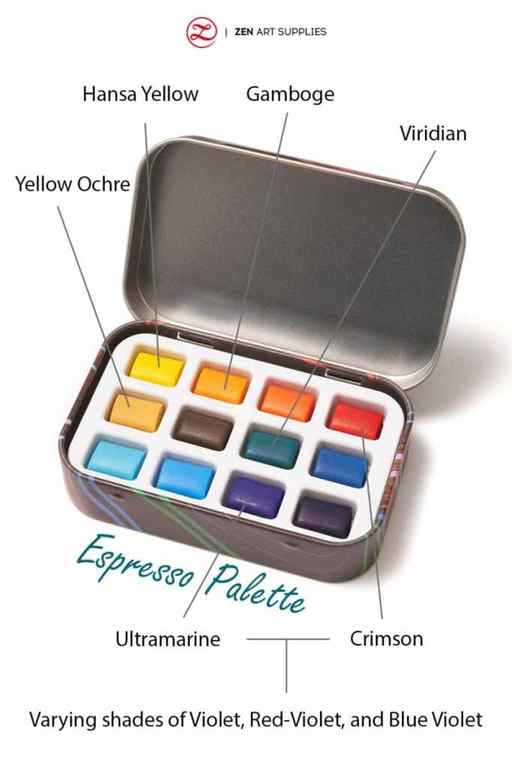 Step 3
Now we can finally start painting, I first apply just clean water on the section I’ll be working on for some wet-on-wet painting. This means that once I’ve wet the surface, I add some color/pigment – a mix of Ultramarine and Crimson – while the surface is still wet. This allows the pigment to bloom and spread unevenly and beautifully on the wet paper. I just loosely paint the shape of the upper left petal in a pale and thinned down mixture.  Then, I get some Hansa Yellow and paint it at the base of the petal – just a light layer as well. I also added some Gamboge to deepen the color a little. I’m being careful to keep the upright petals lighter and less saturated than the drooping ones at the bottom.
  I continue doing the same process to the upper right and bottom left petal. Just keeping everything light, wet, and fluid. Try not to overwork them as the colors will still spread on their own while the paint and paper are still wet. And you’d want to keep the natural texture of your brush strokes, they’ll add a lot of character to your painting.
  Now I’m going to focus working on the bottom petals, allowing the top ones to dry before I paint the next layer on them. I start by applying a creamier and more saturated Hansa Yellow at the base of the petal, then I blend it with varying mixtures of Ultramarine and Crimson.
  Try not to overblend so your colors don’t end up looking muddied. The more colors or pigments you mix together, the higher the chances are of your mixture turning muddy. So keep the amount of colors or pigments you mix together down to a minimum.
  Do the same process to the bottom right petal. I paint with loose and fluid brush strokes, keeping everything more intuitive and relaxed. I’m not focusing on getting every tiny detail but painting with a more intuitive and impressionistic style. Then I start working on the smaller bud-like petals in the middle. I start with Hansa Yellow and then add some Violet with it.
 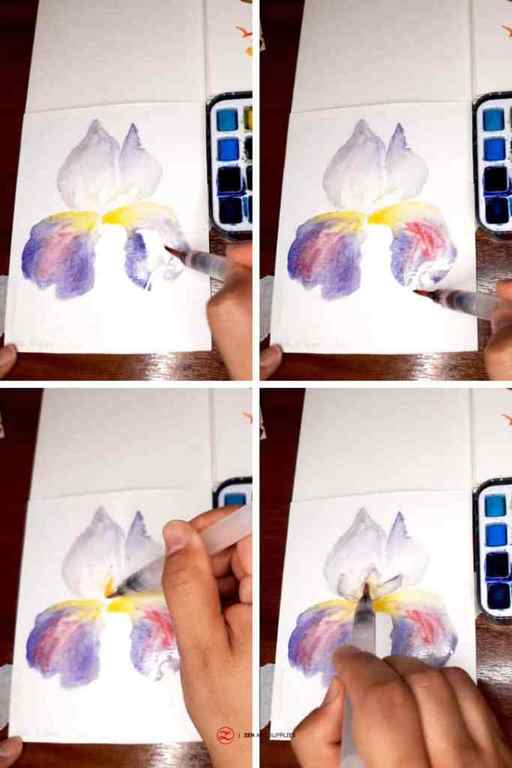 That was enough time for the first layer of the upper petals to dry. Now, I can add the next layer, I made darker violet and blue-violet mixtures. Then applied them both and blended them just enough, where I can still see the colors separately in some parts.
  It’s time to switch brushes, I used a small sized round brush. Using an even deeper and thicker violet mixture, I paint the vein-like details of the petals. Taking care to follow the natural curves of the petals, I make sure to curve my lines appropriately as well. Then I deepen the base of the petals and the smaller petals at the center by adding a more red-violet mixture to those areas. And it’s time to go down and work on the bottom petals. Starting at the base, I paint the same vein-like details starting with a violet mixture first, and then switching to yellow for the middle parts of the petals. I overlap some parts to softly blend them together, creating a softened color gradation. Unlike the top petals, the vein-like details stop around midway of the petals.
  For the other half of the petals, I paint it with varying mixtures and shades of violet, blue-violet, and red-violet. With a dash of yellow here and there at the edges. Again, keep in mind not to overwork your brush strokes and blending. Paint a much darker violet at the center of the flower, and slowly work outwards, adding to the smaller petals at the center. Just make sure to blend it out, the center should be darker.
 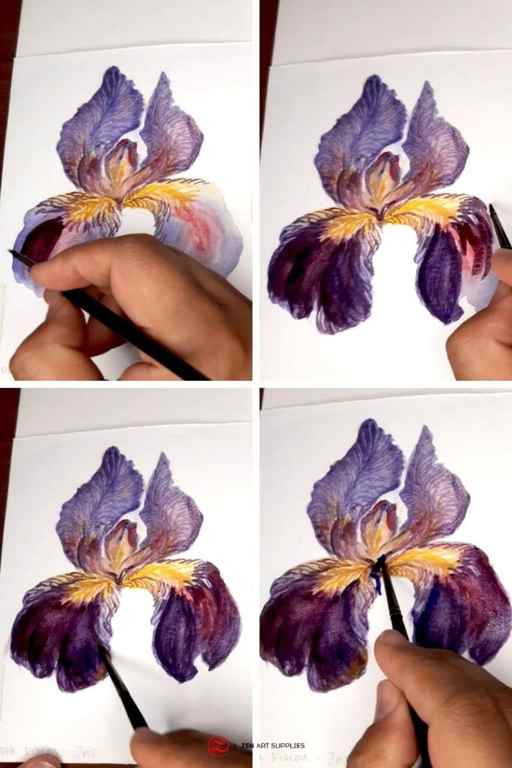 Now it’s time to refine the shading of the petals, add deeper colors here and there and gently blend it out. This is to add shadow and to softly define the contours of the petals. Add water here and there as well to soften some parts, especially the edges. I tried to achieve the soft velvety texture of the petals.
 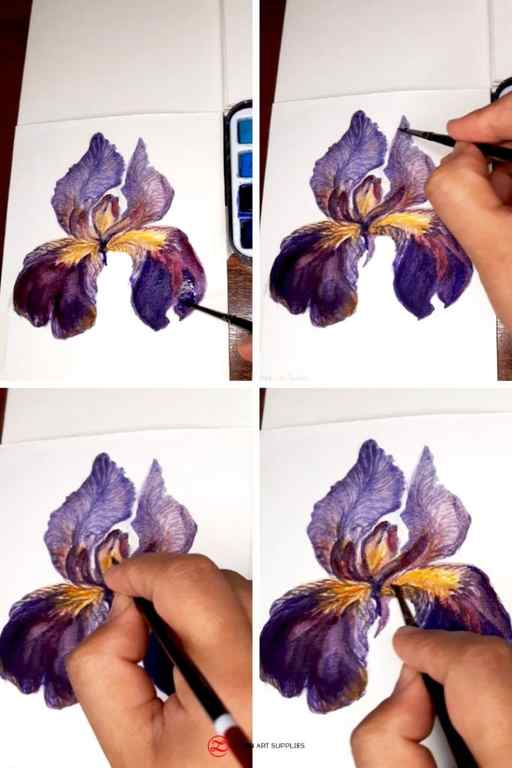 Finally it’s time to paint the stem of the iris flower. I used Viridian, Yellow Ochre, and Raw Umber to create the green color of the stem, mixed in with some violet near the base. If your green is too vibrant, you can mute it down with a little bit of red. I loosely blend them together and paint in a downwards direction, adding more water to lighten the colors.
  And here is the end result of all the layering, color mixing, and blending. A wonderfully vibrant and textured iris flower that’s just full of life.
Watch the VIDEO TUTORIAL below:
How To Paint An Iris Flower In Watercolor on Vimeo
I hope you found that useful and will be enough to inspire you to try it out for yourself. Just remember to focus on enjoying the process instead of the final result, you can always make other versions. It’s important to have fun so that you’ll keep doing it and find it a wonderful experience. The iris flower being a vision of beauty and wonder. Join our friendly art community Painting Inspiration Daily on Facebook to see more video tutorials! You can share your art, ideas, and be inspired to paint!
Ardak Kassenova
Ardak Kassenova is a London based contemporary artist, co-founder and creative director of ZenART Supplies. Her visual style—contemporary impressionism—shares similar aesthetic qualities with those by the French Impressionists. After 20 years of a successful corporate career, becoming a mother to two wonderful girls, and with the continuous development of her practice by taking private lessons from the best artists she could find; Ardak decided it’s time to align her life with her true passion, Art. Driven by this passion and her corporate leadership background, she co-founded ZenART. Say hello to @ardak_zenart on Instagram!
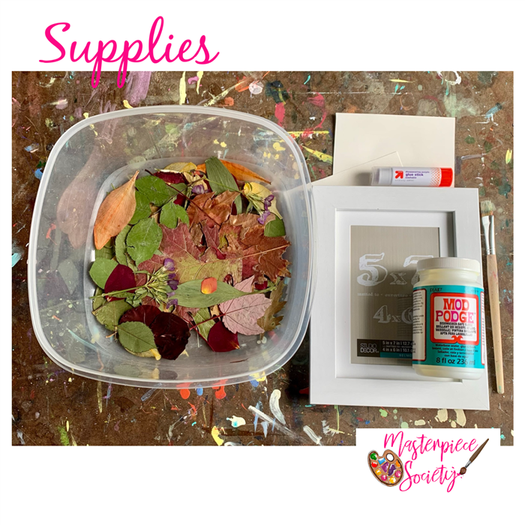
Pressed Flower Art Tutorial
Since this project features pressed flowers and leaves, you’ll need to gather and prepare them in advance. You can do this with help from a flower press kit or by pressing them in large, heavy books over the course of a few weeks . You can also press them with an iron or use your microwave to dry them if you need to speed up the process.
In addition to a variety of pressed flowers and leaves, here are the other supplies you’ll need:
- Photo frame (We used a 5 x 7 frame, but any size will work.)
- Watercolor paper
- Mod Podge (Any finish will work)
- Paint brush or sponge brush
- Glue stick
- Watercolor paint (optional)
Also worth noting, Helen Ahpornsiri’s portfolio can provide wonderful inspiration for this project. We came across her artwork for the first time while reading Drawn from Nature and were stunned by her work. I encourage you to peruse her website and even have a copy of Drawn from Nature on hand before you start. She’ll inspire you in the best way!
Step 1. Prepare background.
Begin by preparing the paper. This can be as simple as trimming it down to fit in your photo frame, but this is also a good time to paint the background using watercolors if you would like to provide an extra splash of color to your project.
There’s plenty of room for creativity when it comes to color selection, but it’s best to keep it simple when it comes to the watercolors. A simple background allows the pressed flowers to shine!
Prefer to skip the paint? No worries! Unpainted paper will also produce a lovely pressed flower project.
Step 2. Plan the design.
Next, experiment with your pressed flowers and leaves by positioning them to create your image. Need a starting point for your planning? Here are some easy pressed flower compositions to consider while you’re experimenting:
- Animals
- Insects
- Objects
- Loose arrangements (like you’ll find in this leaf art project )
- Patterns
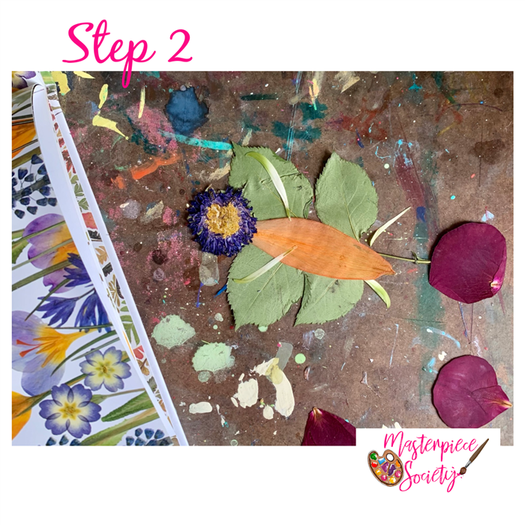
Once you have an idea of your arrangement, take a photo of it to reference as you continue on to the next step.


