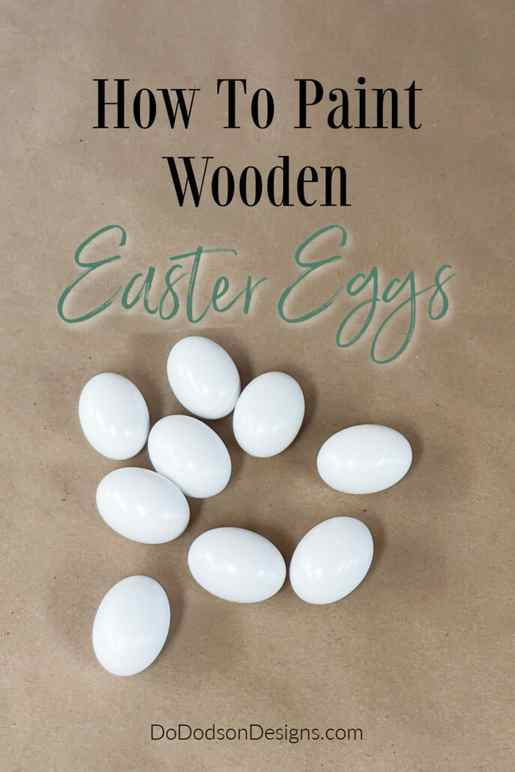
If you’re looking for a more sustainable option than traditional Easter eggs, painting wooden eggs are a great choice. They can be reused year after year and provide a blank canvas for endless decorating possibilities. You could even repaint them the next year to change up your designs. This year I’m going with the speckled eggs. It’s so Springy!
50 Creative Easter Basket Ideas Anyone on Your Easter Sunday Gift List Will Love
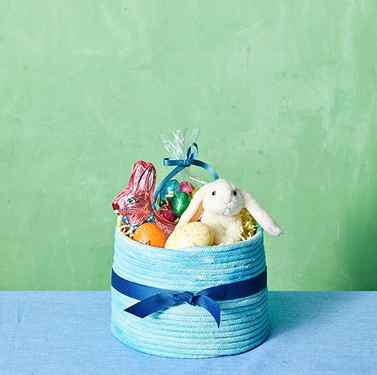
DIY coiled, twined or woven baskets into spring-inspired vessels full of treats for toddlers, tweens, teens and adults.
By Amanda Garrity and Mariah Thomas Updated: Apr 7, 2023
Save Article
Mike Garten
As you’re planning fun activities for Easter like creative egg hunts and “egg-citing” crafts, add a new one to the list: making your own Easter basket where you can nestle sweets, decorated eggs, toys and other treats.
Below, you’ll find easy and colorful ways to upgrade coiled, twined or woven baskets. Envision these DIYs as the perfect gifts for Easter Sunday’s host — from spray-painted golden baskets and non-sew rope designs to bunny fry boxes and personalized candy buckets. Or save money with craft ideas from materials you may have at home, like transforming empty cereal boxes into goodie “bags,” while using leftover paint to decorate any old wooden basket strips. And if you want additional treasures to go with the ones already tucked inside (AKA Easter basket stuffers can be sweeter than candy), try making our carrot treat cones or origami bunnies — they’re filled to the max with your kids’ favorite treats.
No matter who you’re gifting your Easter basket to this year— a family member, friend, work buddy — or what style you want to recreate, these will impress anyone who receives them. We even have non-candy Easter basket ideas, Easter toys for toddlers and unique picks for boys who love surprises. And if you find your basket too gorgeous and memorable to give away, feature it on the table or mantel to really amp up your Easter decor.
Advertisement – Continue Reading Below
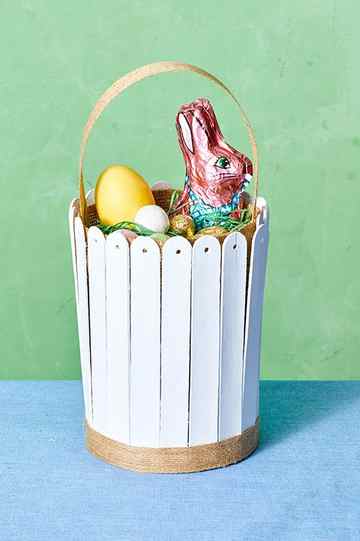
Craft Stick Easter Basket
Mike Garten
Decorate a basic woven basket’s exterior with large wooden craft sticks. It’s a DIY idea that’ll add color and personality to your vessel of goodies.
Materials:
-Large craft sticks
– Screw hole punch
– Top of a round take-out container (ours was about a 4” circle)
– White acrylic paint
– Burlap or another fabric scrap (for the inside)
Steps:
- Make a template craft stick where you put a hole about ½” down from the top in the center. Using your ‘template,’ mark 18 (or more!) craft sticks with where you need to make the hole and punch it out.
- Paint each craft stick white and let them dry. Hot-glue the bottom of a craft stick (without the hole) to the round and hot-glue the rest of the craft sticks until the entire plastic base is covered.
- Cut a piece of burlap or fabric and attach it to the inside of the basket with a few dots of hot glue to make a nicer finish.
- Finish the basket with a strip of burlap ribbon on the bottom of the basket. Attach the bow with a few dots of hot glue and trim it to fit.
Gather Your Supplies
Before you begin painting your wooden Easter eggs, you’ll need to gather your supplies. Luckily, you won’t need anything too fancy or expensive. Here’s what you’ll need:

SUPPLY LIST: How To Paint Wooden Easter Eggs
- Wooden eggs – These white wooden eggs are perfect for painting.
- Small Paintbrush – You can also use artist brushes.
- Toothbrush – Choose a toothbrush with firm bristles for the best results.
- Paint – Dixie Belle’s Chalk Mineral Paint DROP CLOTHCOBALT BLUEHOLY GUACAMOLE (or acrylic paint)
- A small dish, palette, or paper – Use this to blend the paint colors together while painting your eggs.
- Newspaper or drop cloth – Protect your work surface from any paint spills or splatters.
Now that you have your supplies ready, it’s time to move on to preparing your work area before painting your wooden Easter eggs.
Prepare Your Work Area Before Painting
Now that you have gathered all the materials needed for painting your Easter eggs, it’s important to prepare your work area to ensure that you’ll have a smooth and mess-free crafting experience. Here are a few things you can do to set up your workspace before painting:
First off, make sure that you have a flat and stable surface to work on. A table or a countertop works fine, but be sure to cover it with a layer of newspaper or a drop cloth. This will protect your surface from any paint spills or splatters, keeping your work area clean and tidy.
Next, ensure that you have adequate lighting in your workspace. Natural light is great, but if that’s not possible, you can use a lamp to brighten up your work area. This helps you to see the colors and details of your painted Easter eggs more clearly.
Lastly, make sure that you have enough ventilation in your workspace. Open a window or turn on a fan to ensure that you’re breathing in fresh air while painting your eggs. This helps to minimize the fumes from the paint and ensures your safety.
With your work area all set up and ready to go; you’re now ready to paint your wooden eggs!


