Now you can start adding in any final touches. You can darken some areas a little more to define them better if needed.
How to paint a watercolor mountain field scenery


Want to learn how to paint mountains with watercolor? In this post I take you step by step on how to paint this watercolor mountain field scenery. You’ll learn how to create a transition from a snowy mountain peak to a green field resulting in a simple watercolor landscape.
You will practice wet in wet, dry on wet, and various brush stroke techniques in this tutorial.
Contents hide
Materials used
- Watercolor cold pressed paper (140lb/300gsm), acid free
- Watercolor round brushes; I am using one big and small brush (size 8 and 2). (Brush size also depends on size of painitng and manufacturing company).
- Watercolor paint (colors mentioned below)
- 2 jars of water
- Paper towel
- Masking tape
- Painting board (optional), you can also use your desk
- Hb pencil/eraser
- Sky:
- Light blue– Cerulean blue
- Light gray- Cobalt blue + burnt sienna
- Dark gray: Prussian blue + Alizarin crimson
- Muted green: Prussian blue + Gamboge yellow + Touch of burnt sienna
- Yellow ochre
- Light green: Prussian blue + lemon yellow (more lemon yellow). You can also use cobalt blue instead
- Dark green: Prussian blue + Gamboge + touch of paynes gray
- Medium green: Prussian blue + Gamboge
- Dark brown: Brunt umber (you can also use burnt sienna + paynes gray)
- Warm yellow: Yellow ochre
- Redish brown color :Burnt sienna
Step by step tutorial
Video tutorial:
You can watch the tutorial in video version below, or continue reading the written version with more explanations:

Remember not too dark, this is what it looked like on my watercolor paper:

Sky
To paint the sky you’re going to use the wet in wet technique, start by pre-wetting the sky area with clean water. Be sure to avoid wetting the mountain area.
Next, start painting in strokes of any light blue, here I chose cerulean blue. Make sure to leave some empty white spaces where you can add in some gray.
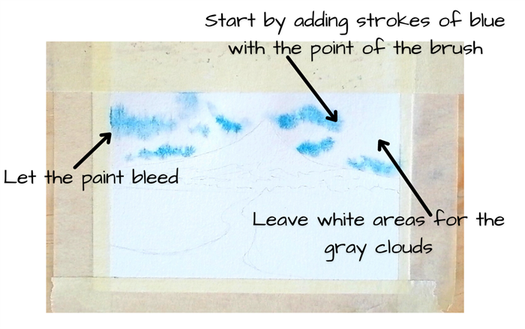
It’s time to add in the gray, to get lighter blue you can use a mixture of cobalt blue + burnt sienna. For this painting I used a mixture of prussian blue + Alizarin crimson to get a dark grey (I then added water to make it lighter), however It depends on you and what you prefer.
Start by dropping in gray between the blue areas of the sky, try not to blend the colors together. You’ll achieve a better result by letting the gray bleed into the paper. While the paint is still wet drop in more gray to make a few spots darker. Remember to avoid the blue areas.

Time to let the paint dry, It may look a little weird right now, but trust the process and don’t keep adding to it. Make sure you’re adding enough pigment because the colors will dry lighter.
Mountain
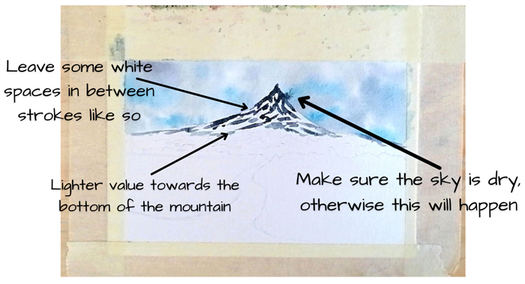
After the sky has dried it’s time to paint in the mountain using the wet on dry technique. Switch to a smaller round brush and begin painting small strokes of dark gray at the peak. Leave some white spaces in between, I also want you to notice how the brush strokes are going in the direction relative to the different elevations. For example towards the peak they’re more vertical, as you go towards the bottom the become more horizontal.
This helps create the illusion of a mountain forming.
Below you can see the mistake I made of letting the paint bleed into the sky, this is because that part of the sky hadn’t dried yet. If this happens you can always dampen your brush and pick up the extra pigment or use a paper towel.
The peak of the mountain is supposed to be darker than the rest, however don’t darken it just yet. Wait until you’ve begun adding the green through out the middle and bottom of the mountain then go back and darken just the peak.
As you approach the bottom of the mountain it’s time to add some muted green strokes. To mute your green try adding a touch of burnt sienna to your mixture. To make a smooth transition from gray to green, I made sure to lighten the colors as I approached the middle.

As you paint the bottom of the mountain start to change from a muted green to a more vibrant mixture. Below I added a dark green, don’t add it all in a straight line, instead add it in small spots.

Field
Begin painting the first layer of the field by using the wet in wet technique. Using clean water, wet the areas where the grass is going to be. Make sure you have applied enough water and left the road area dry for now.
Continue by adding in a warm light green (I used gamboge + prussian blue, with more gamboge). Try not to cover up all the white areas.

It’s time to paint in different variations of green, you can change the shade by adding more blue to create a cooler green.

While the paper is still wet drop in dark green into the field, especially along the horizon line where the bottom of the mountain is.
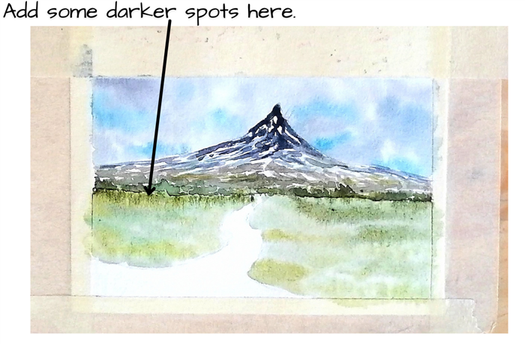
Before the paper dries paint in wiggly strokes of dark green to indicate grass. Add more lines in the foreground and less in the distance (the further away things are, the less detailed they are going to be). Time to let the first layer dry.

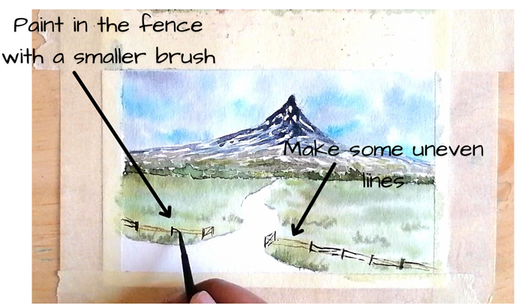
Once the paper has dried, switch to a smaller brush size and start painting the fence. In the image below you can see that I’ve used irregular shaped lines to paint the fence, this creates more interest.
Fence and road:
While the fence is drying you can go ahead and paint the road, start by painting a wash of yellow ochre. Before the paper begins to dry add in a few strokes of burned sienna and umber.
Below you can see I painted in rough lines to create more texture.

Once the road is dried, you can go back to the field and start painting in thin lines resembling grass, specifically in the areas along the road and the fence. Towards the base of the mountain, in the distance, paint straght lines from left to right with green. The idea is to add in texture and detail in places we want to draw the attention of the viewer.
Use the same green colors that were used in the first layer.

You can use the dry brush technique with your smaller brush to create texture like i’m doing in the image below. Careful not to over do it.

Paint in some darker strands of grass in the foregound.

That’s the end of yet another watercolor tutorial! My goal was to go into depth with this tutorial to help you learn something new. If you did make sure to sign up for my news letter, that way you can recieve my free pdf E-book on watercolor principles for beginners and be updated for future content so you can keep learning!
I hope you enjoyed reading or painting along this mountain field tutorial with me. Be sure to sign up for my newsletter where below you’ll recieve updates on new posts, along with a free 3-day watercolor exercise package and e-book on watercolor principles!
Supplies you’ll need
- One colour of watercolour paint (I used Indigo)
- Your choice of watercolour paper (what paper should you use?)
- Round #6 and #8 watercolour brushes
- A pencil and eraser
- Clean water

To begin, lightly sketch a jagged line which will be the top of a mountain. You can use reference photos of mountains to see the peaks and valleys. The idea here is to create somewhat of a silhouette of the shape. You can decide where you want the ridges to go and where you want some of the peaks to be.

Now in the center of the mountain, sketch a couple of ridges/peaks so you have a slight idea of where you want to paint these in.
Painting the background
For this painting, I am using Indigo because I think it’s a very nice cool blue that can obtain both light and dark shades really well. It also has a “cold” look to it which compliments our mountain theme wonderfully.

Using a diluted (watered down) mix of the Indigo shade, fill in the background/sky area of the mountain. Be sure to use the tip of your brush around the jagged edges of the mountain.

Now take an eraser and erase the top line that you sketched. Since you have the background painted, you should be able to see the separation of white paper and sky, so the pencil line shouldn’t be needed.

Painting your watercolour mountain
Using a larger brush like a #8 round brush, mix up a darker shade of Indigo. Now you will begin applying the colour to the areas of the mountain that you want to appear recessed or in shadow.

Begin with the tops of the mountain peaks and try to think in terms of three dimensional objects. If you were staring at this mountain in real life, which parts of the mountain would be closet to you and which would be farthest away? The parts that are farther away are going to be a darker colour.
For the tops of the mountain, imagine them as triangles. One side of the triangle will be shaded while the other will not.

One thing to keep in mind is to try to keep the same angle of painting throughout the valleys/recessed areas. You can see in the image that the blue I’ve painted is all done on a diagonal axis. This is what would happen if the sun was hitting one side of the mountain and casting shadows — so it makes it a little more believable.

Now that you have your dark areas in place, let the paper dry then go over them with an even darker mix of the Indigo. Try to keep your brush strokes loose this time and use the tip of your brush for details.

In my painting, I’m not putting much pressure on my bristles at all. I am simply trying to close up a little more of that white space with texture and fine details as I go. I like to sort of drag my brush downwards to create almost a dry brush effect.
Continue to close up more of that white space with jagged lines and singular little dots as you go. As you start to layer your paint, you’re going to start to see this all come together.


