7. Glue your larger snowy hill at the bottom of your snowy blue cardstock.
Winter Landscape Art for Kids
Looking for some beautiful winter art lessons to share with your children this season? If so, you are going to love this winter landscape art for kids. Using newspaper and a variety of different materials makes it a fun mixed media art project. Did I mention the end result is stunning?!

[This craft activity was originally posted on December 28, 2016. It has since been updated with new photos, a more in-depth tutorial and video.]
How to Make Winter Landscape Art for Kids
I’m not a big fan of living in a snowy climate (Brrr!!) but I love, love looking up at our mountains and seeing the beautiful evergreen trees set against the snowy landscape every winter.
We just had a big storm for Christmas so it was especially gorgeous during all of our holiday travels this past week. It inspired us to make this newspaper winter landscape art project this week. The printed bubble wrap background adds a perfect falling snow texture to the art project.

Before you get started making your beautiful winter landscape artwork, make sure to watch our full video tutorial inside this post.
Supplies needed to make your winter landscape art:
This post contains affiliate links to the products mentioned. Read our disclosure policy for more information.
- newspaper
- green watercolors (We love liquid watercolors!)
- paintbrush
- sponge paintbrush
- light blue and white cardstock
- bubble wrap
- white paint
- paper plate
- metallic markers
- scissors
- glue stick
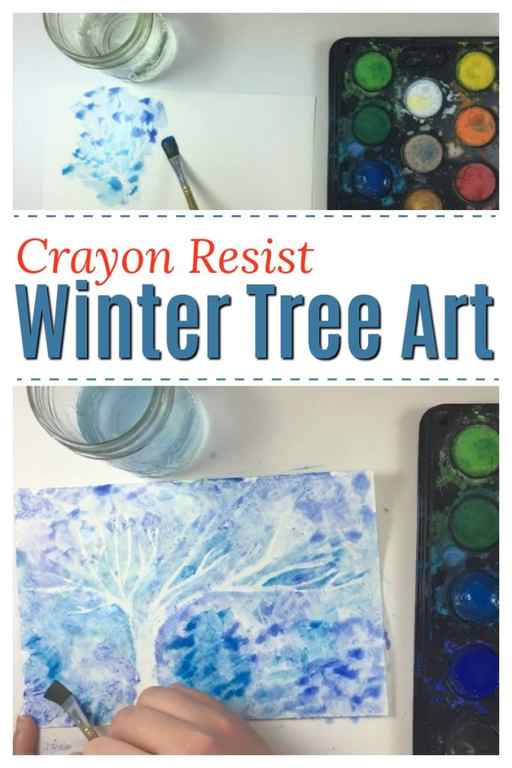
Winter Art Activity: Crayon Resist Winter Landscape
I love the simplicity of crayon resist art. It seems when the weather gets cold we turn to winter art projects a lot. Crayon resist is definitely one of my go to art projects for kids – so easy and so pretty.
We first did this winter art project 5 years ago! At that time I remember how much I loved it because ALL of my kids – then 11, 3, and 1 could participate. Well, Benjamin (who was 1) participated by making some marks with the crayons (and tasting them of course) and then doing a few dots of paint before losing interest. But I still count that as participating!
We just did this watercolor winter tree crayon resist art project again on the weekend – and AGAIN all of my kids loved it!! Well, not Ms. Norah – turns out 2 months is a bit young for this art project. But my 16, 8, and 6 year olds were engaged and happy. It’s not every art activity that can accomplish that!
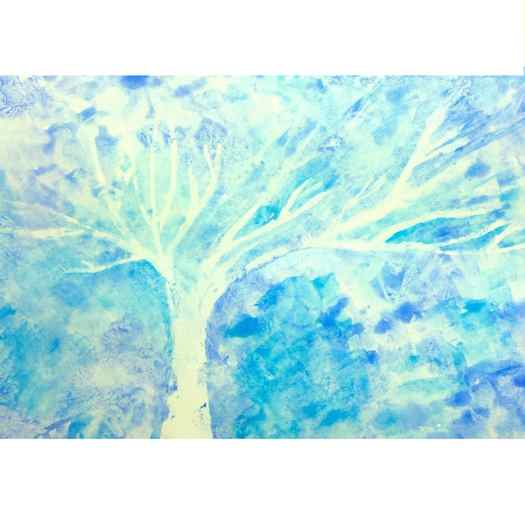
To make this winter art landscape we used paper, crayons, and water colour paints. That’s it! And the process is simple allowing for lots of child-led creativity.
Madeline made this video of her winter art landscape – she did a great job!
To create this winter art activity:
First, the kids drew a picture using white crayons. Any white crayons will do, we just happened to be using some fancy ones. Madeline drew some bare winter trees for her winter art landscape.

Then the kids painted over their drawings with watery water colour paints. Madeline used blends of blues and whites. The trick, I have found, is to use lots of water. This helps both with the blending of colours and in ensuring the crayon resists the paint.


I think this winter art activity was a success – and the winter landscapes look beautiful! I think they will get framed (which we do by using sticks from the backyard … it’s how we roll around here) and hung in our kitchen.
All of my kids seem to love the arts: visual art, drama, singing, music – the whole shebang! This is quite fortunate for me as I can easily differentiate these activities to suit the many levels of abilities in our home. Art is one of my wee ones very favourites, and I find I look forward to it as well. I love seeing how creative my kids are – and how much they learn, grow, and change all of the time.

If I could have my kids either doing art or playing outside all day I don’t think I would have any squabbling at all … well, perhaps that’s a stretch … oh the squabbles
Today was a good day. I hope yours was too!
Thank you so much for reading friends,
WINTER LANDSCAPES – 1ST GRADE

Read below students artwork to see how we created them!


This lesson took 2 (40 minute) art classes to finish. A fun quick lesson right before the winter break! Students had so much fun creating them especially when adding flecks of white paint for the snowflakes with toothbrushes!
DAY 1
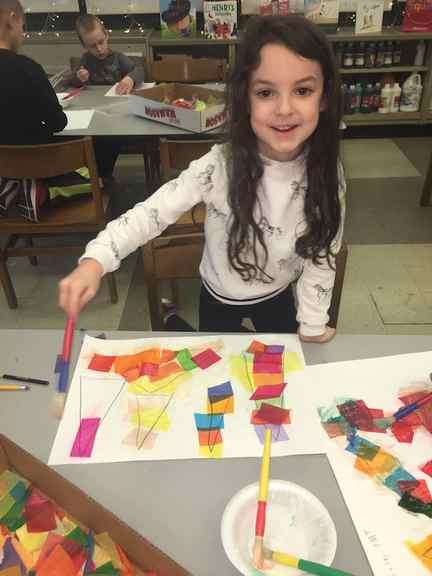
After reviewing what a landscape was, students drew 5 triangles on a sheet of 12×18″ 80# white paper with pencil. I encouraged them to draw them in various sizes. Students could use rulers if they wanted as well.

Once drawn, they went over their lines with a black colored pencil to darken their lines. This is so kids could see their lines better when cutting them out, after gluing down tissue paper on their triangles.
Then they glued colorful cut tissue pieces all over their triangles using watered down white school glue. Students overlapped tissue as they glued, making sure to cover all the white spaces within their triangles. It’s important here to apply thin layers of glue, then one tissue at a time, then add another thin layer of glue on top with their brush to make the tissue lay nice and flat.
I mentioned to students they could go beyond their triangles edges with tissue since we would be cutting them all out later on.


These were set aside to dry until the following art class.
DAY 2
Students cut out their snowy hills from white paper and glued onto a sheet of 12×18″ black paper with a glue stick.

Then cut out their triangle trees and glued onto their snowy hills with a glue stick.

Then for a final touch, dipped a toothbrush (packs of 5 at the dollar tree!) into watered down white tempera paint and using their thumb ran their thumb across the bristles (bristles pointing downward to their landscapes) flecking snowflakes all over! Messy for sure! But fun!


