* This post may contain affiliate links. If you purchase, I could make a small commission at no charge to you. Please read my Disclaimer and Privacy Policy HERE.
Winter Village Window Painting

It’s the most wonderful time of the year… window painting season! Or at least that’s what I say!
This has been a little tradition I started all the way back my first year teaching in 2008 ( ). For me, painting the windows is such an easy way to spread joy to others. Not only is it incredibly relaxing to do as an artist, but be prepared to hear the “Ooos and Ahhs” as students and staff walk by admiring your window painting. I’ll never forget one of my students coming up to me at the end of the day and saying “Mrs. Edington, I was watching you paint those houses from my classroom and it was the joy of my day” ❤️ Are you kidding me?? That right there is our way yall- to give kids the joy in their day!

Let’s Get Started!
- White tempera paint (I use Crayola Premier Tempera)
- Liquid hand soap (to be added to paint)
- Paintbrushes (soft bristle/ synthetic are best)
- Winter Village Drawing Guide (available in my TpT store)

- Add a bit of soap to your paint. This step is totally optional but when I shared these windows on my Instagram, the number one question I received was “WILL IT COME OFF??” Yessss yall- tempera paint is water-based and wipes right off! Sure you will have to spray and wipe a few times but it is far from permanent. Another option is to add a few pumps of soap to your paint and mix it in. This thins out your paint a bit and can make it appear a little more transparent, but when clean up comes around getting the paint off is a sinch! All you need is a straight razor blade and the paint with soap in it scrapes right off! It’s very satisfying if I do say so myself.
- Gather your brushes. I like using a variety of flat and round brushes of varying sized depending on the area I’m painting and the small details there are. My favorite classroom brushes are the Class Pack from Royal Langnickle (the green handles!)
- Print your Drawing guide and get started! Ok you guys- confession time. I have been obsessed with doodling cozy homes for years and years- just check my sketchbooks and you’ll see! So after spending the weekend in a quaint little town near us, I decided to capture the charm of the town and bring it to my students and my resources. Taking photos of all of the cute shops and homes in the town, I turned them into step by step drawing for artists of all ages to follow! You can download this guide here!
- Begin by painting the snow at the bottom of the window (a bumpy line) and then start painting your buildings! The more charm the better- consider adding lights, street lamps, trees, fences, feet prints and more!


Whether you’re planning on painting this village in your classroom, around the school or even at home, I know that you and your little ones are sure to love it! Have fun!
Materials Mentioned
- Plexiglass or Glass Pane Window or Frame
- DecoArt Multi-Surface Acrylic Paint in Turquoise Waters, Night Sky, White, Black Tie
- DecoArt Gloss Enamels in True Red
- Assorted Brushes Set with a Fan Brush
- Americana Decor Metallics in 24K Gold
- DecoArt Glamour Dust in Limelight
- DecoArt Dazzling Metallics in Peacock Pearl
- SnowTex from DecoArt
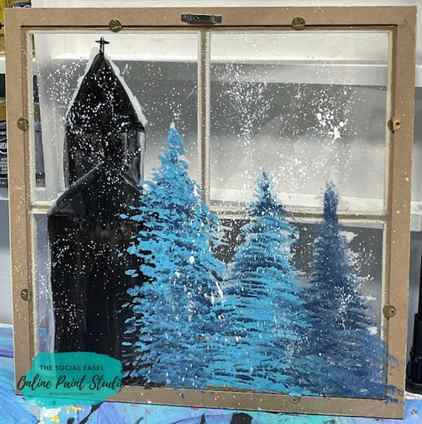
There were a lot of elements I wanted to add—snowy evergreen trees, a chapel with colorful stained glass windows, and of course, metallics and lots of texture. All of these things together can take a little bit of thought when painting on a window.
When painting glass or plexiglass like this, traditionally, you do what is called “reverse painting” and paint the whole image on the back of the panel reversing your steps. I will not solely be reverse painting in this lesson, though. To create a more 3D look, I decided to paint on the back and the front of the glass and then added SnowTex for extra texture.
I had already begun hand painting on the window frame and thought I would show you Live on Facebook how I finished things up.
How to Paint Evergreen Trees on Glass
When you watch the video below, you will see I had already painted a few trees before adding the chapel structure. But I wanted a few peeking from behind and shared with you how I painted those evergreen trees.
To paint an evergreen tree, I like to use a fan brush. I start with a straight vertical line down where I want the center of the tree to be on the backside of the plexiglass. This line is the tree trunk and my guideline for painting the rest of the tree.
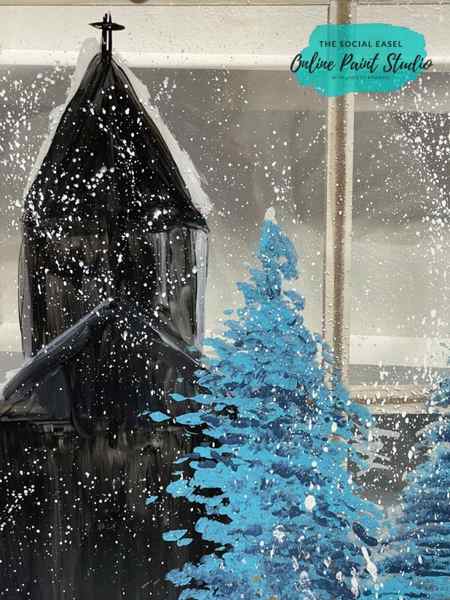
Then, with a loaded brush, bounce from side to side horizontally, creating a broad base and slowly tapering as you work your way up. Turn your brush and use the corner to make narrower marks as you get near the top.
Remember, you want those branches to be kind of staggered on the ends, not forming a perfect triangle.
Flip your painting surface around to see how it looks as you paint. I needed to break up the color just a little bit and decided to add some darker tones as shadows, so I flipped the plexiglass window frame back around and added those in.
See an up-close video of how I paint evergreen trees and other things using a fan brush in THIS blog.
After you have the shape and layers of color how you like, it’s time to add some snow to the front of the plexiglass. I used a flat brush and white paint to dab along, staggered across the tree.

Learn how to add dimension to your trees in my blog, all about painting shadows and highlights.
The snow would be the first step if you were fully reverse painting these evergreen trees on glass.
How to Paint a Chapel on Glass
To paint the chapel, I used a flat brush and black to paint the basic shape on the back of the plexiglass. I like having the dark backing to act as shadows and give a bit of a rustic look.
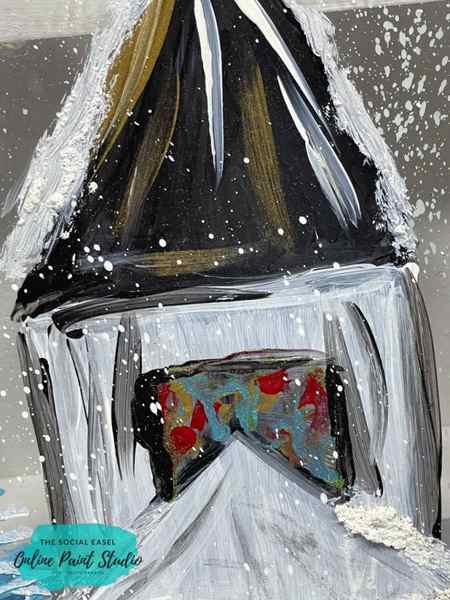
Then, I used white paint on the front of the plexiglass to paint the siding of the chapel, leaving the arched doorway and roofing black and notched out where I would like the stained glass windows to be. If you want, this is a good time to add a thin outline around the chapel in black.
Let your paint dry and do a second coat if you want more opaque colors.
Better Deals
Traditionally, winter is normally a slow time for Indianapolis area contractors. As a rule of supply and demand, painting companies stay busy during the late spring, summer and early fall to complete as many exterior painting projects as possible before temperatures become too cold. Since interior painting can be done year round, painters prefer to schedule interior jobs during rainy days or during the winter months. As a result, if you’re looking for a better deal on your interior painting, schedule the project during the winter rather than during an overbooked summer.
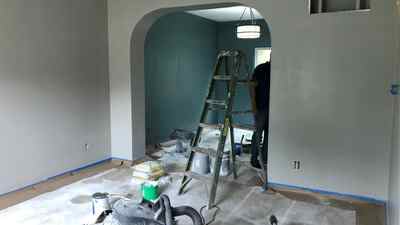
As previously mentioned, when the cold weather breaks and temperatures rise, painting companies can become busy very quickly. It is not uncommon for many painters to schedule project 1-2 months out during the warm weather months. However, because winter months tend to be slower and jobs can be completed much sooner with more flexibility.
Ventilation Is Not An Issue
While it is true that during interior painting projects, one should be aware of paint fumes, but the truth is one doesn’t need to open every window in the home. With today’s low VOC paints, ensuring proper ventilation opening a single window shouldn’t affect your heating bill too much. Likewise, it may be cheaper to have your interior painted during the winter with windows open than during the summer when some contractors raise prices for interior and lower them for colder months.
Humidity. It not only fogs your glasses when walking outside, but a hot and humid day will affect cure time for paint. The more hot and humid it is outside, the longer it takes for paint to dry indoors. When paint takes longer to dry, it can hold up jobs and add time to the project. When it takes longer to complete a project, it could also become more expensive. Therefore, the paint may cure a little faster in the dryer winter than the summer.
Opens Up Summer Project Schedule
If painting the interior and exterior of your home is on the ‘to do list’, scheduling interior during the winter leaves more flexibility for scheduling the exterior. Breaking up the two projects between seasons can also give time to recoup the expense of one painting project before you start another.
In closing, everyone’s schedule and timelines are different, but if your home interior painting can wait, winter is the best time.
If you are looking for interior painting Carmel Indiana and live in the surrounding Westfield, Carmel, Fishers, and Indianapolis area, consider Legacy Painting!
Call (317) 426-7228 and request your free estimate!


