HOW TO DRAW AND PAINT A BUTTERFLY: STEP BY STEP

I’d like to take you step-by-step though drawing a butterfly. I think, for me, what is so interesting in this process is that even things that appear simple take on a complexity when you are drawing them. I love the detailed perspective and newfound intimacy with an object you are slowly bringing to life on paper. It may seem complicated as you sit down and get a close look. If you are like me, you may be taking in all the details and wonder where to even start. Well let’s break this down in small easy steps. First I’ll show you the supplies I used:

Please feel free to use this as a general guideline. I just wanted to show you what I used but you can improvise with what you have. No need for fancy equipment. This is all about fun and experimentation!
Step one: FInd a visual reference for the object you want to draw. Many, many artists use visual references. I prefer, if at all possible to draw from real life (for example food objects are really fun to have set up in front of you, flowers work well, simple things you can find around the house, or thrift store finds). I think drawing from life adds dimension to your drawing that can sometimes be more difficult to capture from a flat picture but very often you do not have access to certain subject matter (like animals, for instance) and have to use photo references. There is nothing wrong with that at all! We are lucky enough to live in a time where we have vast amounts of visual references; things we might have never seen in our lifetimes or had to look up in an encyclopedia at the library, so by all means take advantage. It is a great way to learn. For this example, I chose a picture that I took on vacation of a butterfly. I like it because it is so close and really captures all the details. You can use the butterfly for your reference or you can find one you love (you can search the internet or even your favorite magazine for a nice image). Try to pick something that looks relatively simple to start out, which is close-up.

Step two: Choose which paper you would like to draw on. For this example, I chose a 98lb mixed media paper. The reason I chose this paper was two-fold. This first reason is that it takes water and I plan to use watercolors to paint it. The second reason is that this paper is thinner than standard watercolor paper (which is usually about 140lbs). I would like the paper to be a little more transparent and you will see why in the next step.
Step three: Grab a nice sharp pencil and start sketching the shape of the butterfly. I really love to use mechanical pencils because they are really thin and allow for details. They also do not get dull and need to be sharpened. This is a great opportunity to practice your sketching skills but I have a nice little shortcut for you here if you are not ready to sketch yet. What you can do is print your picture and use your window as a light box! Use a low adhesive tape to affix the picture to a bright window.


Next I place my blank piece of paper over the photo. The window behaves like a light box so that you can trace your object! This is also wonderful for when you have done a sketch and it is covered in eraser marks that won’t come up. You can just retrace your sketch minus all the eraser marks, so don’t be afraid to try your hand at sketching. You can always fix it later:)

Next, get your nice sharp pencil (I like the .05 mechanical pencils) and trace. Feel free to lift the paper and peek at the photo from time to time when some of the details aren’t as clear. Think about the pressure as you draw. I tend to be quite heavy handed and dark pencil lines are hard to erase so I try to use a nice light touch when sketching.

So here you have a nice little sketch. At this point you may want to sit down with your sketch and fine tune the details a little bit. You can perfect some of the areas or erase unwanted marks.
Step 4: Ink in the sketch. I like to use a nice fine micron marker to ink over the sketch. Once you are done , you can go over the whole thing gently with an eraser to get rid of the pencil marks. If you plan on using watercolor, you just want to make sure to use a marker that is permanent. Nothing worse than trying to paint over ink that isn’t permanent. trust me when I say it’s a mess!


At this point I like to take a close look at my visual reference and come up with a ‘plan of attack’. When taking a close look at the details, I notice the color variation. There is an yellow-y orange and a red-orange. I also notice that the edges around each color segment are a little bumpy. I decide that first I will use my micron pen to add some pointillism to reflect the bumpiness around the color segments in the wings:

Step 5: Add your Paint. I often start with the lightest light and then get darker as I go adding black last. I have to be honest though, sometimes I just go where the wind blows and paint by intuition rather than light to dark. That is the great thing with art. You can always break the rules:) What rules.

O.K, now the really fun part. adding color! I’m going to start with the color segments in the wings. I dive right in with a nice yellow-orange color.

Once I painted all the color segments that yellow-orange color, I now get my red-orange color and go over the areas that are darker (by using my visual reference photo as a guide).
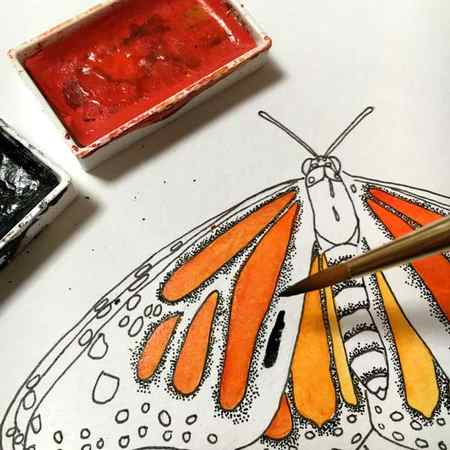
Once I am satisfied with my color variation on the wings, I start to fill in the black parts.

I continue to carefully add the black. You will need a nice fine pointed tip on your paintbrush. I like to use round size 0 for really fine details. This paintbrush is a round size 4 watercolor brush. If I am having a hard time staying in the lines, that is when I switch to a smaller sized brush.

I decide to paint around the white spots on the wing. If you are trying to achieve bright white when using watercolors, one way of doing this is by not painting the area and leaving the white of the paper exposed. Often if you look closely, white has all kinds colors in it but in this case I decide I want the stark white of the spots on the wing to really pop so I carefully paint around them.

It’s always a great idea to step away from your work and look at it from a new perspective to keep you on the right track. Things can look a lot different from farther away than really close up.

Once I have my first layer of color, I go back to my visual reference and see that there are lighter areas of both the color segments and in the black parts as well. I go back in with my brush and gently remove some of the color to lighten the area where there are highlights. You can achieve this by wetting your brush (not dripping wet, but wet) and rubbing the paintbrush on the area you wish to remove the paint then dabbing the area with a paper towel to pull up the paint. You may want to designate a special brush for this process, as it tends to be rough on a brush and you do not want your good brushes getting ruined.

I continue to remove where I want highlights, like in the body segments. See how in certain spots the pointillism is visible and adds some interest?

Now I colored the flowers under the butterfly. I decided to make them more of a lavender than pink shade. Sometimes when I don’t like something I have to stop and say “Wait a minute here, I’m the artist and I can change anything I want”. Make a blue butterfly! Leave out the flowers! Use this as a rough guide for the thought process and some tips and tricks to get you going then feel free to go crazy and make it your own!
When you have finished painting your butterfly you can do all kinds of things with it! Make a pretty Mother’s Day Card, cut it out and bend the wings to make it 3-D or decoupage it onto a wooden box. Make a few in different colors. Sky’s the limit!
Hope you have had some fun.
easiest way to sketch a butterfly

835.6K
butterfly tutorial #butterflydrawing #doodle #aestheticdrawing #doodleart #easydrawing
410.2K
How to draw cute butterflies #butterfly #butterflies #drawingtutorial #howtodraw #artteacher #learntodraw #tutorial #tutorials #arttutorial butterfly drawing tutorial! #pendrawing #alcoholmarkers

276.5K
How to draw easy Butterfly. #fy#fyp#fypシ#viral#viralvideo#viraltiktok#butterfly#artist#draw#challenge#fypage#v#video#fory
23.4K
Chack out the full tutorial in yt! My channel: artsygio ✨ #drawing #drawingtut #drawingtutorial #drawingchallenge #butterfly #butterflydrawing #howtodraw #inktober #ink #howtodrawbutterfly #tattoodesign #butterflytattoo #art #desenho

3795
How to Draw Easy butterfly Art #art #drawing #howto #artist #butterfly
3.4M
Replying to @janinedonaire monarch butterfly drawing tutorial #drawingtutorial #arttutorial #butterfly #monarchbutterfly #arttok #learntodraw #doodle


