We attached the pieces using a nail gun and stained the box to create a more “rustic” look, but painting this a bright color or a stainless steel color could look great too!
DIY Ice Cream Pumpkins

We know, we know…it’s isn’t even Labor Day and we’re already chatting about PUMPKINS! But we just can’t help ourselves. Fall is going to be here before we know it, and we want to be prepped for one of our favorite seasons.
Last year, Michaels challenged us to come up with a creative idea using their craft pumpkins, and we created these adorable DIY donut pumpkins. Michaels has craft pumpkins in so many shapes, sizes, and even colors this year (like blue!)… the possibilities are seriously endless!
Is anyone else craving a donut right now?! Us too!
Just like last year’s pumpkin craft, these ice-cream pumpkins are super easy to execute (READ: NO CARVING REQUIRED!!)
Pumpkin Ice Cream Cone – SUPPLIES
We built a cone holder so that the pumpkins could sit right in their cones on the counter or porch. Here’s what you’ll need if you want to re-create that look:
- Wood (cut to size)
- Nail Gun
- Corner Brackets (options)
- Hole Saw + Drill to cut perfect circles
- Stain
Pumpkin Ice Cream Cone – STEPS
1. Instead of going with the orange craft pumpkins, we opted for the white ones. This made it a lot easier to paint on our ice cream “flavors.” We used a light green for the mint chocolate chip base, a pink for strawberry, and left one pumpkin completely blank for vanilla! We needed about 2 good coats of paint for each one, but it dries fast. Each pumpkin took us about 5-10 minutes to paint, then each coat dried within 20 minutes so we were able to complete each pumpkin pretty quickly.
4. We opted to design our pumpkins using some of our favorite flavors, but feel free to use your favorites when designing your ice cream cone pumpkins. Heck, you could even stack two pumpkins on top of each other for a double scoop of deliciousness!
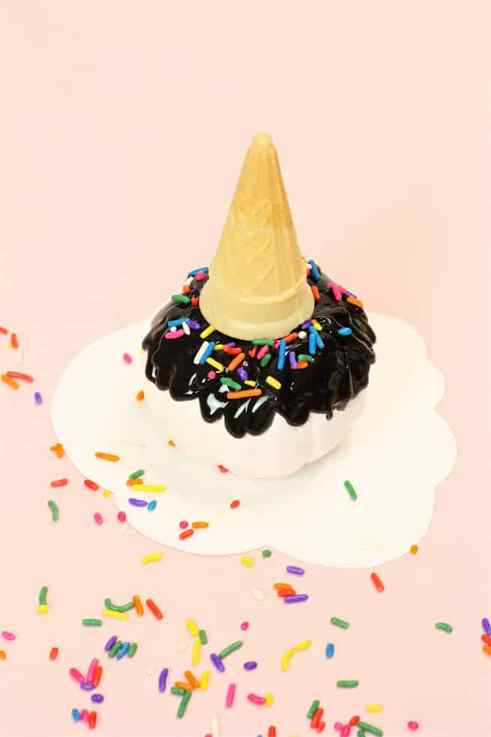
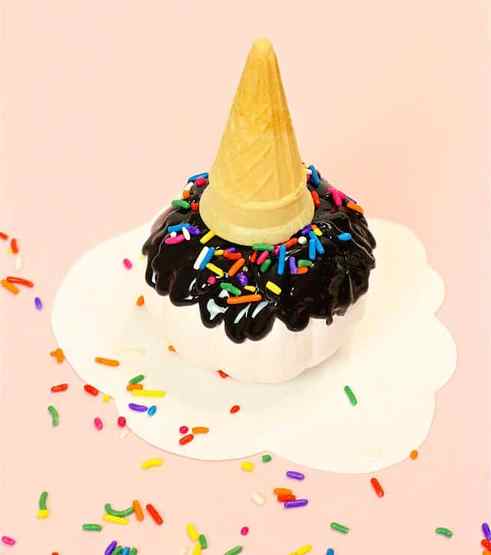
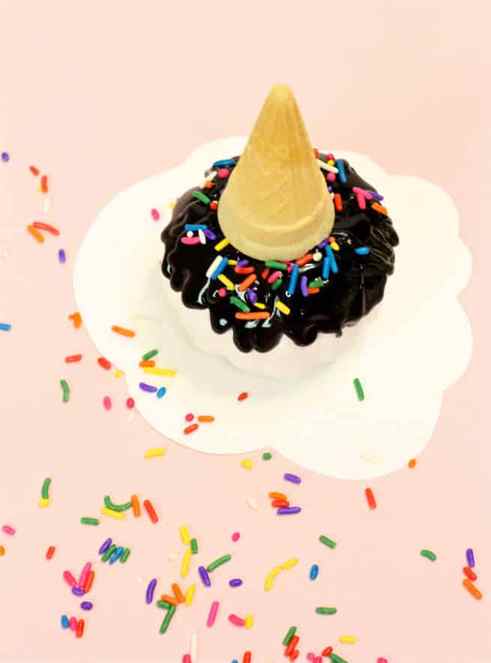
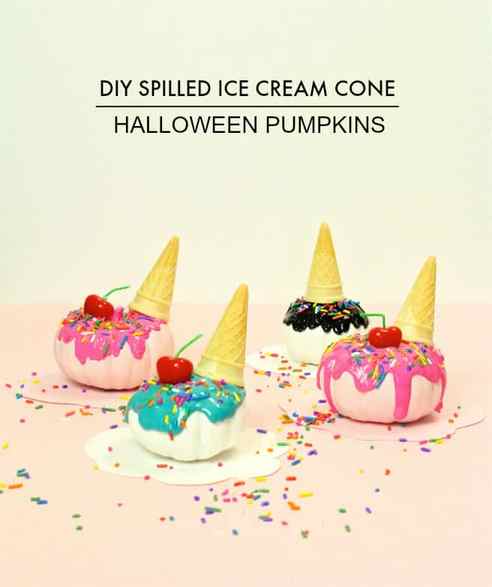
DIY Spilled Ice Cream Cone Mini Halloween Pumpkins!

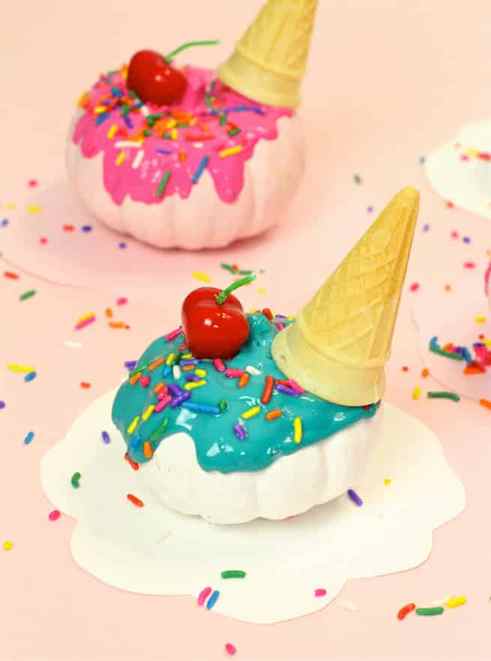
I’m sure you remembered those spilled melted ice cream con ice cream cakes I made back in September right? I loved them so much I decided to turn my mini Halloween pumpkins into spilled ice cream cones this year. I love how they came out. I’m literally obsessed with them. They are super simple to make and I’m sure your local 99 cents store or your local grocery store has some mini pumpkins to use for super cheap. It’s the week before Halloween, so I’m sharing all my last minute Halloween DIY’s, Costume Ideas, and Recipes this week!
Here’s how to make this colorful tasty looking mini Halloween pumpkins!
- Black, Pink, and Turquoise Puffy Paint
- Pink and White Spray Paint
- Mini Pumpkins
- Mini Ice Cream Cones
- Candle Cherries
- Glue Gun and Glue Sticks
- Sprinkles
- Scissors
- White and Pink Cardstock
The puffy paints have this pointed tip on them, which I cut off with my scissors, so the paint would flow better.
First you spray paint your mini pumpkins pink and white. Let them dry completely for a few hours and then pour your puffy paint colors over each one.

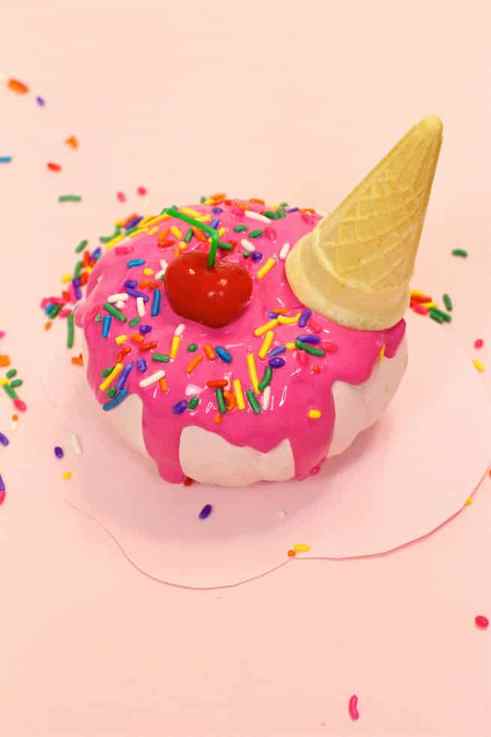
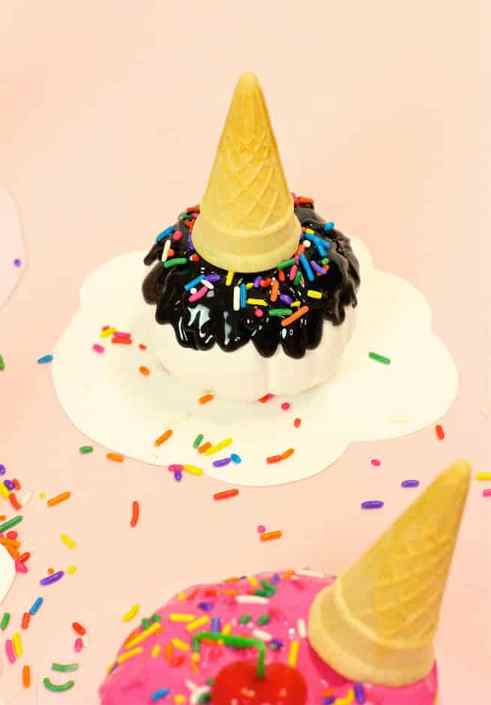
I did a mixture of Pink on Pink Pumpkins, Turquoise on White Pumpkins, and Black on White Pumpkins (which look like melted chocolate cones).
After you’ve gotten your puffy paint poured on your pumpkins, you sprinkle them with sprinkles and add a candle cherry near where the stem is.
You then take your glue gun and glue the rim of the mini ice cream cone to stick it securely to the pumpkin. Remember none of this is edible once you glue it and put them in the puffy paint! I would recommend letting your puffy paint dry over night.
Once your pumpkins are completely dry, you cut out some melted ice cream shapes (They are kind of like cloud shaped) from your pink and white card stock and you take your glue gun and glue the bottom of the pumpkin to the cardstock.
This gives the pumpkin the complete look of being a spilled and melting ice cream cone! That’s it you’re done! How cute is this pink pumpkin below? LOVE IT!
The turquoise one is also adorable!
I think I’m obsessed with this pink one though…
It made be a tied obsession with the chocolate and vanilla ice cream cone below. It’s just beyond the point of cute!
It’s definitely a tie for which one I love more!
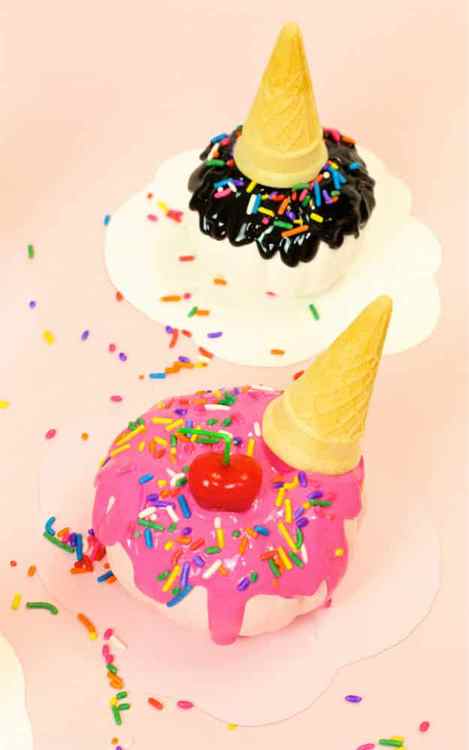
The Vanilla and Chocolate looking cone pumpkin may be winning out!
Look how much it looks like an adorable spilled ice cream cone!
When I was a kid this would have been devastating, and heck if I spilled my ice cream today it would still be devastating, but this looks so darn cute!
These are probably the cutest Halloween Pumpkins I’ve ever made. This is totally taking my spilled ice cream cone look obsession to a whole new level.
I hope you enjoy making these DIY Spilled Ice Cream Cone Mini Halloween Pumpkins as much as I do!
I have some more of fun last minute costumes to share this week and next week. There is one last Ladies with their Fur Babies Costume coming so stay tuned! I also have some fun last minute costumes coming too like my favorite marshmallow, chocolate, and graham cracker tasty treat and some nostalgic costumes too. Think she’s truly outrageous, they stare with their bellies, and they were the best little pony toys ever! Nostalgia costumes are coming!
If you decide to make any of these fun DIY’s and costumes, be sure to share some pics with me by tagging me @BriteandBubbly on Instagram, Twitter or Snapchat with hashtag #BandBHalloweenParDIY, so I can see all the fabulous Brite & Bubbly Halloween DIY’s & Costumes out there!
For more Fun DIY Halloween ideas and recipes CLICK HERE!
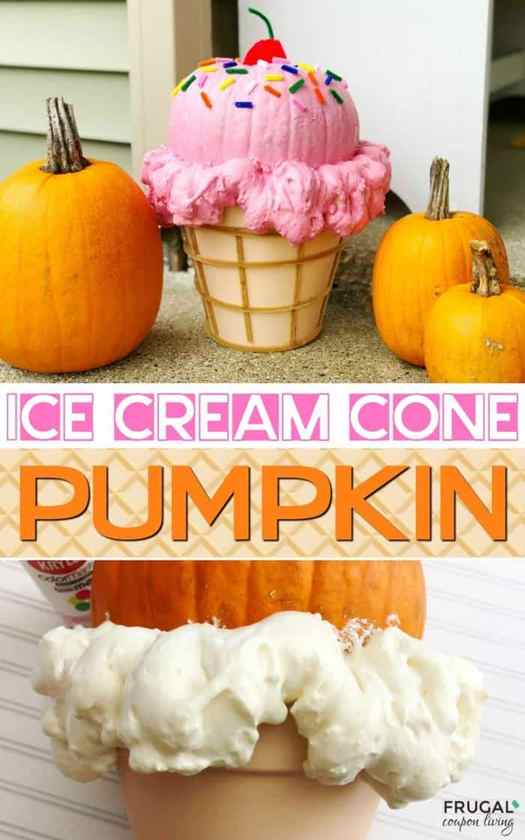
Ice Cream Cone No Carve Pumpkin
My third child’s (Eli) birthday is in October and I am always thinking of what I can do to incorporate his birthday and Halloween (without it being too scary!) I first made these cute Halloween Spirit Drink Labels, to share with you, plus I put together some yummy Halloween Kids Food Crafts.
I wanted to take our next birthday party idea a step further with our front door. The front porch has all the Boo-tiful Halloween decor, but it lacked something special for celebrating Eli’s birthday – thus the evolution of the Ice Cream Cone Pumpkin. Drop the knife, this is a no-carve easy pumpkin craft.
What better excuse for a cute pink pumpkin that an October birthday. Let’s begin.

Supplies
These craft supplies needed for DIY ice cream cone pumpkins are quite simple Most you can find at your local craft store. We created a pink no-carve ice cream cone gourd but you could also use brown and/or white paint to create an entire Neapolitan fleet of pumpkins.
This could include really cute mini ice cream cones too. Make your own mixture with a pink pumpkin, white pumpkin and brown chocolate pumpkin ice cream cone! How adorable would that be?

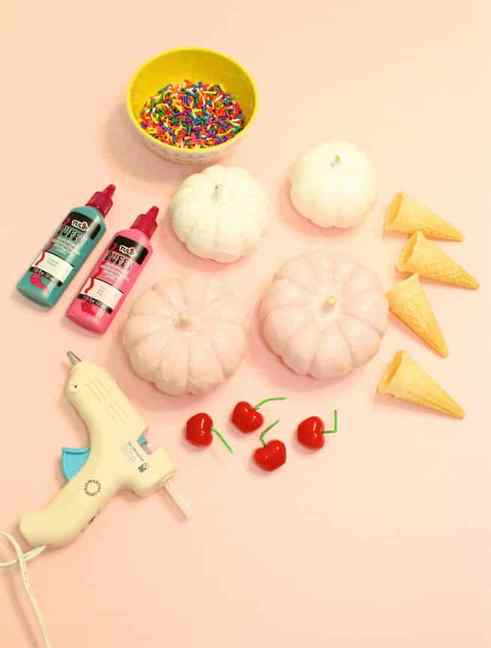
Gather the following supplies for an ice cream cone pumpkin:
- Medium pumpkin
- Large terra cotta pot (12 to 14 inches)
- Pink spray paint or craft paint
- Clear spray paint
- Tan craft paint
- Tan pipe cleaners
- Multi colored pipe cleaners
- Large red pom-pom ball(s)
- Foam paint brush
- Spray foam insulation
- Hot glue gun/hot glue
- Scissors
- Gloves
There are a few supplies needed for this project. I would say the most unique supply is the spray foam insulation. It was not something I had on hand. Keep this project in a well ventilated area. You have craft paint as well as the foam. Adult supervision is suggested for this project!
One thing to take in to consideration for this project is it takes time. You will need time for the pot to dry, the ice cream base, and the pink paint to dry. So about three different times where your project needs to “sit” before you move on to the next step.
Let’s take a look at these easy pumpkin directions.
How to Make An Ice Cream Cone Pumpkin
This October craft tutorial includes really easy directions. It will take a few days to complete as you will need to let different steps in the process dry before moving on.
First, protect your area by laying out a piece of newspaper or scrap paper in a well ventilated place. You will want to paint your terracotta pot tan and let it dry.

Once your pot is dry, you will place your medium pumpkin upside down into your large clay pot.
If you are doing this with the kids, this particular part is for ADULTS! Please read directions/precautions on your Spray foam insulation can. Put your gloves on and carefully spray a small amount of spray foam insulation around the bottom of pumpkin/top of the pot. Keep in mind that the foam will grow twice the size while it dries. You can always add more after it dries.
Let it dry until you are ready to move on to the next step.

In a well ventilated area, carefully wrap (or protect) the pot and spray or brush two coats of pink paint onto the pumpkin and dried foam. Let your pink paint dry.
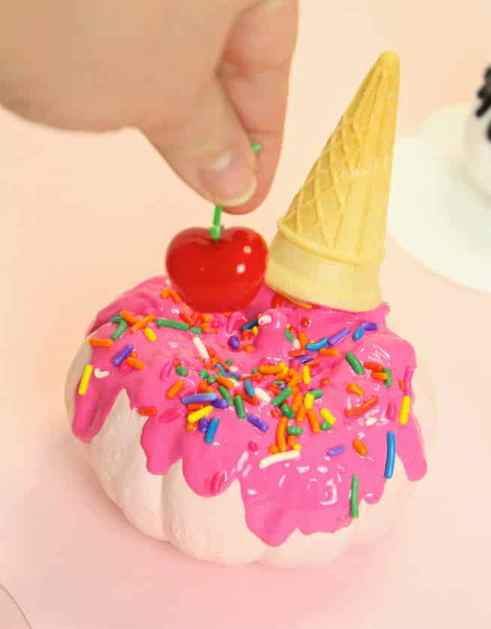
The next step is for your cute ice cream cherry. Glue a red pom pom ball to the top center of the pumpkin and add a two ince bent green pipe cleaner in the center of the red pom-pom ball for the cherry and stem.
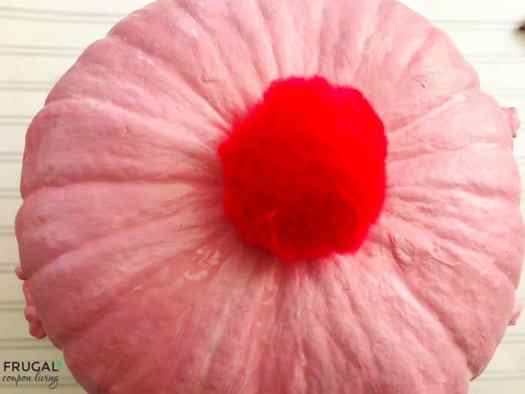
Cut your colorful pipe cleaners into 1/2” pieces and carefully hot glue them to the top and top sides of the pumpkin to look like sprinkles.

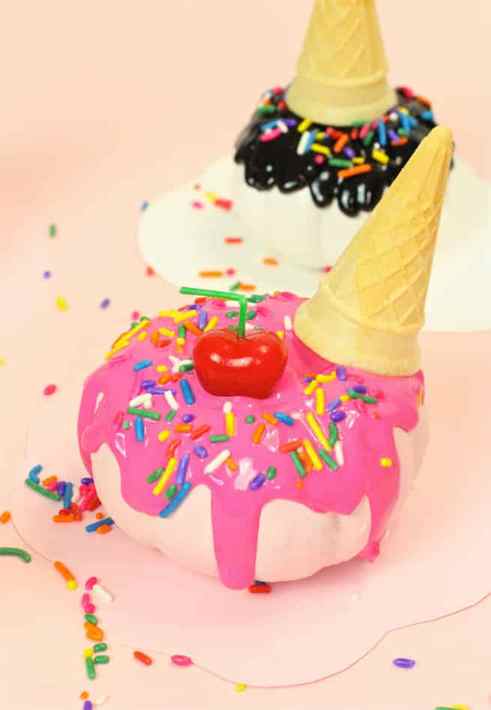
Measure and cut your tan pipe cleaners to be the same length as the bottom of the terracotta pot and glue vertically around the pot leaving approximately a 3” space in between.
Next, glue tan pipe cleaners horizontally around the pot leaving a 2-3” space in between to look like an ice cream cone.

To protect your pumpkin, bring your pumpkin outside and spray with a clear coat of spray paint and let dry.

More October Party Ideas
Hosting an ice cream party? Make sure you download and use these fun Ice Cream Party printables! These include ice cream party décor and ice cream party games for kids! At your October party, serve some tasty creamy pumpkin ice cream! Pin to Pinterest.
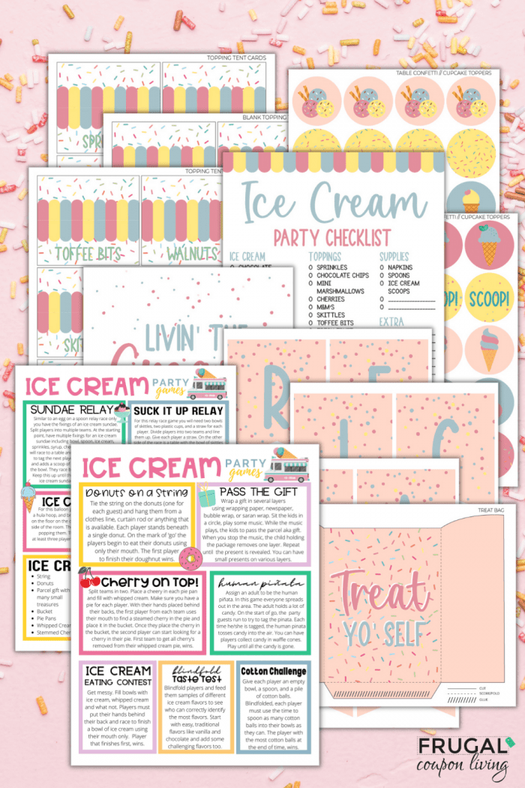
October birthdays are a great excuse for a Halloween party. For a Halloween themed birthday party – why not twist it up with a little bit of ice cream? You can also use these Halloween Party games for a little bit of fun and activity. Or if you love a good 60 second challenge, try these Halloween Minute to Win it games that your guests will love. When your games are all done, how about prizes for the winner? Your ice cream cone pumpkin could be that golden trophy! Pin to Pinterest.

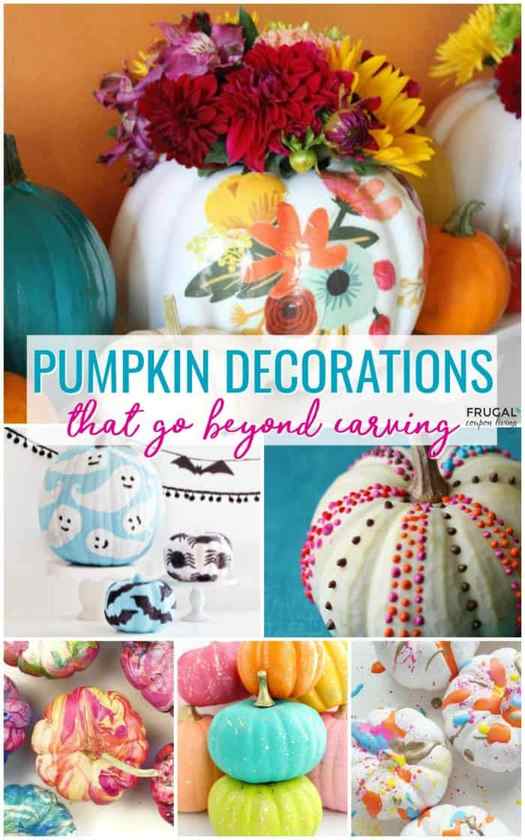
Take a look at our other creative pumpkin decorations for Halloween – they go beyond your traditional carve with dozens of no carve pumpkin ideas. Pin to your Halloween and Craft Pinterest Boards.
Also enjoy these cute ideas for your front porch and front door – Halloween Porch Décor. These October porch ideas will add the most adorable welcome to your party guests when they arrive at the party. Pin to Pinterest on your Home and Halloween Boards.

If you loved this October Party Pumpkin, share to Pinterest. Tell us how your ice cream pumpkin turned out and how you celebrated a speical October birthday.

Enjoy your pumpkin party decoration and have a very happy birthday! We hope you get some great gifts.
Update: This post has been updated in 2022. It was originally published on October 11, 2018.
WHAT’S TRENDING? Looking for a few engaging activities? Grab Minute to Win it Games – Traditional, Christmas, Friendsgiving, Thanksgiving, and more! Use these fun activities in the office, classroom, or at your next party.
Last Updated on August 17, 2022 by Ashley at Frugal Coupon Living


