Add a rectangle of cute patterned paper to the back of the frame and reassemble the frame.
How to Distress Acrylic Paint on Wood Frame
Distressing paint on wood frames is a simple and durable way to redecorate without spending a fortune. Just follow these simple steps. If you make a purchase using the affiliate links included, we may earn a commission.
Do you like to make home decor for your home? There is something about making it yourself so it perfectly matches your own personality and style. I love it!
Recently, I was given a bunch of frames from work. They are really nice frames but have the company logo on them.
I love my job but that doesn’t necessarily mean I want it plastered all over my house.
So I came up with a fun way to paint over the frames and create some beautiful decor for my home at the same time.

More Home Decor Craft Ideas:
I love to share our favorite, tried, and true craft tutorials with you? Like this Glitter Paper Flower Frame, DIY Mirror Wall, and a Glass Etch a Picture Frame.
Be sure to look around the blog for more DIY Projects!

Craft Supplies:
The technique used here can also be used to paint distressed furniture, but I recommend painting something small to get the hang of it before moving on to a larger piece of furniture.
You can also select any paint colors you like. I recommend a darker color for the base color and a lighter color for the top coat.
Materials
- Acrylic craft paints in three colors: tan, light gray, and dark brown (I used DecoArt craft paints in the colors fawn, raw umber, and slate gray)
- painter’s palette or paper plate for mixing paints
- Chip brush
- clean rag
- Matte sealer if painting furniture (I love General Finishes Flat out Flat Topcoat )
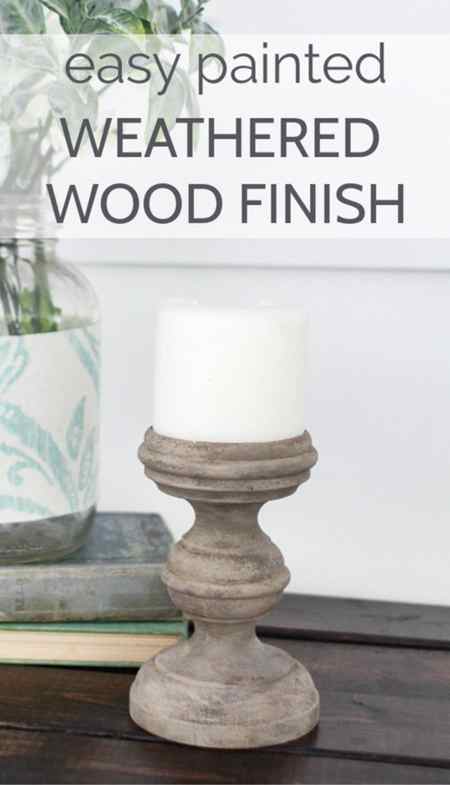
Creating this weathered wood finish is quick, easy, and very inexpensive.
You can use chalk paint for this, but honestly, acrylic craft paints work just as well and they are very inexpensive.
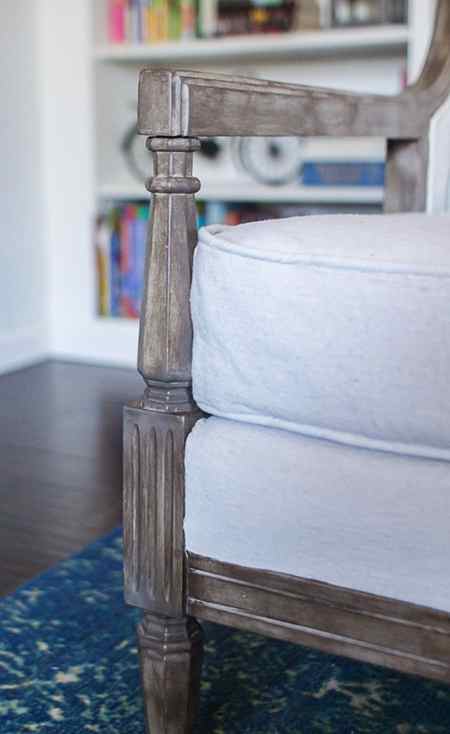
I had plenty of paint in my three little bottles to do my entire couch frame as well as this candlestick and several other projects.

Before you get started painting, you always want to start by giving your piece a quick cleaning to remove any dust and grease.
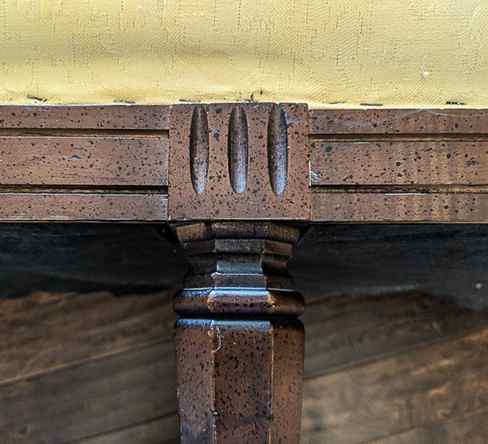
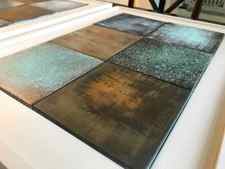
This is what my couch’s wood finish looked like before. It seems they may have gone a bit overboard with the black flecks!
Once your piece is clean, use your chip brush to paint a rough coat of tan paint all over your piece.
The paint should cover most of the old finish but it is fine if the color looks uneven or there are a few bare spots.
In fact the less perfect it is, the better.
Real weathered wood is not uniform; it has lots of texture and different shades. A few layers of imperfect paint can give us a similar look.
Usually these craft paints dry in a matter of minutes and once your first coat is dry, it is time to move on to the dark brown paint.
You want to dry-brush a light coat of dark brown over the tan. If you aren’t familiar with dry-brushing, it is very easy.
Simply get a very small amount of paint on your paintbrush and then wipe most of it off on your painter’s palette or a paper towel.
Then lightly drag your paintbrush over the piece you are painting.
Be sure to paint in the direction of the wood grain or if you are painting something that doesn’t have wood grain, paint along the length of any straight edges, in the direction wood grain would typically go.

If your paint goes on a little thicker than you wanted, you can use a clean rag or scrap of an old t-shirt to gently rub off some of the excess.
This will also help to really get the paint into all of the nooks and crannies of your piece.
For the third coat of paint, mix equal parts of your gray and tan paint together.
Dry brush a light coat of this over your piece.

My favorite thing about this technique is that it is truly impossible to mess up.
It doesn’t need to be perfect and since each piece of wood is different, there is no right or wrong way for it to look.
But if you aren’t satisfied with how your piece looks after the third coat, it is very easy to simply add more paint.
If you would like it to look grayer, brush on a bit more gray. If you want it lighter, you can always mix a little white into your tan paint.
Or if you wanted it darker, just add a bit more dark paint. Just keep dry-brushing on layers of color until you love the result.
If you are using this finish on a piece of furniture, you will definitely want to protect your finish with a good sealer.
General Finishes Flat out Flat is one of my favorite sealers. I used it on my vintage sofa and it gives the perfect matte finish.
If you are painting small home decor pieces, a sealer really isn’t necessary. (I’ve got a whole post about this, if you aren’t sure why or when you need to use sealer on painted furniture .)
Video Tutorial
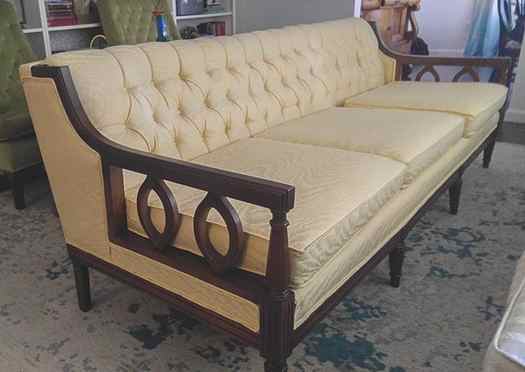
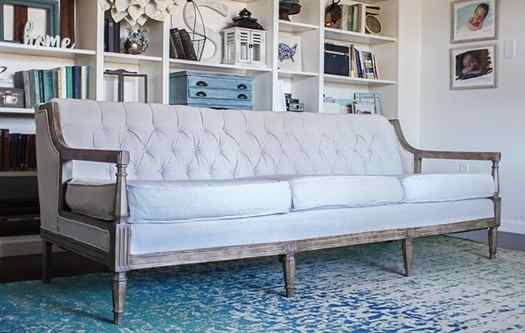
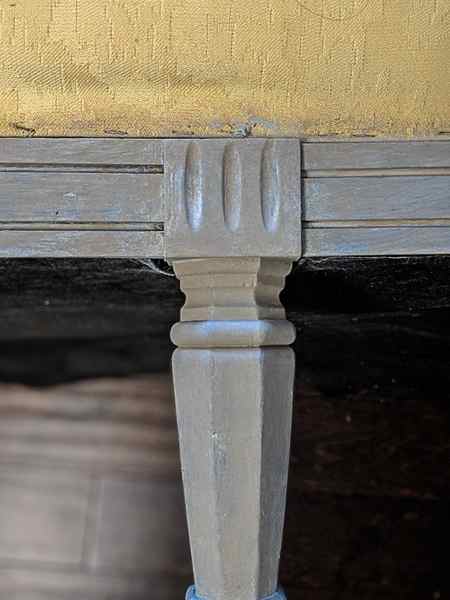
Talk about a huge difference! If you missed the post where I detailed the whole process including that gorgeous upholstery (it’s a drop cloth!), you are going to want to head here to check it out .
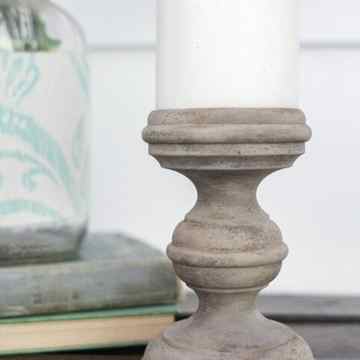
And here is a before and after of the cute little candlestick, I painted in my video tutorial.
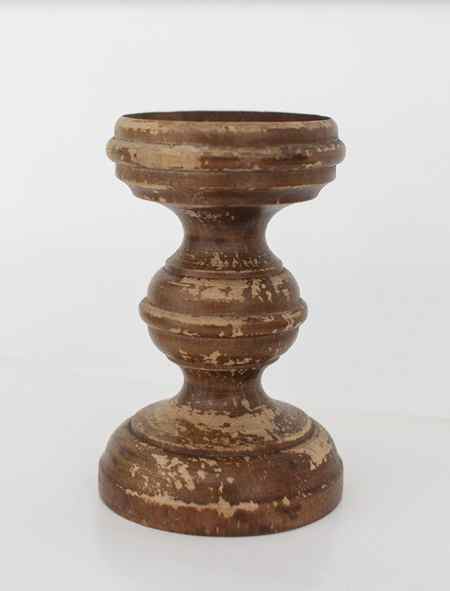
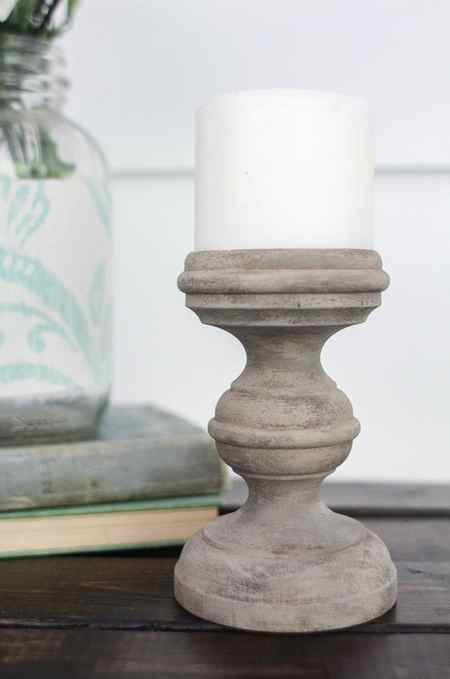
I love how the candlestick and sofa look slightly different even though I used the exact same colors.
When you layer paint this way, you are pretty much guaranteed to never get the exact same results every time just like with real weathered wood.
I’m going to be on the lookout for more chunky candlesticks as I’m thrifting.
I think a group of these would be gorgeous on my mantel!
Pin it for later!
How to Create a Beautiful Weathered Wood Finish with Paint
Yield: 1 Piece
Prep Time: 5 minutes
Active Time: 45 minutes
Total Time: 50 minutes
Difficulty: easy
Estimated Cost: $5-$10
Learn how to create a light wood finish on furniture or other home decor, without all the work of sanding or stripping off the old finish.
Materials
- Paints in the colors tan, dark brown, and light gray
- Painter’s palette or paper plate
- Clean rag
- Matte sealer if painting furniture
Tools
- Chip brush
Instructions
- Give your piece a quick cleaning to remove any dust and grease.
- Use your chip brush to paint a rough coat of tan paint all over your piece.
- Once your first coat is dry, dry brush a rough coat of the dark brown paint.
- Use a clean rag or scrap of old t-shirt to gently rub off some of the excess paint.
- For the third coat, mix equal parts of your gray and tan paint together.
- Dry brush a light coat of this over your piece. Blend the paint with a rag to get your desired finish.
- If using this finish on a piece of furniture, add a protective sealer.
Recommended Products
As an Amazon Associate and member of other affiliate programs, I earn from qualifying purchases.

General Finishes Flat Out Flat Topcoat, Quart
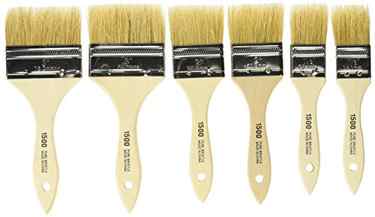
Linzer A 1506 Chip Brush Multi-Pack
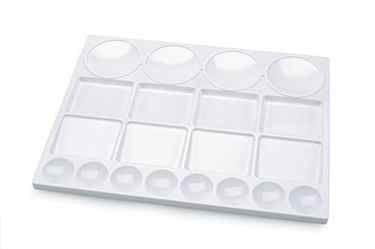
Darice Art Palette with 20 Wells, 13” x 10” – Plastic Palette for Oil Paints, Watercolors & Acrylic Paints, Ideal for Mixing and Separating Colors, For all Skills Levels
Did you make this project?
I’d love for you to leave a comment on the blog or share a photo on Pinterest!
© Carrie
Project Type: Furniture Flips / Category: DIY Decor

Comments
- Debbye says May 2, 2019 at 4:33 pm
I love what you did. I even adore the color of the cushions on your sofa! Thanks for sharing those 3 particular colors. They remind me of driftwood. Very pretty!
- Carrie says May 6, 2019 at 2:13 pm
Thank you so much Debbye! I agree, it is very similar to driftwood which I love.
Thanks so much for the video. Visual really makes a difference. Going to give this a try on a wood chest.
- Carrie says May 6, 2019 at 2:13 pm
Thank you Alicia – I am so glad it helped!
The couch turned out lovely, and love the weathered wood finish! Thanks so much for the video that helps so much being able to watch the technique.
- Carrie says June 3, 2019 at 10:05 am
Thank you Linda!
Beautifully decored sofa. I Liked the colors mostly, I bought a new home confused with how to decorate. Thanks for sharing now I got the idea,
- Carrie says June 3, 2019 at 10:19 am
Thank you!
Beautiful work! I just purchased a new dresser online and its a beautiful color but its darker than I expected. The thought of touching a brand new piece of furniture with paint is almost kind of… wrong, isn’t it?! Nevertheless, I want it lighter and this seems like a soft enough technique that won’t totally transform it. Do you think this will work on a finished piece? It’s pretty textured and seems to have a nice top coat from the factory.
- Carrie says October 28, 2019 at 9:59 pm
I know what you mean about it feeling weird to paint a brand new piece of furniture…but I’ve done it before. I say it’s your furniture and you can do whatever you want with it! And just because the factory made it a certain color doesn’t mean they are right that it is the best finish. Based on your description, it sounds like this technique would work well. The texture shouldn’t be a problem at all – it will just enhance the final finish. I would just be sure to use chalk paint or acrylic craft paints or another paint that adheres well without primer. If the current finish is very shiny, you may need to lightly sand it first just to help the paint adhere, but if it isn’t super shiny, you probably can skip the sanding. Good luck!
Hi there! I absolutely love everything that you make! I so wish i had your talent! Which i def do not! Ha I have a big dresser , coffee table, and 2 end tables that are in desperate need of a pick me up. Ive been wanting to paint them for so long now but im worried ill really mess them up. I love the color you did the wood here. Do you think i coukd use this technique on such bigget pieces of furniture or should i go with chalk paint? Just looking for a direction to start in! Hope to hear back from ya! Thanks!
- Carrie says May 14, 2020 at 9:22 pm
Thank you so much for the compliments! First of all, if you want to paint your furniture, I say go for it. The great thing about painting furniture is that if you don’t love how it looks, you can always paint over it. Since you are just starting out, I would recommend starting with one of the smaller, simpler pieces and working your way up to the big dresser. But if you’d rather just go for it, that’s fine too. I think you could do this technique on a bigger piece of furniture, but it may be a bit tricky to get it to look exactly how you want. You might want to practice on a piece of scrap wood first to see how you feel about it. Good luck!
Thank you so much for the wonderful idea and for including the colors that you used!
- Carrie says June 22, 2020 at 1:49 pm
You’re welcome! I hope it helps!
I love, love, love this look. Do you think it would stand up to kitchen table? Every other article I’ve read says latex paint, chalk paint, or stain. You are the first to use craft paint. I bought one of those oak (discovered it was oak veneer when I sanded it, ugh) pedestal tables and would love to attempt this!
- Carrie says November 28, 2020 at 9:31 pm
First, I will say I do usually use chalk paint, latex paint, or another furniture paint when painting furniture. But, in this case, acrylic craft paints just worked well for me since I wanted to use a little bit of a lot of different colors. You could definitely do the same technique using chalk paint. The real key to having your painted furniture last though is in the primer and the sealer. The paint really is just the color. Use a good oil based primer first so the paint will adhere well and wood tannins won’t bleed through. And finish it with a good sealer – I like General Finishes Topcoats. If you do that, I craft paint should work just fine in between!
Leave a Reply Cancel reply
This site uses Akismet to reduce spam. Learn how your comment data is processed.
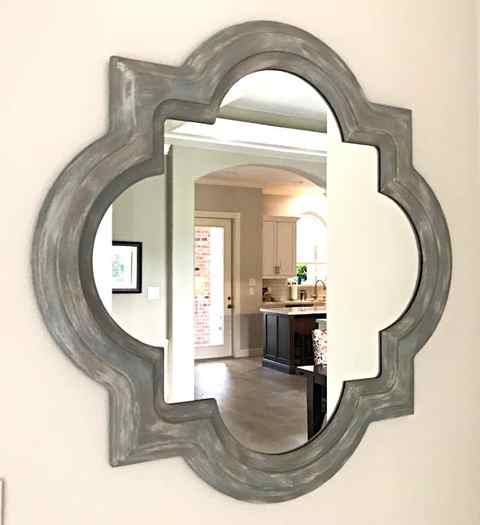
Make This EASY DIY Weathered Paint Look With Chalk Paint
Update furniture or home décor with this beautiful DIY Weathered Paint Look. Here’s easy steps, photos, & a video to help you copy the look.
This easy weathered chalk paint makeover is a fun project, guys! And, so much easier than it looks. It’s all about lightly layering the paints and picking colors that look good together.
I’ve wanted to give this mirror a quick makeover for months. The black seemed a little too stark in our light colored foyer. So, I wanted to tone it down a bit.
And, I always love a weathered paint effect when I see it in the stores. So, this was the perfect excuse to give it a try with chalk paint. I’m pretty excited about how it looks!

Some links on this post are affiliate links. As an Amazon Associate I earn from qualifying purchases at no additional cost to you.
Materials Used
- Fine Grit Sanding Sponge
- Nylon Paint Brush
- Chippy Paint Brush
- Clean Rag
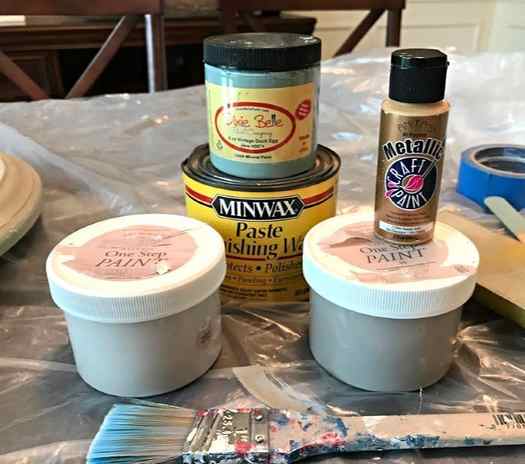
Paint and Finishes Used
- Dixie Belle Chalk Paint in Vintage Duck Egg
- Amy Howard Chalk Paint in Selznick Gray and Linen
- Gold Acrylic Paint
- Minwax Paste Finishing Wax, in Natural
You don’t have to use these exact brands. You can find any pretty medium blue and greige chalk paint shades that look good together. Or mix up your own DIY chalk paint from latex paint and plaster of Paris.
How to Paint a Weathered Look
Step One – Start With The Base Color
Start with 2 layers of your medium greige chalk paint (Selznick Gray), using a good nylon brush. Chalk Paint will stick to almost anything.
But, if what you’re painting has some built up dirt or oils, you can clean it first. I’d use Dawn dish soap mixed with water or TSP to clean. Let that dry, then paint.

Step Two – Add Lots Of Layers
Grab your chippy paint brush for the rest of the layering. You can see in the video below how to do a very light dry brushing with a chip brush.
You just barely touch the brush to the paint and lightly apply it across the mirror. I started with the vintage duck egg because I only wanted hints of the color to show through.
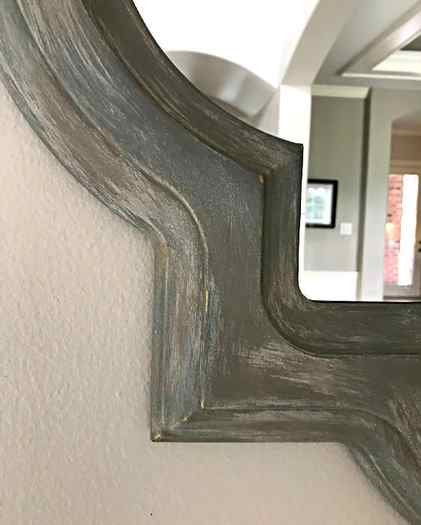
Grab a gold acrylic paint that looks like shiny gold jewelry, not that antique gold. Using your finger or a Q-tip put a little on any raised points, in grooves or on details. This is in the video too.
Then I dry brushed a light cream color, called Linen. Followed up by one last dry brushing of that original paint color, a greige called Selznick Gray. AND again with that Linen color.
All of that layering is the key to this look. Just keep adding more to get a look you really love.
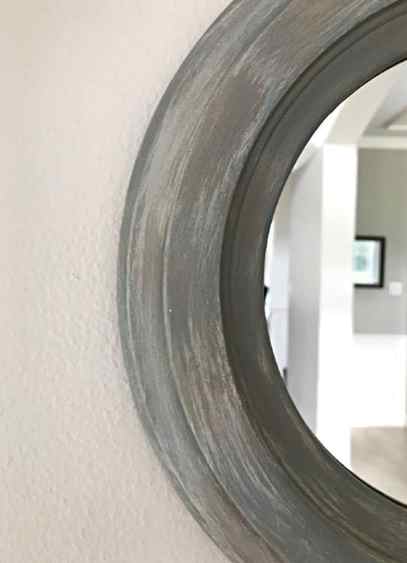
After all of that paint dried, I wet a fine grit sanding sponge, squeezed it out, then lightly sanded everything to smooth the finish.
I sanded a little harder on the raised details to bring more detail and paint variations in there. Distressing corners and edges always makes faux finishes look better. At least, that’s what I think.

Step Three – Sealing the Weathered Paint
Now it’s time to apply a wax sealer. First, wipe the whole thing damp with a slightly damp clean cloth to remove any residue from the sanding.
Let dry, then rub on 2 layers of your favorite clear or natural wax. Be sure to follow the directions on the wax for the best results.
If you don’t have wax, you can use a water-based poly to seal the finish instead.
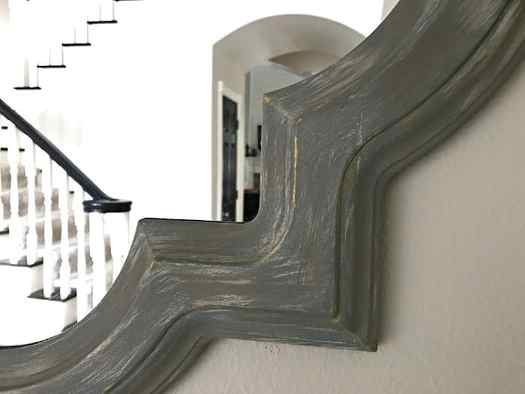
This weathered antique paint effect can really look great with so many styles. It works in my traditional home.
But it would look like barn wood in a rustic or country home. And, on a more detailed, vintage style mirror it’d look like that pretty blueish gray French Country look.
On furniture, it’s really close to that Restoration Hardware paint finish everyone loves.
That’s it for this DIY Weathered Paint Look tutorial.
How To Make Paint Look Weathered – Video
If any of the steps above are confusing, watch this short video to see how I paint this weathered chalk paint look.
You can also find this popular Blue Distressed Paint Using Vaseline Tutorial


Feeling inspired? Now that you’ve seen this DIY Weathered Paint Look tutorial, you can do it too. Let me know if you have questions.
Don’t forget to sign up for the Abbotts At Home email newsletter to get DIY, Remodeling, and Crafty ideas in your inbox.
By Author Stephanie
Home » DIY Home Decor » Make This EASY DIY Weathered Paint Look With Chalk Paint


