When you paint faux wood grain in acrylics it creates a wonderful background for many paintings and craft projects.
How to Use Acrylic Paint on Wood: [ Varnishing Tips Included ]

For every beginner artist or the people who have an interest in painting, acrylic paint brings quite some excitement. It brings out the beautiful pigmentation of vibrant colors on a wide variety of materials including glass, wood and more.
Today we will specifically focus on how to use acrylic paint on wood. Even though its fast-drying trait is an advantage for many, it can also become quite troublesome.
That is why there are some extra steps you need to take in preparation. We are here to explore those precautionary steps and more!
Table of Contents
Can You Use Acrylic Paint On Wood?
Acrylic paint is well-known for its capability to dry up fast. Many of you may wonder if its chemical composition will go well with wood. Although it is easily soluble in water in its original form, the paint becomes water-resistant after drying up.
Before use, sometimes it needs to be diluted as required by the painter to achieve the effects of watercolor or oil painting. But applying water on wood can damage its quality and durability.
So you may often wonder – does acrylic paint work on wood?
The answer is – YES! However, you will need to use the right kind of wood and take the necessary precautions to keep it protected.
That is why it is important to understand and remember the steps of applying acrylic paint on wood.
Acrylic Paint On Wood – The Applying Process
A. Tools You’ll Need
Before starting the process of painting the wood, you need to gather all the required materials for carrying out the job. For applying the acrylic paint of your choice on the wood, the necessary tools will include-
- Wood primer
- A bowl of water
- The paint palette
- Some sandpaper
- Some paper towels
- A paintbrush
Besides, make sure you are doing all these in a place where there is enough ventilation. So choose a room with more windows and outdoors than usual, or just arrange everything on the balcony! This is important to let the strong odor of acrylic paint to be displaced by the fresh air of outside.
If your project is relatively small and can do with extra support, you can also rely on an easel to place the plank on it. This will help you with applying the paint with more accuracy.
B. Preparing Wood For Acrylic Painting
Wood is a popular choice for painting since its natural texture and smooth flat cuts make the perfect surface to brush off your strokes. However, it requires some preparation to ensure that this work of art will persist for a long time and will not damage the material.
Start by cleaning up the surface so that there is no dirt stuck to the paint later. Rub it with a clean paper towel or cloth.
Then go for sealing the wood in order to keep it safe from discoloration or SID (Support Induced Discoloration). SID is one of the scenarios which only happens with acrylic paints where the color becomes amber yellow over time.
The reason behind it is the impurities present on the support. These elements come in contact with the transparent acrylic paints or their softer shades. That is why you should seal or size the wood which prevents it from getting warped because of humidity shifts.
So prepare the wood for acrylic painting by applying two or more coats of the sealer. When it dries up, use primer over it for improved adhesion. Make sure the primer has filled all the pores on its exterior. This will ensure an even coating later.
C. The Painting Process
Trace The Design
If you are thinking of doing a particular design on the wood, get its blueprint first and then trace it on the plank using a graphite paper. Put the tracing paper on the primed wood such that the black side facing down and then place the pattern over it.
Take a pencil and start following the outlines of your design so that you can replicate it bit by bit on the main surface.
Arrange The Equipment
Now it’s time to set up all the tools one by one. Start by squeezing out some paint of the first color on the palette. If you already know which other colors your painting will need, then squeeze bits of them here as well.
Fill up a bowl halfway with water. Keep a few paper towels close-by so that you can clean the tainted brush with it between strokes. Otherwise, two distinct colors may mix up and create an undesirable shade.
Paint!
You can use a sponge to start the painting if it is a large or elaborate design. It can also be used for giving a unique texture to your painting background.
For the smaller designs, a paintbrush is the safer and more effective option. It comes in many varieties and helps with precision. So you can implement an intricately detailed design on wood or create an abstract painting of broad strokes instead. If you want some matte effects, you can rely on a foam brush.
In order to make blended colors, clean the brush after applying the first color and then go for the second one. Just make sure that it is still wet when you are dipping it into the new shade.
Flip The Side
After you are done with one side, let it dry fully. Then flip it for working on the other side. Like the first surface, this one also needs to be properly primed. If there is a base on the wood surface, make sure to be done with that part first and give it time to dry.
Wait And Seal
When the entire painting is done, leave it alone for at least 24 hours to dry. Since there are many variations of acrylic paint, this waiting period can vary.
When it does dry up completely, use a sealant so that the design does not get damaged later. If you mean to use it quite often, apply multiple coats and hard shellac.
Acrylic Paint on Wood – A Guide on Painting on Wood with Acrylics

A crylic paint is made from several components, such as stability materials, silicone oils, blending components, and esters. This product dries very fast, is not difficult to apply, is affordable, and has great adhesive qualities. Acrylic paint works better on surfaces that are gloss-free, for example, any wooden surface, metal, leather, fabric, and metal.
Table of Contents
- 1 Does Acrylic Paint Work on Wood?
- 2 The Best Acrylic Paint for Wood Work
- 2.1 Best General Acrylic Paint for Wood: CRAFTS 4 ALL Acrylic Paint Set
- 2.2 Best Budget-Friendly Acrylic Paint for Wood: CASTLE ART SUPPLIES Acrylic Paint Set
- 2.3 The Most Popular Acrylic Paint for Wood: APPLE BARREL Matte Acrylic Paint Set
- 3.1 Sanding the Wood Before Painting
- 3.2 Applying a Primer Before Starting to Paint
- 7.1 Is Wood Suitable for Acrylic Paint?
- 7.2 How Long Does It Take for Acrylic Paint to Dry?
- 7.3 Is It Mandatory to Apply Primer Before Acrylic Paint?
Does Acrylic Paint Work on Wood?
Acrylic paint can be applied on several wooden platforms. If you apply it correctly, it will give you the best appearance. It does not take a long time to dry and is not difficult to spread on the surface. Moreover, the paint is non-toxic and water-based. Acrylic polymer emulsion gives a reaction to the components that are used to make this type of paint. Cleaning and maintenance of acrylic paint is extremely easy – just make sure you use clean water and soap.
Acrylic paint has a lot of advantages as compared to other products, such as the fact that it is not difficult to find. This is because it is a popular paint in most outlets. It gives unlimited coverage in the sense that you can use it on several different wooden platforms. Wood is also readily and easily accessible compared to other materials, although you have to make sure you pick the best wood that will not be difficult to work with. The perfect wood must be free of dents, cracks, or any damages as this will interrupt the setting time.

Acrylic paint does not consist of any dangerous chemicals or components. It is recommended for educational purposes in paint and art institutions where kids can apply it in their learning projects. Acrylic paint is a multi-purpose paint that can be applied on several wooden surfaces and still be able to produce excellent and professional results.
It is important to look at the nature and size of your work first before purchasing acrylic paint. Before applying it on wood, a thorough background preparation must be done first. This is done to create an even and ready surface for acrylic paint application.
It is advisable to do some background preparation and apply a primer coat beneath the actual acrylic paint in order to achieve the best outcome.
While wood does have a lot of benefits, there are also downsides of using wood instead of other surfaces like canvas. Acrylic paint requires a lot of effort in preparing the background surface of the wood. If the background surface of the wood is not properly prepared, the paint will not last long and will lose its pigmentation. The best solution is to apply a primer before the actual application of acrylic paint.
Wood also requires a thorough background preparation because it has more weight compared to canvas. Poor background preparation will make the wood twist out of shape. After a while, you would find out that it will be difficult to hang or display it your walls. The wood-frame structure is very difficult to put together as well, as it requires a lot of experience to assemble.
The Best Acrylic Paint for Wood Work
Any form of paint has to meet certain requirements before it can be used. For example, it must be durable and resistant to the vagaries of weather and use. In this regard, there are two main types of acrylic paint suitable for woodwork, being those of artistic quality and those of student quality.
Student-grade acrylic paint is quite affordable and does not have the same quantity or color texture as artist-grade paint. It does not have a large variety of colors and the paint is not very strong, which is because the paint is made up of fillers, thus making it more liable to any threat or damage.
Artist-grade paint, on the other hand, is the best option. Not only does it have a wider variety of colors, but it is also considered a strong option because it has a high content of pigment. It is quite expensive compared to student-grade paint, however.

Best General Acrylic Paint for Wood: CRAFTS 4 ALL Acrylic Paint Set
This type of paint can be applied on a variety of surfaces such as glass, plastic, wood, and clay-based surfaces. It produces excellent and professional results. The acrylic paint set is a budget-based product, making it a very cheap option. It also comes in a variety of packages so as to cater to different prices and purposes.
Let Dry
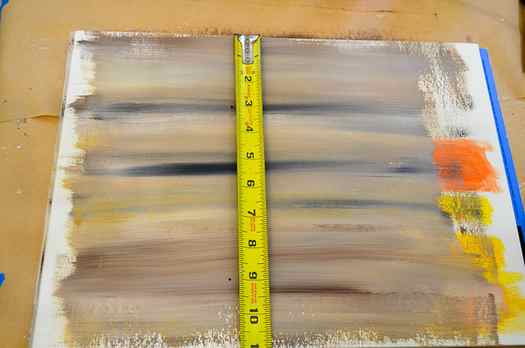
3. Once you get all of the surface covered with the streaky layer then we will let it dry.
4. Add the board lines. If you want precise width boards for your background then measure it out with a tape measure or ruler to do that and mark where to place them.
Put the marks on each end and not in the middle like I am showing here. In the next shot you see the marks on the edges.
Most of the time I don’t measure, I usually eyeball it.
5. Dampen your brush enough to make the paint a bit inky as you load your smaller flat brush.
In the video I use a 3/4″ flat brush and in these photos I am using a #12 flat brush. You choose, either will work. You do want a nice chisel edge on the brush.
6. When you have the brush loaded with the inky paint, grasp your brush close to the end, and drag it from one edge to the other creating a line.
(you can use straight black or tone it down with some brown if you like)
If you want a more precise line then use a straight edge like a ruler or a board of some kind. (as I show in the video)
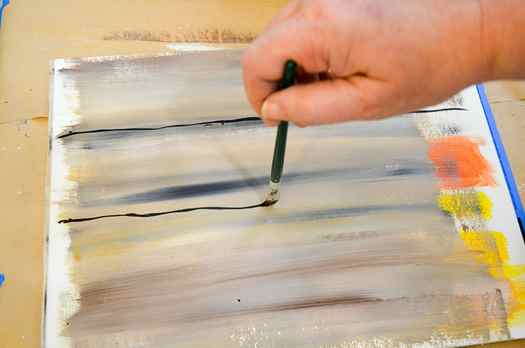
When I created my board lines I added and released pressure as I dragged my brush so the wood boards look worn and rustic.
If you want sharp lines for straighter boards then try to maintain consistent pressure as you drag the brush from one edge to the other.
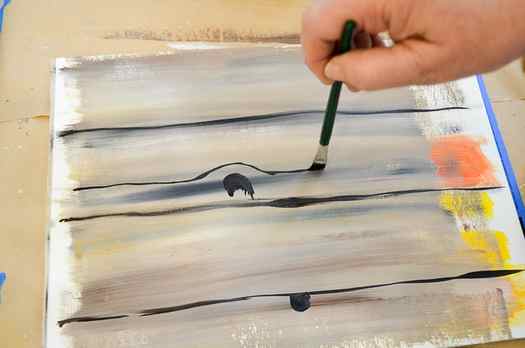
Details
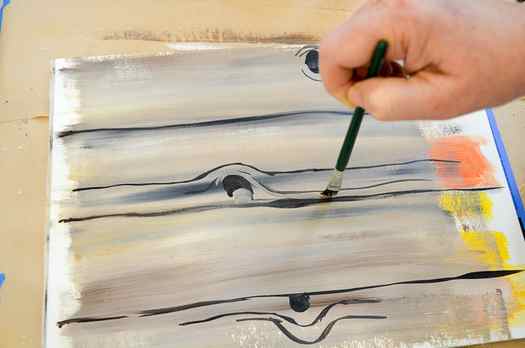
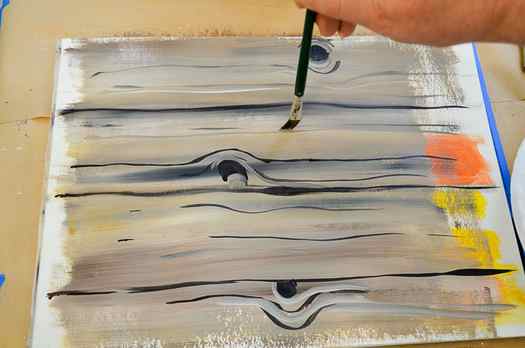
7. Now for the details like knot holes and grain lines.
Again using the inky paint in black paint on half circles, circles and comma strokes to mimic knot holes.
8. Still using inky paint draw grain lines with a light hand, let the brush dance along as you paint so it skips.
You don’t want sold lines. Make sure to go around the knot holds with a curve.
9. After making the dark grain lines go back with a lighter color, some white mixed with the darker paints.
Pull in some light lines to highlight alongside the dark grain lines. Also pull some lighter color around the knots to highlight those.
Walk Away
Don’t over think it and remember less is more. From time to time step back, walk away briefly then come back and look at it with new eyes.
Add more if it needs it or blend some out if you think it is too busy.
Before you know it you will have a wonderful faux wood grain background for barn wood effects for your paintings!
Need more help, watch the real time video!
For a complete list of my basic supplies I have on hand at all times when I paint see this post My Basic Paint Supplies there is a downloadable, printable list.
Please enjoy and share!


