drawImage is the method used to display or “draw” an image on canvas . You might or might not already know that it’s not as simple as just passing the URI of the image to it. drawImage accepts a maximum of 9 parameters. They go something like this, ready? Hold your breath…
drawing over an Image in HTML5 Canvas while preserving the image
In HTML5 Canvas, what’s the simplest way to draw and move a line over an Image (already on the canvas), preserving the image underneath? (e.g. have a vertical line track the mouse X position) My current canvas:
$(document).ready(function() < canvas = document.getElementById("myCanvas"); context = canvas.getContext("2d"); imageObj = new Image(); imageObj.onload = function() < context.drawImage(imageObj, 0,0); >imageObj.src = "http://example.com/some_image.png"; $('#myCanvas').click(doSomething); >); Follow
838 6 6 silver badges 19 19 bronze badges
asked Nov 13, 2013 at 23:57
Asaf Bartov Asaf Bartov
2,731 3 3 gold badges 20 20 silver badges 18 18 bronze badges
4 Answers 4
Sorted by: Reset to default
You will have to do most of the ground-work with canvas which in this case you will have to implement the functionality to move the line and then redraw everything.
The steps can be:
- Keep the line as an object which can self-render (method on the object)
- Listen to mousemove (in this case) in order to move the line
- For each move, redraw background (image) then render the line at its new position
You can redraw the background as a whole or you can optimize it to just draw over the last line.
Here is some example code of this and a live demo here:
var canvas = document.getElementById('demo'), /// canvas element ctx = canvas.getContext('2d'), /// context line = new Line(ctx), /// our custom line object img = new Image; /// the image for bg ctx.strokeStyle = '#fff'; /// white line for demo /// start image loading, when done draw and setup img.onload = start; img.src = 'http://i.imgur.com/O712qpO.jpg'; function start() < /// initial draw of image ctx.drawImage(img, 0, 0, demo.width, demo.height); /// listen to mouse move (or use jQuery on('mousemove') instead) canvas.onmousemove = updateLine; >Now all we need to do is to have a mechnism to update the background and the line for each move:
/// updates the line on each mouse move function updateLine(e) < /// correct mouse position so it's relative to canvas var r = canvas.getBoundingClientRect(), x = e.clientX - r.left, y = e.clientY - r.top; /// draw background image to clear previous line ctx.drawImage(img, 0, 0, canvas.width, canvas.height); /// update line object and draw it line.x1 = x; line.y1 = 0; line.x2 = x; line.y2 = canvas.height; line.draw(); >The custom line object is in this demo very simple:
/// This lets us define a custom line object which self-draws function Line(ctx) < var me = this; this.x1 = 0; this.x2 = 0; this.y1 = 0; this.y2 = 0; /// call this method to update line this.draw = function() < ctx.beginPath(); ctx.moveTo(me.x1, me.y1); ctx.lineTo(me.x2, me.y2); ctx.stroke(); >> If you are not gonna do anything specific with the image itself you can also set it as a background-image using CSS. You will still need to clear the canvas before redrawing the line though.
Loading an image in canvas
Let’s start simple with an image and an HTML5 canvas .
Here’s what our directory looks like
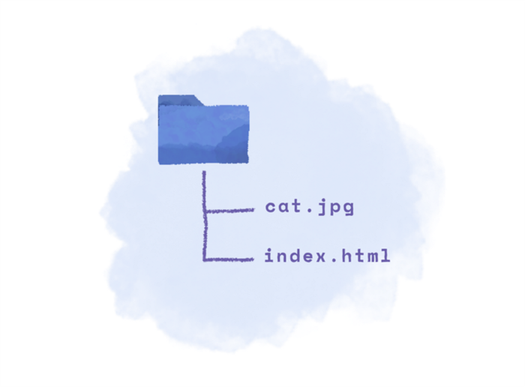
Inside of our index.html file we have created a new canvas element like so.
Our goal is to take the cat.jpg image and put it on the canvas ( #my-canvas ). And like I already said, it ain’t that easy betty! Otherwise I wouldn’t be writing this article, you feel me? Good.
To start with, let’s target the canvas element using JavaScript and get its context.
const myCanvas = document.getElementById('my-canvas'); const myContext = myCanvas.getContext('2d');We need myContext to interact with the canvas element. It’s like, if canvas is a blank sheet of paper, the canvas’s context is the pen. Intuitively, you’ll tell your pen to draw something on a blank sheet of paper, and not just yell at the paper to draw something on itself right?
There are a number of things you can do with context . You can draw a rectangle, or an ellipse or a line, or an… image. Also, notice that the context myContext is implicitly linked to myCanvas . You can have multiple canvas es and call getContext() on each of them to get a new context/pen for each. In our case we are dealing with just one canvas ( myCanvas ) and just one context ( myContext ).
Alright, with that out of the way, we can finally start getting our feet wet with drawImage .
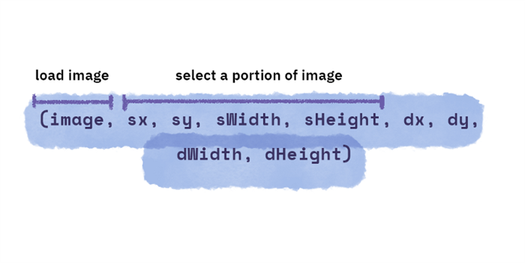
For a refresher, here are the 9 parameters that drawImage accepts.
(image, sx, sy, sWidth, sHeight, dx, dy, dWidth, dHeight)We’ll start with the first parameter, image . Let’s first write something that doesn’t work.
context.drawImage('./cat.jpg', 0, 0);See the two zeroes at the end? Good. This is not the part of the article where you’re supposed to understand what they’re there for. Ignore them for now, just keep in the back of your head that Nash wrote 2 zeroes and didn’t explain them. I won’t mind.
Now notice . (‘./cat.jpg’. in the line of code above. Appears to be a perfectly correct URI doesn’t it? And it is…buuuut, if you fire up index.html in a browser you’ll see a long long error message identical to what’s shown below.
ERROR: The provided value is not of type '(CSSImageValue or HTMLImageElement or SVGImageElement or HTMLVideoElement or HTMLCanvasElement or ImageBitmap or OffscreenCanvas)The error is telling us that it needs an image element and not just a URI to the image. To get around that, this is what we can do.
const canvas = document.getElementById('canvas'); const context = canvas.getContext('2d'); const img = new Image(); img.src = './cat.jpg'; img.onload = () => < context.drawImage(img, 0, 0); >;That is something you didn’t expect did you? Canvas needs a preloaded image in order to draw/display it in itself. No need to show any contempt towards canvas, by the way. It has its reason, it’s just like the rest of us. We’ll eventually see what those reasons are and maybe then you’ll be able to sympathise.
drawImage asks for 9 parameters, first of which is image . We looked and understood that canvas requires a preloaded image to draw and not just a URI to the image. Why does it need that? It will become clear as you read.
Now it’s time for the remaning 8 parameters. Pop your collars! I am gonna learn you some graphics editing first!
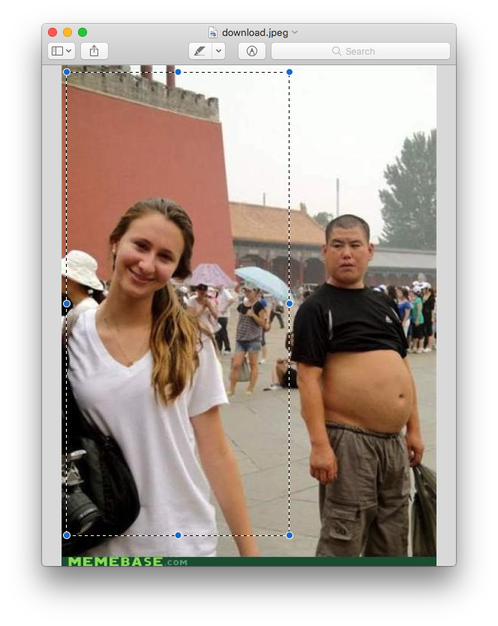
How to crop a picture
Every single graphics editing program, even the most basic, comes with the feature of cropping. It’s fairly simple: open an image > select the area you want visible > hit crop. And just like that, the naked beer belly of that obnoxious smelling old man is out. Poof!
Technology! Saving people’s Instagrams since Instagram existed.
Let’s take a step back, and stop riiight, here.
Let’s mark some points on it.
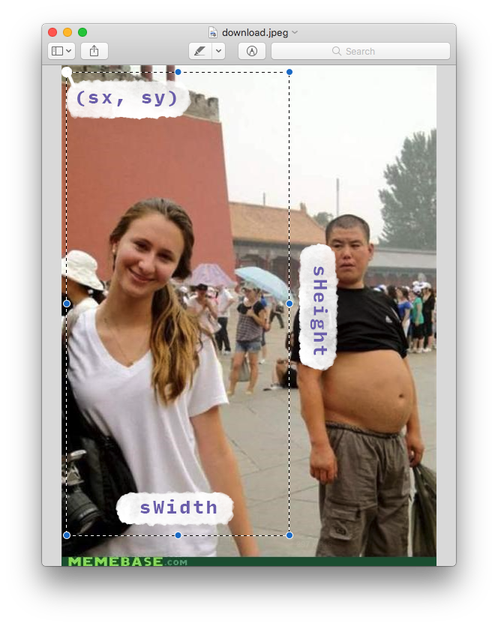
“Wait a second! sx , sy , sWidth and sHeight ? I have seen them before!”
Yes, about a minute ago! Which leads us to the fleshiest part of the article.
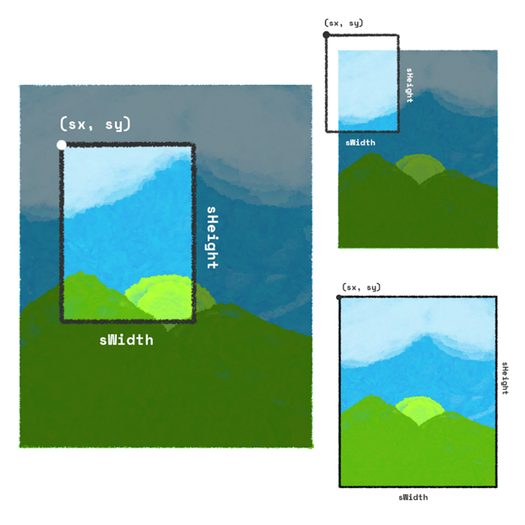
Displaying an image on canvas, Step 1: Selection
The first task drawImage performs (behind the scenes) is it selects a portion of the image based on the four s parameters ( sx, sy, sWidth, sHeight ). You can say that s in all the s parameters stands for “select”.
Here’s how it goes. sx and sy mark the point on the image from where the selection is to begin, or in other words the coordinates of the top left corner of the selection rectangle. sWidth and sHeight then, are the width and height of the selection rectangle respectively. You can scroll right up to the last image to get a clearer picture of what I am trying to explain.
“But why the selection Nash? Can’t it just display the entire image?” We’re getting closer to all your answers, patience.
Just know that the first step drawImage performs after receiving a proper image is it selects a portion/area of the image based on the s parameters (sx, sy, sWidth, sHeight) you provide.
Remember that you don’t always have to select a small portion of the image, you can select the entire image if you want to. In that case sx and sy will have values 0 and 0 respectively and sWidth , sHeight will be the same as the image’s width and height.
Also, negative values are welcome for sx and sy . The values of sx and sy are relative to the origin of the image on the top left.
Once drawImage has selected the area of image you asked it to – and we’ll see soon why selecting an area of the image helps – the next step is to draw the selected portion of the image on the canvas.
“Originally” s and d in the official documentation stand for ‘source’ and ‘destination’. But, just between us, let’s call it ‘select’ and ‘draw’. It makes much more sense this way, doesn’t it?
Again. s election is done, the next step is to d raw.