Add Sky using horizontal parallel lines to finish this quick drawing.
Drawing a Waterfall: Step by Step
Drawing a waterfall may sound intimating, but as we will see below, it is quite easy to do with few simple strokes that any beginner can do. So, grab a pen and follow along. Such fun drawings gives us a creative break in our lives and are always enjoyable. Try one now.
Start with a slight wavy line like below, indicating the top of waterfall, may be a river or a stream.
Step 2: Draw Falling Water:
Use slightly curved lines like shown below to indicate falling water. Turn the paper if need be to draw it. Don’t make the lines flat. Give them a slight curve or bulge as shown below.
Use tapered dark like shown below to indicate volume in falling water.
Step 4: Indicate Water Flowing Out
After the fall, water continues its journey towards the viewer. Use lines like below to draw ripples that indicate that. Notice how they open up and grow bigger as they go out.
Add such ripples to the waterfall.
Step 1
Let’s start drawing a waterfall from the simplest – draw two simple and not very even lines. The upper line is the upper edge of the waterfall, and the lower line is the lower edge.
Step 2
Now let’s depict the waterfall itself, or rather its contours using two very light lines. Do not try to make these lines perfectly straight and smooth.
Step 3
This stage will be a little more complicated because here we depict rocks. Try either to repeat everything as in our example or come up with your own form of rocks under the waterfall.
How to Draw Waterfall, Volcano, and Sandy Beach – Nature Drawing for Kids
In today’s blog, we’re going to learn how to create another amazing nature drawing and landscapes- a waterfall, a volcano, and a sandy beach!
Nature and landscapes drawing is a great way to spend time together with your little ones while teaching them about the wonders of the Earth.
Grab your pencils, and let’s start!

Recent Posts
Table of Contents
Learn How To Draw and Paint at Creativity School!
Let’s begin the creative journey of your kids and enhance their potential this 2021!
Our award-winning artists give away free LIVE art classes from the Creativity School.
Learn how to make collages, animations, pop-up cards, draw ninjas, characters, paint, and much more!
- Copy paper or a sketchbook journal
- Pencil 2b
- Black ballpoint pen
- Sharpie
- Rulers

Waterfalls seem kind of hard to paint or draw, but they are usually made of rectangles if you look at them. Some waterfalls are thin at the top that widens at the bottom. Let’s combine those shapes to draw a waterfall!
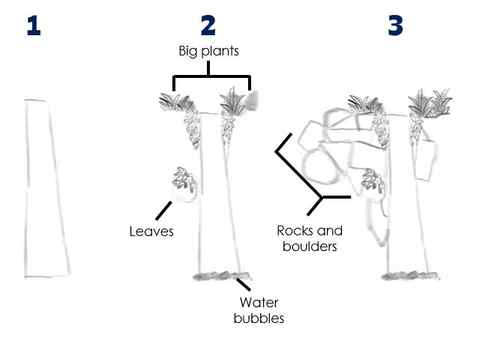
1.First, draw a rectangle that is narrow at the top and wide at the bottom.
You can bring out shapes using values or line textures.
2.Using the side of your pencils, make a slightly darker tone of tiny bubbles at the bottom part of the waterfalls.
Draw a patch of leaves around the edges at the top part of the waterfall using small triangles or teardrop shapes. Draw another patch of leaves on the left side of the waterfall.
Create circular tones at the top of the waterfall, then draw big plants.
3. Look at the reference picture, and you’ll see that around the waterfall are big rocks of different shapes and sizes. To make these, draw a mix of triangles, squares, and circles on the left and right sides of your waterfall.

4. Add some dark tones on the rocks to highlight the waterfall.
5. Create some ‘water’ movement to the waterfall. Draw thin and thick lines from the top going down. You can also draw small lines, big lines, and broken lines to show the movement of water falling.
Let’s add the splash at the bottom of the waterfall. Draw teardrop shapes near the ‘bubbly’ water you created at the bottom. Ensure that it looks like it’s going away from the moving water, just like a splash.
Trace some ripple lines around the ‘bubbly’ water that goes out of the moving water.
6. Get your creative juices flowing and add details such as water ripples, additional plants, and leaves to your waterfall drawing to make it more beautiful!