Start with a clear base coat, then painstakingly paint on the gnome and tree using a fine brush and a steady hand.
Christmas Tree Gnome Sketch Fill and Simple Stitch Machine Embroidery Design
Digital Download Will Include the Following Embroidery Machine Formats:
DST, EXP, HUS, JEF, PES, SEW, VIP, VP3, XXX
Embroidery Fonts (not Applique Alphabets) will include the BX format
Frequently Bought Together:
Add %str% to cart
Inc. Tax
Ex. Tax
Christmas Tree Gnome Sketch Fill and Simple Stitch Machine Embroidery Design
MSRP:
You save
Hide Show
About this Machine Embroidery Design:
A machine embroidery design of an applique of a gnome wearing a hat designs to look like a Christmas tree with a star and string lights.
Comes in sketch fill applique finished edges. Sketch fill requires no fabric and uses a loosely filled embroidery fill. It is not tightly stitched and the garment will be visible beneath the stitched due to low density by design. This is to provide a quicker stitch out.
This embroidery design set includes a printable sewing help file jpg image that displays the full color step sequence.
Size Information:
Comes in 4×4 hoop size, 5×7 hoop size, 6×10 hoop size, and 8×12 hoop size. Since our designs come with multiple size options, no matter what hoop or embroidery machine you use, our designs offer you many options for crafting on blank t-shirt, pillows, quilt, banners or whatever you fancy! Detailed sizes are shown in the gallery above.
Digital embroidery design download for embroidery machines. Lifetime access after purchase to this design in 9 different file formats. After purchase, your downloads are stored in your account order history for repeat access. Designed with love by Planet Applique Inc using no clipart, hand drawn by our in house digitizing artist.
Formats:
Our embroidery machine formats include:
You will receive all the sizes and all of the embroidery machine formats with your purchase, so that if you ever upgrade your machine, or change brands, there is no need to re-purchase past embroidery designs from our website. We give you everything you need regardless or format or size with every design we offer on our website.
Basic applique instructions for our simple stitch embroidery designs are as follows:
1) The Red lines show you where to place your applique fabric pieces, and the colored lines will stitch the fabric in place. For best results, we recommend using a light weight fusible interfacing on the back side of applique fabric pieces used in an embroidery design. An example of this would be heat-n-bond lite.
2) After each fabric piece is stitched down, you will then use small curved scissors to trim very close to the tack down line to remove excess fabric.
3) Repeat this for each piece of fabric in the design.
4) Lastly, you might have some embroidery elements to stitch out, like eyes, mouth, or wording. We combine colors logically so reduce the number of times you will have to change out your thread color. For example, if the design is of a kitty cat, we would combine the inside of the ear with the nose of the cat making them both pink. It is possible, however, to stop your machine after one element and change the thread should you rather have the kitty cat nose be brown, for instance.
We follow this general template for creating our designs so that you are getting all the fabric down at the beginning and can relax and do other things while the majority of the stitching is being done toward the end. We feel this is the most efficient use of your time embroidering.
Basic applique instructions for our sketch filled embroidery designs are as follows:
1) There is no fabric used in these types of designs, only thread.
2) Stitch each color of the design to complete it.
3) Similiar elements are often combined when its logical to do so to reduce the number of thread changes.
4) The stitching on our sketch filled embroidery designs are low density to reduce time and materials. They are not totally filled in with a lot of stitching like many other embroidery designs available online. The stitching is still sufficient to make your design stand out on your project.
About Sizing
Because our embroidery designs come in multiple sizes, we do not recommend resizing our designs. Resizing a design can result in unpredictable results. When you resize a design, for example a PES file, and make it smaller, the thread count will not change proportionately. Some machine will try to fit the same number of stitches but now in a smaller footprint which can result in strange jumping, alignment issues, thread breakage, tension issues and needle breaks. The same issues can occur if you make an embroidery design larger. Embroidery designs are not vectorized. They cannot be enlarged or shrunk down and still stitch out in the same quality as was originally digitized. And this is why our embroidery designs come in multiple sizes. We try to do most of the work for you so that you have several sizes to choose from depending on your project but without the work and worry of trying to resize it yourself.
Free Embroidery Designs:
If you would like to try out one of our designs, we offer free embroidery designs on our website and offer free designs on our homepage monthly. Be sure to keep an eye out for these free machine embroidery designs so you can build up your library.
This embroidery design includes a printable sewing help file jpg image that displays the full color step sequence.
Design Size Information:
Please see our product photos for detailed size information on this embroidery design.
Our embroidery machine formats include: DST, EXP, HUS, JEF, PES, SEW, VIP, VP3, XXX
You will receive all the sizes and all of the embroidery machine formats with your purchase, so that if you ever upgrade your machine, or change brands, there is no need to re-purchase past embroidery designs from our website.
Whimsical Gnome Wonderland Design
Often, you’ll find the whimsical gnome wonderland design an enchanting choice for Christmas-themed nail art.
This innovative DIY nail design captures the fun, festive spirit of the holiday season.
With a mix of vibrant colors and whimsical gnome figures, this Christmas gnome nail art truly stands out.
The gnome nail design, intricate yet playful, is a trend-aware choice that caters to your creative side.
You can achieve it by using nail art decals, making it a user-friendly option even for beginners.
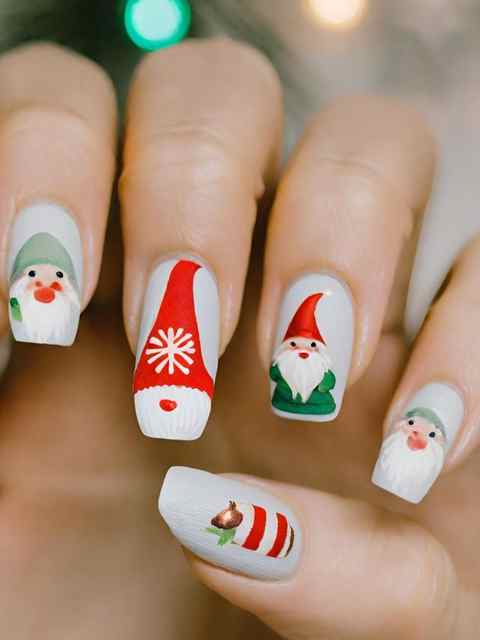
Traditional Red and Green Gnomes
Diving into the classic Christmas colors, you’ll adore the traditional red and green gnomes nail design.
These Christmas gnome nail designs are the perfect blend of holiday charm and trendy nail art ideas.
The traditional red and green gnomes are rendered in stunning detail, their adorable hats and beards popping against a snowy white background.
Get creative by adding nail decals nail or nail art decal stickers for an extra touch of sparkle.
Cute gnome nail decals, especially those in the red and green theme, can add depth to your Xmas gnome design.
Don’t forget to use Christmas nail stickers to emphasize the festive mood. These nail designs and nail decorations promise to make your nails the talk of every holiday party.
So, get ready to flaunt your festive fingertips with pride.
Glittering Snowy Gnome Art
Continuing with the festive nail art themes, you’ll fall in love with the glittering snowy gnome art design.
This winter nail design adds a dash of sparkle to any holiday nail look. Picture Christmas gnomes, cheerfully peeking out of a glittering, snowy landscape painted on your nails.
It’s a manicure that captures the whimsy of Christmas and the beauty of winter in one.
Here’s how you achieve it:
Start with a clear nail polish base. Then, using white and silver glitter polish, create your snowy backdrop.
Next, using nail art ideas from your favorite gnome nail designs, paint petite Christmas gnomes onto the glittering landscape.
Add a top coat to seal the art, and voila! Your Glittering Snowy Gnome Art manicure is ready to dazzle.


