All how-to-draw guides on the BIOWARS website and our YouTube channel were created by one man — Goncalo Lopes — the lead artist in our team.
How To Draw A Rose In 6 Steps: A Beginner’s Guide [Video + Illustrations]

Roses are arguably the most popular and loved flower in the world.
There’s no denying that they’re pretty to look at, but when it comes time to draw them, things can get a bit confusing.
Rose petals are in the golden ratio, i.e. the Fibonacci sequence, which means that each petal is the sum of the petals preceding it.
A rose may seem too complicated to draw, but that’s not the case when you know the right person to show you how to do it!
Follow along as the lead BIOWARS artist shows you how to draw a rose in six easy steps:
He also created a set of illustrations to accompany each step, so you can practice drawing a rose at your own pace.
Table of Contents
The Tools You Need For A Rose Drawing
Here are the tools you can use for your rose drawing:
- An H pencil: The hard lead leaves behind light lines, which is just what you want when outlining. Plus, these lines are easy to erase.
- An HB pencil: This type of pencil has a medium-hard lead, so it leaves a moderately dark trace. They’re the best choice when adding light shading to your sketch.
- A B pencil: The softest lead of the three, this pencil is your best friend for shading your drawing.
- A kneaded eraser: Easily stretched and shaped to your needs, a kneaded eraser is just what you need to get rid of unnecessary lines. You can also use this eraser to highlight parts of your drawing.
- Lightly sketched paper: The smooth surface of this paper ensures your pencil glides over it. It’s also easier to erase lines when the paper isn’t heavily textured.
Grab all of the tools above, or simply opt for your favorite pencil and start sketching!
Biowars comic book
Uncover the battle raging within!

How To Draw A Rose Easy In 6 Steps
In our guide to drawing a rose, we’ll show you how to:
- Draw the flower’s core
- Add the petals
- Draw the sepal
- Shade the rose
The key to learning how to draw a rose (and pretty much everything else) is to break it into basic shapes.
And that’s exactly what we’re going to do.
1. Draw The Core
Recommended pencil: HB pencil
The most common way to draw a rose is from the side, and we want to draw it facing the left.
So, let’s start with a simple oval shape.
Draw the core of the rose at the top left corner of your paper, as you need to make room for the petals and the stem.

Next, draw two lines on either side of the oval form and point them downward.
Their distance from the oval shape marks the size of the rose.
Make sure to point the lines slightly inward at the top and then immediately curve them outward to create a pot-like shape:

At the rose’s center, there is a pistil, which is a female reproductive organ in flowers.
In the rose that we’re drawing, the pistil is a no-show; it’s hugged tightly by the tiny petals.
To sketch the core of the rose, draw a quarter-moon from one end of the oval shape to the other, but make sure not to touch the top of the oval.
Then, divide the half-circle into two almost equal parts, with a vertical curved line.
Next, split the right half of the half-circle with a horizontal line, like this:

2. Draw The Petals
Recommended pencil: HB pencil
Now it’s time to start drawing the petals.
While they look delicate and of course feel delicate to the touch, beginners find them the hardest to draw.
Here’s how we’re going to simplify the process of adding petals to the sketch.
We’re going to set the stage first and mark where the “petal layers” will be. Let’s start with a layer on the left.
Draw a curved line resembling the letter “S” from the middle of the core upward, then point it to the center of the rose:

Continue drawing the S-shapes to partly outline other petals.
Start at the bottom center and curve the line to the left, so that it’s drawn just a little bit over the core.
Then, have it pass through the middle of the core and touch the bottom of the line you previously drew.
Lastly, extend the line to the right side of the rose.

Now, add two more lines to the sketch.
Draw one on the left and make it parallel to the first S-shape.
Make sure to leave some space between the two, because the petals shouldn’t be too close to each other.
Next, draw a curved line on the right, starting at the bottom quarter of the top line on the left, like this:

Let’s add two more S-shapes.
One starts at the bottom center and follows the shape of the longest line on the right.
The other looks more like a scythe and stretches from the bottom center to the left.

Now, connect the lines to fully form the petals!
Draw a line from the top petal on the right, following the oval shape.
Once it reaches the middle of the oval form, bring the line back to the left so that it looks like a spike.
Curve the line and bring it down toward the point where the top left and right petals meet.

The further away from the top of the rose you get, the larger the petals become.
To connect the petals to each other, add lines that go from the layer above and point them outwards on either side of the rose.
Now, bring them back inwards, but keep them below the petal lines you drew earlier.
Make the lines slightly wavy, then curve them toward the center of the rose.
To make the drawing cohesive, connect the upper and lower layers by drawing vertical lines from one spiky petal end to the other:

Continue to apply the same principle to the next petal layers.
Draw the curved lines starting at the level above and point them outwards, only to bring them back inwards.
Make your strokes slightly wavy as you direct them to the center, keeping in mind that petal edges aren’t straight.
Next, connect the higher and lower levels with vertical lines.
Remember: the layers gradually grow in size the further away from the top they are and your drawing should reflect that!

To finish drawing the petals, add one more layer at the very top, right above the center of the rose.
This petal is barely visible but it helps add more texture to the rose.
To draw it, connect the top petal on the left to the top petal on the right.
Then, add two more petals at the bottom on either side of the rose.
You know the drill by now! Start from the layer above, angle the line outwards and curve it back inwards.
Don’t forget to connect the layers to the core.
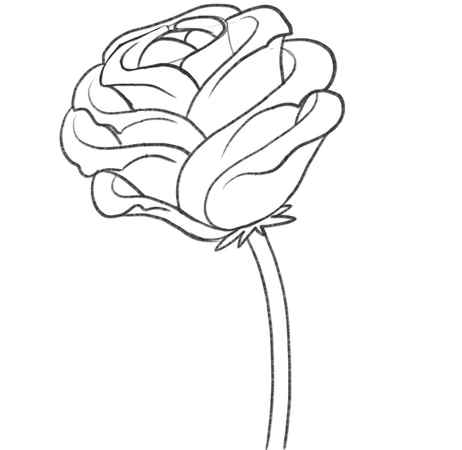
The finished outline with all petals in place should look like this:

3. Draw The Sepal
Recommended pencil: HB pencil
A sepal is the leafy part of the flower that surrounds the bud, then opens to reveal the petals.
To draw it, sketch pointy shapes under the bottom of the rose as if you were drawing one half of a star, like so:

4. Draw The Stem
Recommended pencil: HB pencil
Once you finish drawing the sepal, it’s time to add the stem.
Draw two parallel vertical lines starting from the middle of the sepal, and make them as long as you prefer.
Ours is just a little bit longer than the rose itself and it’s also thorn-free:
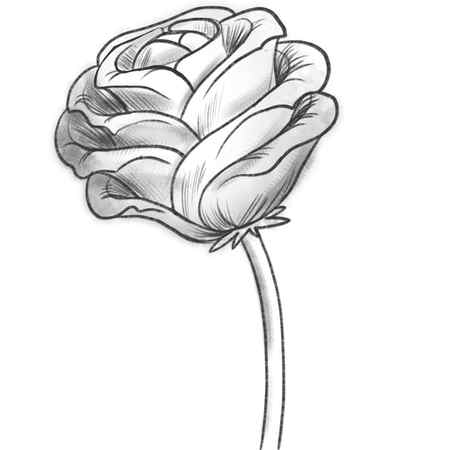
5. Shade The Petals
Recommended pencil: HB pencil
Now that all elements of the flower are in place, it’s time to pick up the HB pencil (if your toolkit includes one!) and add some shade to the petals.
First, make the inner parts of the petals darker.
Simply draw thin, vertical lines and place them close to one another.
Add the lines to the outer parts of the petals without applying too much pressure to your pen, since these parts on the flower get more light:
6. Finalize Your Rose Drawing
Recommended pencil: B pencil
To finalize your rose drawing, grab your B pencil and add some dark shade along the left side of the stem.
That means we positioned the light source on the right, so the petals and the stem are lighter on the right side:
How to Draw a Rose
Print of this guide and keep it handy while you work on your rose drawing step by step. This is perfect for beginners! You wouldn’t know it by looking at the final result, but this rose consists of just a few repeated shapes–making this step by step rose drawing easy!

Rose Drawing EASY Step by Step Tutorial
- Start by drawing an oval shape, shown in step 1.
- Now draw a small oval around the beginning oval, making the bottom of the second oval even with the first. See step 2.
- Next, draw an oval around these, as in step 3.
- Draw another oval around the tiny shape, keeping the bottoms of the ovals even. Can you see how it’s starting to resemble the center of the rose petals?
- Continue making ovals until you’ve built up the center of the rose.
- In Step 7, you’ll draw a curved line down from the outer oval on the left side.
- Now repeat that gentle curve on the other side.
- Following the drawing guide and video below, continue drawing the rose’s outer petals.
- With step 19, you are ready to add other parts of the rose, starting with the leaves.
- Add a line down the center of each leaf.
- If you would like a rose with a stem, add two lines at the bottom of the rose.
Watch this video and you will see learning how to draw a rose step by step easy. It is like taking drawing lessons! This realistic rose can be sketched with pencils. Finish the rose with leaves and stem if you like.
TipS for Rose Drawing
After you work through the tutorial, you’ll have a whole bouquet of colorful, realistic looking roses in no time! All it takes is a little patience.
For the best results, sketch with a light hand at first. I recommend using a pencil, and going over the lines you are happiest with at the end to make them darker if you wish.
Have fun with your drawings, and don’t stress too much about making your shapes exactly like the ones in the tutorial. Remember, every flower is different – and they are all perfectly beautiful.


