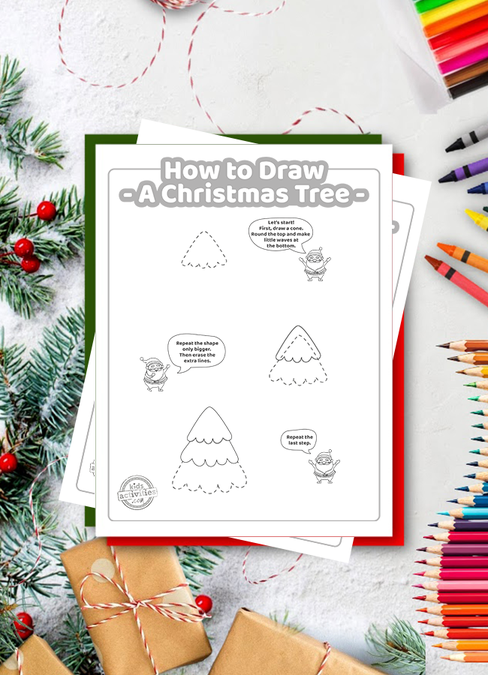
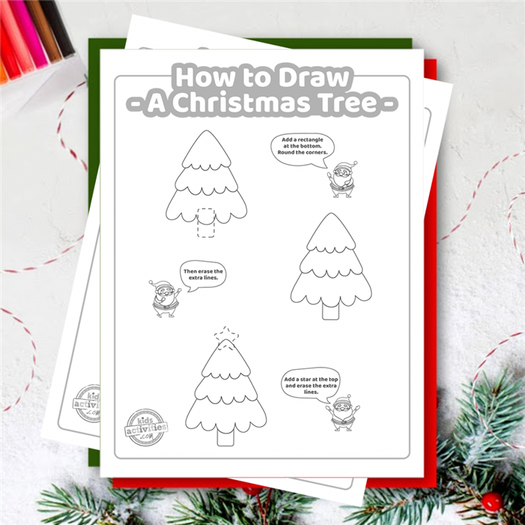
The first page of our how to draw a Christmas tree tutorial will give you the base you need for your Christmas tree.
How To Draw A Christmas Tree Easy Printable Lesson For Kids
Today we are learning how to draw a Christmas tree together from the top of the tree to the Christmas tree trunk, we will use basic shapes and easy steps on creating our own Christmas tree drawing. Kids of all ages can follow along in this drawing lesson step guide and create holiday amazing artworks. Our easy Christmas tree drawing lesson is a printable drawing tutorial that you can download and print with three pages of simple steps on how to draw a Christmas tree step by step with a pencil. Use this Christmas tree sketch guide at home or in the classroom.
Make A Christmas Tree Drawing Easy For Kids
Learning how to draw a simple Christmas tree is easy enough for children of all ages and skill levels, this printable how to draw a Christmas tree tutorial is so simple that even beginners can do it.
Download this free 3 page step-by-step Christmas tree drawing tutorial below for a great indoor activity: it’s easy to follow, doesn’t require a lot of preparation, and the result is a cute Christmas tree sketch!
How To Draw A Christmas Tree Step by Step- Easy
Enjoy an afternoon filled with drawing fun during the Christmas break with this easy how to draw a Christmas tree tutorial to make your own easy Christmas tree drawing.
Step 1
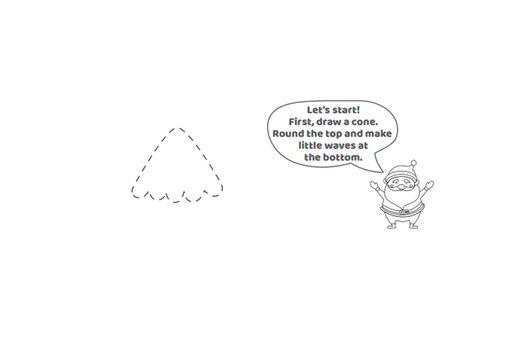
First step, draw a cone and round the top and make little waves at the bottom. This is going to be the top of your Christmas tree. The two angled lines or diagonal lines will be almost straight lines while the waves are the bottom are little circles of different sizes drawn with a curved line arranged lined up along a loose horizontal line.
Step 2
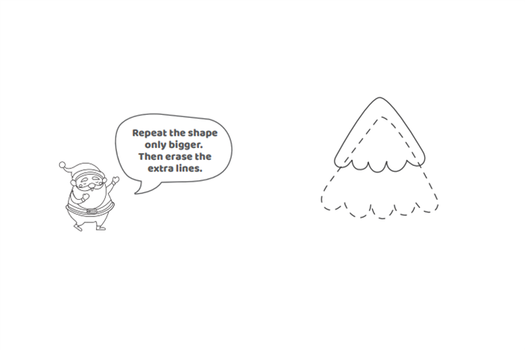
Repeat that same shape again only a little bigger and appearing underneath and behind the top of the Christmas tree you just drew. You can either create the entire new section with pencil and erase the lines or look at the step example and see what would show below. This will be the middle section of the Christmas tree.
The middle of the cone shape should line up with an imaginary vertical line that goes through the middle of the tree from the top.
The small circles halves lined up across the bottom of the layer will be a little larger than the first set.
Step 3
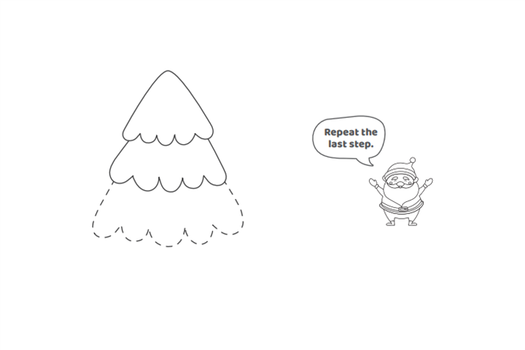
Next step, repeat that same step one more time a little bigger below the second tree shape which will be the final section. The stacking of these three cone shapes give it that Christmas tree look.
Step 4
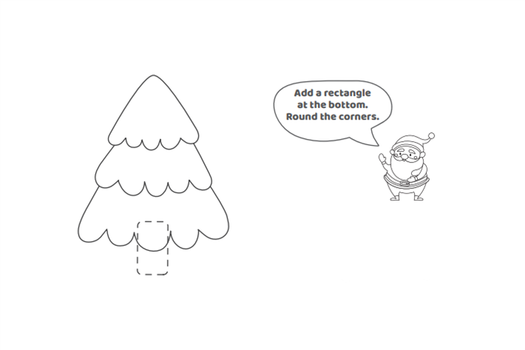
Let’s add some new lines at the bottom. Draw a rectangle at the base of your tree with two visible horizontal vertical lines and two horizontal lines. This is your Christmas tree trunk.
Step 5
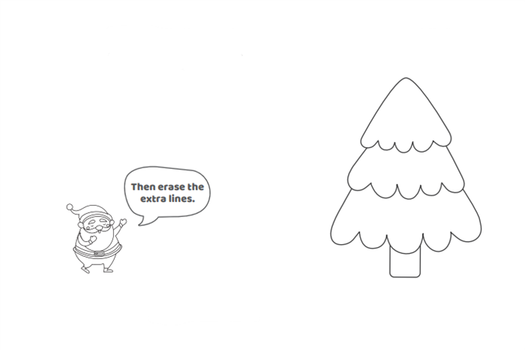
Erase the horizontal line that is inside the tree branches.
Step 6
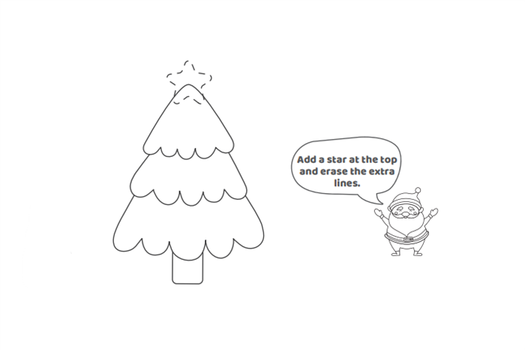
Draw a star at the top of your Christmas tree as a tree topper and erase any additional lines. To make your tree a Christmas tree, this is an important step!
Related: How to Draw a Star step by step tutorial guide
Step 7

Now you have the foundation of your Christmas tree drawing and it is time to add the holiday details.
You could stop right here if you want to have a group of outdoor evergreen trees (like a pine tree) without decorations if it is not Christmas time.
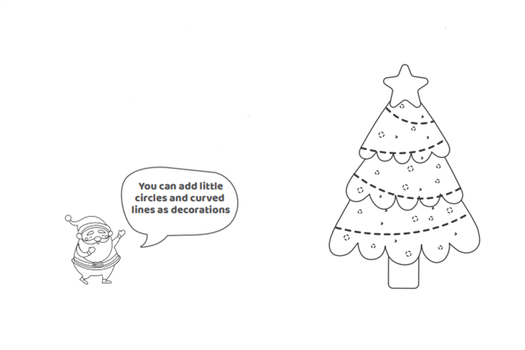
To add simple garland to your holiday tree, free hand draw curved lines starting at the top and stretching across each basic shape cone that created our tree outline. In the example, we made two curved lines at the top tier and one curved line on each of the lower two tiers.
Step 8
Draw ornaments and decorations for your festive tree:
- Add little circles for Christmas balls and round ornaments.
- You can also reinforce the curved lines that created the garland with a parallel line to emphasize it for a different look.
- Add oval shapes on the garland to look like Christmas lights.
- Draw star shapes on the tree to look like star ornaments.
- Color your Christmas tree drawing and repeat with more drawn trees until you have a group of colorful Christmas trees!
- Add some small rectangle shapes and add bow details to create a bunch of Christmas presents at the base of the tree.
Step 9
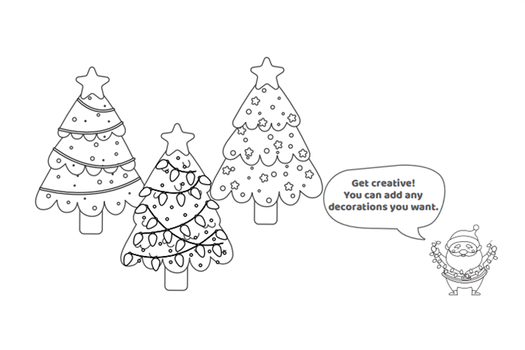
Now you’re finished! Get creative! You can add any decorations you want!
You can make your tree more of a cartoon Christmas tree with big shapes without a much detail (you can even trace over your outline with a permanent marker) or make it look more like a real Christmas tree by adding shading and detailed ornaments.
Introduction: How to Draw a Simple Christmas Tree Step by Step (in Inkscape)

By spetboris Boris Spet Follow
More by the author:


About: I love exploring the influence of colors and shapes on moods and Open Source programs help me doing just that:) More About spetboris »
Drawing is a fun pastime and free digital tools like Inkscape can help us to be even more creative and productive. Let’s draw a simple Christmas tree made from basic figures like rectangles, spheres and triangles! We will not forget garlands either.
From the very beginning, we’ll follow the initial idea of this free vector graphics editor – a final result is always a construction of smaller, often very simple elements.
Add Tip Ask Question Comment Download
Step 1: Drawing Triangles
I have recently made a pretty in-depth guide on drawing triangles in Inkscape. Here are only the basic steps:
1. Draw a triangle with your favorite method.
2. Color it with ctr-shift-F. You can choose different colors for the edge and the interior (stroke/fill), but don’t exaggerate.
3. Make a few copies. This is done by a select tool (F1), ctr-C to copy the selection into the memory buffer and ctr-V to call it back from it.
Add Tip Ask Question Comment Download
Step 2: Manipulating and Assembling the Triangles
1. Thanks to Selection tool (F1) and Edit paths by nodes tool (F2) you can change the already made triangles into different ones which will still belong together in the same tree.
2. Construct the greenery of the Christmas tree.
Add Tip Ask Question Comment Download


