Both sides of your dune should have sloping sides.
How to Draw a Palm Tree Step by Step
This tutorial shows how to draw a palm tree in six steps. It give simple illustrated examples and quick and easy to follow instructions.
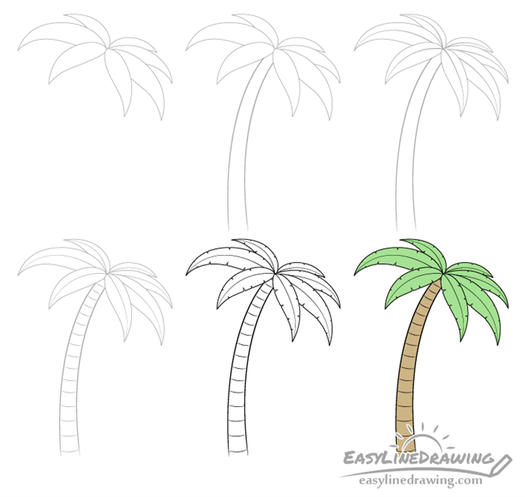
You can see a preview of the drawing stages included as examples in the image above. Overall the tutorial is fairly beginner friendly and shouldn’t take too much time.
It’s recommended that you use a pencil and draw light lines for most of the steps as you will need to erase some small parts of the drawing before you finish. Making light lines will also help you correct any potential mistakes. You can darken them before coloring.
Step 1 – Draw the Crown of Leaves
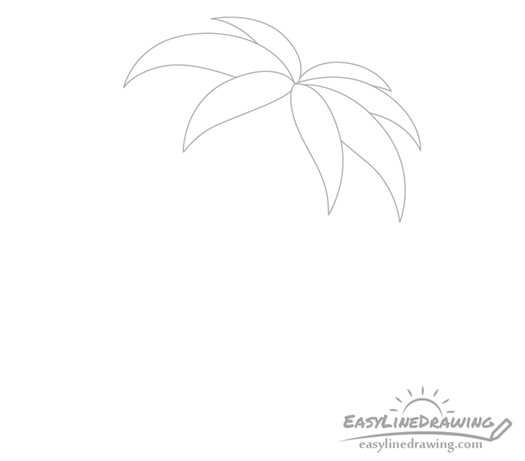
Start the palm tree drawing with an outlines of it’s leaves.
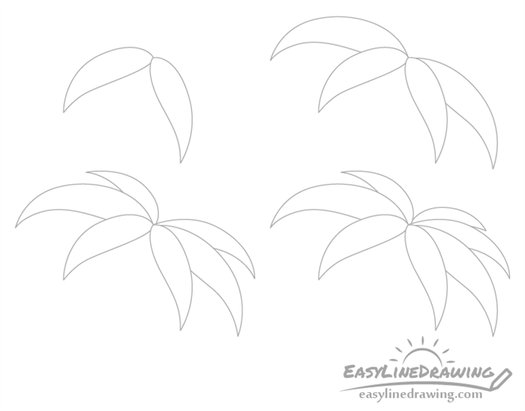
First draw the leaves that are facing towards the front. Then draw the next set of leaves behind them followed by the next set behind those. Finally draw the last leaf at the very back.
Step 2 – Draw the Trunk
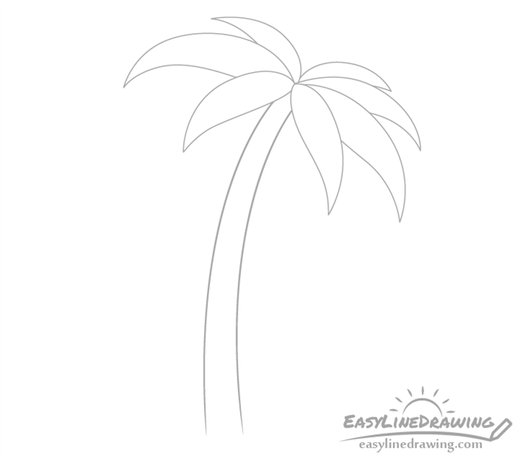
Below the leaves draw a curved trunk that is wider at the bottom and gets narrower as it goes up. You can do this with just a pair of curved lines.
How to Draw a Palm Tree – A Step-by-Step Palm Tree Drawing Tutorial

Nothing says tropical beach holiday quite like a palm tree. In today’s drawing tutorial, we are going to show you how to create an easy palm tree drawing with our step-by-step instructions. At the end of our guide, you will have your very own perfect palm leaf drawing. Grab your drawing supplies and let us get started!
Table of Contents
- 1 A Guide to Our Easy Palm Tree Drawing
- 1.1 Step 1: Drawing the Sand Dune
- 1.2 Step 2: Adding the Tree Trunk
- 1.3 Step 3: Sketching the Guiding Leaf Lines
- 1.4 Step 4: Adding an Outline to the Sand Dune
- 1.5 Step 5: Outlining the Palm Tree Trunk
- 1.6 Step 6: Sketching an Outline for the Crown Palm Leaves
- 1.7 Step 7: Adding the Final Details
- 1.8 Step 8: Coloring the Sand Dune
- 1.9 Step 9: Selecting a Color for the Palm Tree Trunk
- 1.10 Step 10: Applying Color to the Crown Leaves
- 1.11 Step 11: Adding Texture and Highlights to the Sand Dune
- 1.12 Step 12: Emphasizing the Palm Tree Trunk
- 1.13 Step 13: Highlighting the Palm Tree Trunk
- 1.14 Step 14: Shading the Crown Leaves
- 1.15 Step 15: Finishing Up Your Palm Tree Drawing
- 2.1 Is It Difficult to Learn How to Draw a Palm Tree?
- 2.2 What Colors Should I Use for My Palm Tree Sketch?
A Guide to Our Easy Palm Tree Drawing
Escape with us to a tropical destination and learn how to draw a palm tree the easy way, in this full step-by-step tutorial. In today’s guide, we will be covering the basic elements of drawing the palm tree, including its coloring process.
The collage below shows each of the 15 steps that we have taken to achieve the final result, and demonstrates what your drawing should look like at every stage.

If you have always wanted to learn how to create a palm tree sketch, follow along with us! As always, your choice of medium for creating your easy palm tree drawing is completely up to you! Whichever medium you have chosen, make sure to gather all your supplies so that we can start our drawing.
Step 1: Drawing the Sand Dune
The very first thing you will need to do in your palm leaf drawing is to sketch out your sand dune, which is what your palm tree will rest on. Locate the center of your drawing area and begin to draw a heap-like dune at the lower end.
Both sides of your dune should have sloping sides.

Step 2: Adding the Tree Trunk
You will now draw your tree trunk at the very top of your sand dune. In the middle, draw two vertical lines stretching upwards, with a very narrow space between the lines. The higher you draw your lines, the more narrow this space should become. At the highest point, your trunk should be the narrowest.
These lines do not have to be completely straight and should rather be slightly waved.

Step 3: Sketching the Guiding Leaf Lines
Working at the top of the trunk that you just drew, you will need to begin planning where your leaves will be located. Begin by drawing several lines that curve outwards, which all meet at the center above your palm tree trunk.
These curving lines are used to plan the position of the crown leaves in your palm tree sketch.

Step 4: Adding an Outline to the Sand Dune
Going back to the sand dune, you will now start to draw the outline of the dune. Make sure to connect the bottom base, so that it starts to resemble a sand dune.
Your outlining can be done using free hand.

Step 5: Outlining the Palm Tree Trunk
Using the construction lines that you have already drawn for your narrow palm tree trunk, begin to trace over them again to create your outline for the tree trunk. Be sure to leave enough space underneath the crown leaves.
Do not outline your tree trunk right up to your leaves, as you will be using that extra space in your next step.

Step 6: Sketching an Outline for the Crown Palm Leaves
In this step, you will focus on the drawing of your palm leaves. Using the construction lines that you have already drawn in step three, sketch out your final crown leaves. Draw the sides of each leaf, complete with a zig-zag pattern along the spine, along your construction line.
Tip: Start by drawing the front leaves first before working your way to the rear leaves. This will help create a more realistic 3D illusion.

Step 7: Adding the Final Details
You have now reached the final drawing bit that you will need to do for your palm tree sketch. Focusing on the palm tree, draw fine lines across the trunk to represent its rough texture. Working with your sand dune, draw some fine lines and dots to add texture as well.
To complete this step, add some fine arching lines within the palm crown leaves.

Step 8: Coloring the Sand Dune
You are now ready to begin coloring in your palm tree drawing! First, you will select your color for the sand dune. Using a regular brush, evenly color in your sand.
Whatever medium you have chosen, we suggest that you choose a shade of golden yellow for your sand.

Step 9: Selecting a Color for the Palm Tree Trunk
Moving on to your palm tree trunk, select a dark brown color that will work well in your drawing. Use a small regular brush to paint your palm tree trunk.
Always remember to color in the elements of your palm tree evenly.

Step 10: Applying Color to the Crown Leaves
The last element that you will color in is that of your crown leaves. Using a regular brush, color your palm leaves evenly with the green paint you have selected. Once this is finished, switch over to a small soft brush and black paint. Lightly create a darker shade of green on some of your leaves.
Tip: Vary the darkness of black paint on your green color between each leaf, to create a more realistic variety of shades.

Step 11: Adding Texture and Highlights to the Sand Dune
Now that all of your coloring has been completed, you will start to add some texture and highlights to your palm leaf drawing. Focusing on your sand dune first, use a small soft brush and gold paint to trace the texture lines within the sand.
Using a small soft brush and white paint, repeat this process to add fine highlights between the texture lines on your sand dune.

Step 12: Emphasizing the Palm Tree Trunk
Focusing on your palm tree trunk, start to add some subtle shading to the trunk. Use a small soft brush and some black paint to lightly apply shading to the right-hand side of the entire trunk. This will create the illusion that the right-hand side of the tree is in the shade.
Tip: Using a clean soft small brush, brush the shading layer towards the left lightly to create a fading shade look.

Step 13: Highlighting the Palm Tree Trunk
Now that you have added some shading to your palm tree trunk, you will need to add some highlights. Select a fine sharp brush and light gray or white paint (either color will do just fine).
Using your chosen color, paint horizontal stripes along the entirety of the trunk between the texture lines to create some highlights.

Step 14: Shading the Crown Leaves
The final section that you will need to add shading to are your crown leaves. Making use of a soft brush with black paint, lightly apply the final shading to your palm leaves.
Your shading should be added to the top layer of your crown leaves.

Step 15: Finishing Up Your Palm Tree Drawing
This last step is optional, but we do suggest that you perform it to finish off your palm tree drawing. This will help you to create a final drawing that is seamless and without any visible outlines. You will first need to select a sharp brush and the corresponding colors for the different areas of your palm tree.
Once you have everything, trace down the entirety of your palm tree, sand dune, and inner texture lines to create your final seamless result. When everything has dried, you will be left with your completed palm tree drawing!

Well done for finishing your very own palm tree sketch! We have now come to the end of our step-by-step guide on palm tree drawing. After going through our easy palm tree drawing tutorial, you should be fully equipped to make many more beautiful drawings in the future. We hope that you have enjoyed our tutorial on making these tropical palm tree sketches, and that you continue to practice your drawing skills with us!
Frequently Asked Questions
Is It Difficult to Learn How to Draw a Palm Tree?
Not at all! In the above tutorial, we have walked you through the 15 quick and straightforward steps that you need to do in order to create a beautiful palm tree drawing. If this is your first time ever drawing, do not be afraid to make mistakes, as this is how we learn! Simply erase your error and try again, and we are sure that you will pick it up in no time.
What Colors Should I Use for My Palm Tree Sketch?
In the palm leaf drawing that we created above, we have chosen to use traditional colors in our drawing. However, this is not to say that you need to choose the same colors as us. Your drawing is completely unique and can be colored however you like. Let your imagination run wild and select any colors you wish!
Matthew Matthysen ( Drawing and Painting Artist )
Matthew Matthysen is an educated multidisciplinary artist and illustrator. He successfully completed his art degree at the University of Witwatersrand in South Africa, majoring in art history and contemporary drawing. The focus of his thesis was to explore the philosophical implications of the macro and micro-universe on the human experience. Matthew uses diverse media, such as written and hands-on components, to explore various approaches that are on the border between philosophy and science.
Matthew organized various exhibitions before and during his years as a student and is still passionate about doing so today. He currently works as a freelance artist and writer in various fields. He also has a permanent position at a renowned online gallery (ArtGazette) where he produces various works on commission. As a freelance artist, he creates several series and successfully sells them to galleries and collectors. He loves to use his work and skills in various fields of interest.
Matthew has been creating drawing and painting tutorials since the relaunch in 2020. Through his involvement with artincontext.org, he has been able to deepen his knowledge of various painting mediums. For example, watercolor techniques, calligraphy and lately digital drawing, which is becoming more and more popular.
Learn more about Matthew Matthysen and the Art in Context Team.
Step 6 – Finish off your palm leaf drawing with color
Now you’re ready to close off this palm leaf drawing with some colors! Palm leaves are famous for their rich green coloring, and this is what we went for in our reference image.
We used various shades of dark green to create a lovely texture for the leaf, and you can go for a similar approach if you like this look!
You could also use any other colors you love for the image.
You could use some browns and yellows for a more aged look to this leaf, or you could use your favorite bright colors for a more stylistic approach.
What colors and art mediums will you use for this image?
5 Tips To Make Your Palm Leaf Drawing Even Better!
Create a relaxing vacation feeling with these tips for your palm leaf sketch!
Now that you have completed this drawing of a palm leaf, you could make it even better by adding a few more to the image.
This could be one or two more, or you could fill the page with palm leaves. Drawing them at some different angles or with minor detail differences could be a great way to differentiate them.
How many leaves do you think this drawing needs?
Another way of adding more leaves to this picture would be by drawing the palm leaves still attached to the tree.
You could draw as much of the tree as you like, and it could be fun to make an entire scene out of it!
You could even add more than one tree if you want to draw lots of leaves.
A palm leaf will often make people think of tropical vacations. Because of this, you could add other symbols of a tropical vacation to finish off this mood.
There are many examples of what you could add, for example you could add some sunglasses, a coconut or maybe a beach towel.
You can probably think of many more things that remind you of a vacation day!
When you have finished this palm leaf drawing, you could add other kinds of famous leaves to the image. This would be a great contrast to the palm leaf that you created!
For example, you could draw a maple leaf or maybe a bay leaf. These are just two examples, but you could draw any leaves or plants that you like!
Earlier, we mentioned making a scene by drawing the tree this palm leaf is attached to. You could take that even further by focusing a lot more on the background of this palm leaf sketch.
This is something you could do whether you drew the tree or not! For instance, you could even add some human or animal characters to add some life to the drawing.
Your Palm Leaf Drawing is Complete!
That brings you to the end of this guide on how to draw a palm leaf!
We hope that the steps in this guide made it fun and easy for you to draw despite the more tricky elements a drawing like this can present.
Now that you have completed all the steps, you can keep it going with your own fun elements and ideas!
We mentioned a few ways that you could add some background details, extra elements and creative color choices, but we can’t wait to see what incredible ideas you come up with.
Then, when you’re ready to take on a new drawing challenge, you can visit our website to sample the many amazing drawing guides we have for you there.
We plan to upload many more soon, so keep checking in!

We would also be thrilled to see your finished palm leaf drawing, so please share your finished creation on our Facebook and Pinterest pages for us to see!