Image credit: Designer Gemma77 via YouTube
How to Paint Flowers on a Large Canvas Step by Step For Beginners | Painting Tutorial with Elle Byers
Learn how to paint loose flowers on a large canvas step by step! This is one of my most popular painting classes on Skillshare!
In this class I teach you how to paint large, loose flowers on canvas with acrylic paint step by step. I show you how I mix my paint colors, how I sketch my composition onto my canvas, and how I add lots of layers of paint to create large loose flowers on my canvas. Click HERE to watch!
My painting classes on Skillshare are beginner friendly. All of my classes are broken down into smaller tutorials and lessons so you can easily follow along step by step. I hope to give you some new ideas and teach you the easy acrylic painting techniques you need in order to create your own large, loose floral painting!
My painting classes are on Skillshare. If you’re not a member yet, you can get a 1-month free trial membership to Skillshare with my link! https://www.skillshare.com/r/user/ellebyers
Here are the supplies I used for this painting tutorial.
Paint Colors I used (I used Golden Fluid Acrylics)
** see below for other paint options
Turquoise Phthalo
Hansa Yellow Medium
Quinacridone Red
Titanium White
Teal
Carbon Black
30 x 30 inch canvas
Paint palette or paper plate
Flat paint brushes (2-½ inch, 1-½ inch, and 1 inch)
water to clean brushes
paper towels
If you create a painting inspired by this class, you can share it on Skillshare by clicking the “Projects & Resources” tab under the video and then by clicking on “Create Project.” You can also tag me on Instagram @ellebyersart and use the hashtag #modernabstractflowers so I can see your beautiful work!
**Golden paints can be expensive. If you are looking for a good student grade acrylic you might try Liquitex Basics. A good palette to start with would be Primary Red, Primary Yellow, Phthalo Blue, Light Blue Permanent, White, and Black.
I have 30+ painting classes on Skillshare! When you become a Skillshare member you will get access to all of my classes and all of the other wonderful painting classes on the site. There are so many talented artists sharing their best tips and techniques for creating beautiful acrylic paintings.
Beginner-Friendly Cosmos Flower Acrylic Painting Technique

Image credit: Designer Gemma77 via YouTube
Advertisement
Advertisement
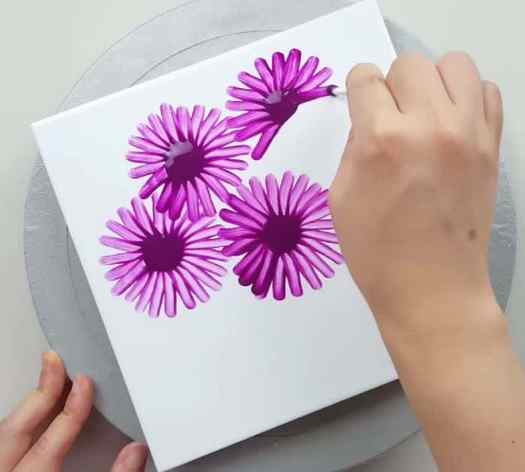
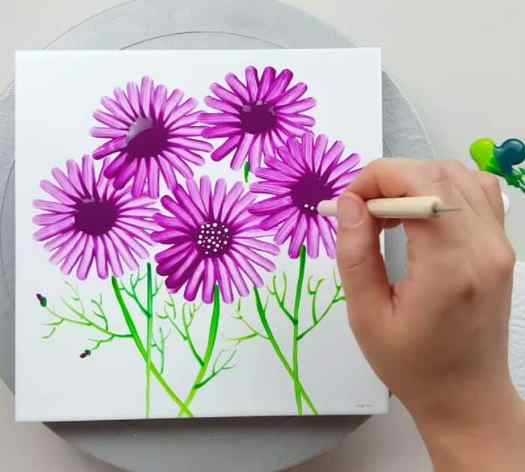
Drawing pretty flowers can be challenging for some people but it doesn’t mean that it is difficult to do, sometimes all you need is the proper technique to create beautiful artwork, and you don’t even need to be really good at painting, to begin with, because this tutorial will definitely help you improve your skills. What’s even better is that you won’t be needing a lot of supplies or any special tools to create this artwork. Go ahead and read the written instruction down below now and learn how with this video tutorial by Designer Gemma77 on YouTube. I hope you enjoy and find this art idea as helpful as I did.
Advertisement
Materials:
- Violet acrylic paint
- Lime green acrylic paint
- Cyanine green acrylic paint
- White acrylic paint
- Water
- A cotton swab or Q-tip
- Paintbrush with thin tips
- Dotting tool
- Canvas
Step 1
Put large dots of violet acrylic paint and water mixture in your canvas, then grab a cotton swab or Q-tip, and from the center push the paint outward to create the petals. Do this all around the dot until the flower is complete, then do this to the rest of the dots as well.
Step 2
Using a thin paintbrush, mix together some of the greens, then paint the stem, and add small branches to those stems. Add a small green bud on each end of the stem branches, then add a small bud of violet at the top of the green bud, and add white dots all over the center of the flowers.
*Thanks to Designer Gemma77 via YouTube for all images used here. If you loved this video tutorial, then you’ll surely love her other painting techniques and hacks too, so give her channel a visit and subscribe!
Acrylic Flower Painting Tutorial + Amy Style Calligraphy
I love tutorials — so today I’ve got a special treat for you! Two tutorials, one post. Learn how to paint acrylic flowers and make my signature Amy style calligraphy … all in one shot!
- Click to share on Pinterest (Opens in new window)
- Click to share on Facebook (Opens in new window)
- Click to share on Twitter (Opens in new window)
- Click to email a link to a friend (Opens in new window)


I apologize for my absence this weekend! We decided to take off to Kansas for Easter to see our adorable little niece. In the free moments I had, my mom and I worked on a new concept: fabric wedding invitations!
To make up for my lapse in writing, I’ve got quite the treat for you today, though. Not one, but two tutorials! I was lucky enough to get some insight from Jan, a talented acrylic artist from St. Louis, on acrylic flower painting; and I thought a tutorial on Amy style calligraphy would pair up nicely with Jan’s instruction.

You may remember from my watercolor calligraphy post that Jan sent some gorgeous envelopes, which I used to model the Amy style calligraphy today.

Jan was kind enough to send over photos of her larger acrylic flower paintings, which will soon be displayed in a gallery showing! Take a look:

Jan has a wonderful style that is whimsical and summery. Her paintings me of the nostalgic English times, like I see depicted in Downton Abbey or Jane Austen novels .
Before we discuss how to create Amy style calligraphy, I’d like to share the photos and instructions that Jan provided to me on her acrylic flower painting process. She wanted to provide a tutorial for a project that will only take you a couple of hours to make; this is a wonderful way to practice your acrylic skills and make some beautiful adornments for your home .
Jan purchases her canvasses as Michael’s in a group of nine. They are 4″x4″ and 1.5″ deep. They are pre-gesso, meaning they are already coated with white paint, so they’re good to go! If you have an untreated canvas, however, you will want to coat yours with gesso beforehand.

Jan chooses a base color and covers the front and sides of the canvas with it. She uses pencil to draw a freehand rose outline. If you’d like a reference photo, simply conduct a google search for “rose photo” .

Once the base background color is on the canvas, you’ll want to assemble the different acrylic paint colors you will use for your flower. Jan has chosen one color plus white for the rose, two different greens, a gold, a liner brush and medium size paint brush.

You’ll use the rose color you have chosen to create the base coat for the rose. Notice here how Jan uses specific stroke patterns to create nice contouring.

Immediately upon painting the rose base, you’ll want to add some white. Acrylic dries quickly, so you have a small window of time to blend! Always pay attention to contouring; each petal is created with a “C” or “U” brush stroke. At this point, Jan advises adding a little yellow to the center of your rose to add a pop of unexpected contrast.

Next, Jan works on the leaves. She uses a fun “wriggle” stroke to blend the lighter green leaf base with a deeper evergreen tone.


To finish the acrylic flower painting, you’ll want to coat it with gloss medium. This protects the piece and also gives it a professional look. .

Jan also freehanded a rose motif on the back of the canvas for a fun little surprise!

And for canvasses this deep, it’s good to finish the sides as well:

Acrylic is a very nice medium for portraying a number of subjects; I like to use it to create portraits, as well! It’s the paint I used to create this portrait of two of our family members:

And also this portrait of a friend’s dog:

You can get some really rich tones with acrylic; and your creations are sure to be striking!
Now — let’s talk calligraphy!

To create this calligraphy, you will need a Brause “Blue Pumpkin” nib. If you don’t have one, grab one now at Paper & Ink Arts. They’re cheap and high-quality, plus the shipping is very reasonable .

The Brause Blue Pumpkin is a great nib because it stands up to a lot of pressure. It’s great for putting in straight holders !
This style is a straight up-and-down style. The best way I can explain how to make it is simply by showing you the alphabet:

Remember, you’ll put pressure on your downstrokes, and take pressure off when creating your upstrokes. And have fun with the curls! The Amy style is all about dainty curls!
I have also put together a worksheet so you can practice! You can download it for free here.
Enjoy your flower painting and calligraphy making! I’d like to extend a very special thank you to Jan for sharing her technique!
*This post contains affiliate links to Amazon
- Click to share on Pinterest (Opens in new window)
- Click to share on Facebook (Opens in new window)
- Click to share on Twitter (Opens in new window)
- Click to email a link to a friend (Opens in new window)


