Painting glass with acrylic paint is definitely something you can do and it’s a great way to repurpose an outdated vase or spruce up a dollar-store vase!
Amazing Acrylic Paint and Baking Soda Vase Makeover

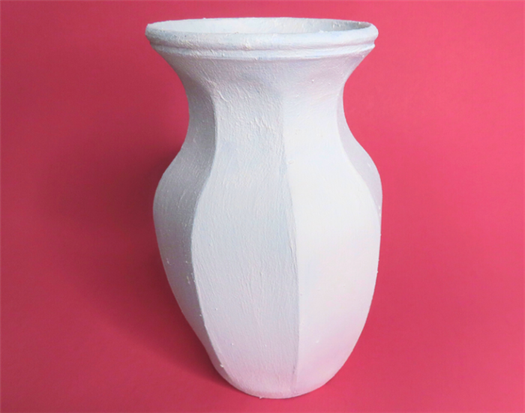
Have you ever had that moment when you stumble upon something old and think, “Hmm, I wonder if I can give it a fabulous makeover?” I had that moment recently with an old flower vase hiding in my pantry. It was covered in faded blue paint and peeling black spray paint – not so pretty anymore. I was about to toss it in the trash because I’ve been in a cleaning frenzy lately, but then… cue dramatic music, a brilliant idea struck me! Why not repurpose this vase into a stunning ceramic piece using acrylic paint and baking soda?
It was like a light bulb lit up above my head! I’ve seen similar crafts on Pinterest and YouTube, but they usually vibe vintage. I wanted to give it a modern twist, that “West Elm Vibe” that matches my house’s style. So, I got into my creative mode, and here’s how I turned this old vase into a chic ceramic beauty!
But wait, I’m getting ahead of myself. Let me show you the step-by-step process to transform this vase into a masterpiece that will make your friends go, “Wow, did you buy that from a fancy store?” Get ready to unleash your inner crafter, my friend!


What Happens When You Mix Acrylic Paint and Baking Soda?
When you mix acrylic paint and baking soda, it creates a thicker chalk paint. When you apply this mixture to a vase, it creates a ceramic vase appearance. If you mix baking soda with red or brown earth-tone colored paint, it gives a terracotta look when it dries.
- Old Glass Vase
- Baking Soda
- Acrylic Craft Paint (2 different colors)
- Painter’s Tape
- Foam Brush
How To Make a Faux Ceramic Vase
Preparing the Vase
Our first mission is to clean that old vase. Grab some dish soap and water, and scrub away all the dirt and grime. We want our vase to shine like a superstar. Once it’s squeaky clean, we’ll make sure to dry it off well.
Now, inspect our vase for rough spots or peeling paint. If we find any, we’ll gently sand them with a fine-grit sandpaper. Think of it as giving our vase a mini spa treatment, making it all nice and smooth.
Craft time can get messy, friend, so we’ll be smart and protect our workspace. Grab some old newspaper or a drop cloth and cover the area. That way, we won’t end up with paint splatters everywhere. We’ll keep things neat!
Creating the Faux Ceramic Texture
Grab a throwaway bowl and mix up four parts of white acrylic paint and one part of baking soda. Give it a good stir until everything’s all mixed up. Make sure it’s blended evenly for the perfect consistency!
Painting and Finishing Touches
Grab a sponge brush and spread the white acrylic paint all over the outside of the glass vase. Let it dry completely before adding a second coat. If the color covers the glass entirely, awesome! Move on to the next step. But if it’s still see-through, no worries, paint a third coat. Now, don’t forget to paint the inside of the vase too, as far down as you can reach!
Waiting for the paint to dry naturally can take forever, but we have a solution! Use a hand dryer to speed things up.
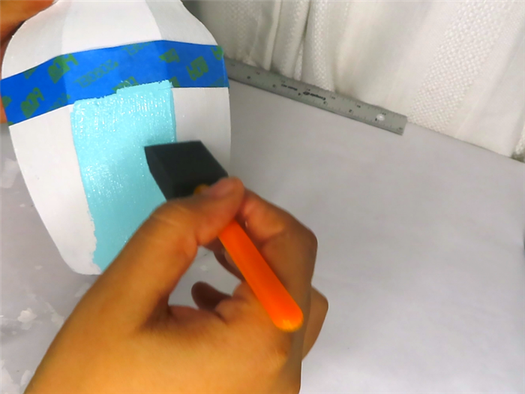
Once that paint is completely dry, it’s time for some tape action. Grab painter’s tape and make a straight line halfway up the vase. Press the tape down firmly with your finger to ensure it’s stuck all the way around.
Here comes the fun part! Mix your second paint color with baking soda and give it a good mix. Now, use that special mixture to paint the bottom half of the vase. Make sure you cover the entire bottom evenly. Carefully remove the painter’s tape, revealing a crisp line. Turn the vase upside down to let the base dry perfectly without any blemishes.
Styling and Displaying Your Faux Ceramic Vase
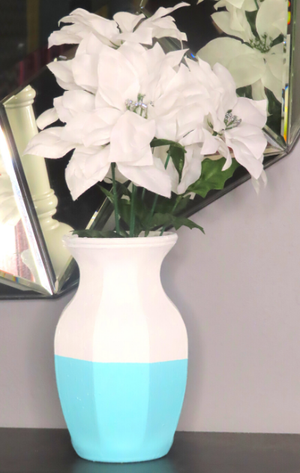
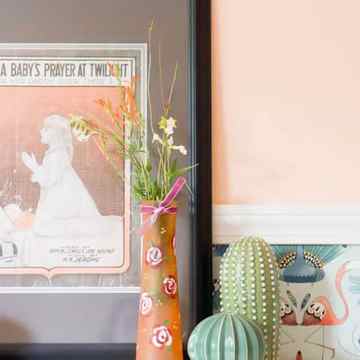
Let me give you some quick tips to style it like a pro! For a cozy look, go for dried or wildflowers and display them on a wooden shelf or farmhouse-style table. If you want a modern vibe, choose fresh white blooms or simple greenery and place it on a sleek mantel or contemporary table. Remember to pick flowers or greenery that complement your vase’s look and experiment with different arrangements and spots in your home. Now, you can enjoy showing off your beautiful vase to everyone!
How to Upcycle a Glass Vase to Look Like Clay
Matte finishes are on trend, especially for plant pots, vases and other home décor. Baking soda will turn any acrylic paint into a textured paint that will transform an everyday mason jar, thrift store glass vase, or ordinary bottle into a chic, elegant showpiece.
Whether you’re making a home for your succulents, adding visual interest to shelves, or flexing your DIY crafting skills, upcycling old glass containers is an easy and inexpensive way to create something beautiful out of something discarded. Everyone has a florist vase or two hiding in their cabinets, and if you’re one of the few who do not, your local thrift store has plenty. These glass vases are functional but not beautiful – until you paint them to look like high-end clay pottery. So grab your supplies and in a few minutes of painting, you’ll have transformed the blah and basic into something bold and beautiful.
How to Make Textured Baking Soda Paint
For a beautiful matte finish that makes ordinary glass look like ceramic pottery, add 1 tablespoon baking soda to any color water-based paint and mix thoroughly. Use acrylic or latex paint only (oil-based paint will not work). Apply to a clean glass surface with horizontal brush strokes.
- 1 cup water-based paint in your desired color (acrylic or latex)
- 1 tablespoon of ARM & HAMMER™ Baking Soda per cup of paint
- A small bowl or container to mix the paint in
- Spoon or craft stick to mix the paint
- Paint brush – either foam or traditional bristled
- Glass vase, bottle or jar
- Soap and water to clean the vase and a lint-free towel to dry
For even thicker textured paint that will build up on the surface and can be sculpted or patterned, add up to 4 teaspoons baking soda per cup of paint.
Step 1: Select Your Glass Items to Upcycle with Paint
Any glass container can be turned into a modern art piece with textured baking soda paint. Pull vases from the back of cabinets or hit up garage sales and your local thrift stores. You can also purchase inexpensive plain glass containers at dollar stores or save the jars from your tomato sauce, pickles or other foods. Your items can be ceramic or glass, in any color, clear or opaque, with a glossy or flat finish.
What to look for in objects to paint with baking soda:
- Interesting and varied shapes. Think short or tall, round or square, items with flared tops, long necks, flat fronts or bulbous, etc. If you’re painting more than one item, look for pieces that complement each other and look interesting as a collection.
- A variety of sizes. You can paint 3 oz cups, vases that hold a half-gallon, or pots that hold a handful of soil to a bucket-full. Larger items will require more paint.
- Different uses. Will your items be for display or will you use them for storage or organization? Tall, skinny vases work great for cut flowers or to store art supplies. Jars with wide openings can hold utensils or toiletries. The possibilities are endless!
Some glass painting ideas to try:
- Mason jars of various sizes. Mason jars are the ultimate for shabby chic and rustic farmhouse styles. Note: depending on how much paint you apply, you might not be able to use the lids any longer, and painted jars are not food safe. Instead of lemonade and jam, try dried flowers, utensils, makeup brushes, and more.
- Florist vases. From single bud vases to large arrangements, florist vases come in many shapes and sizes. A basic vase from Valentine’s long past can look like expensive terracotta pottery when you upcycle it with baking soda paint.
- Unusual shaped bottles or jars. Got an old mustard, pickle, or candy jar that has a cool shape? It’ll make a neat painted vase.
- Old soda or wine bottles. Instead of recycling, upcycle into an artful piece.
- Plain glass pitchers. Turn them into Greek-style amphoras to display on your bar or with fresh-cut flowers as a table centerpiece.
- Mismatched drinking glasses. They won’t be useful for drinking any more, but they will be elevated to art and display, or artful organization.
- Plant pots. Take the basic and boring to the next level and achieve the high-end white matte finish that’s in all the home décor magazines and HGTV shows.
How to Paint the Outside of a Glass Vase
What kind of paint can you use on glass?
- Acrylic craft paint is perfect for something like this. You can use a coat of polyurethane to protect the finish.
- I’ve also painted a vase with nail polish and it has lasted forever!
- Enamel paint is long lasting but you would want to use it in a ventilated area and it can take a few days to completely cure.
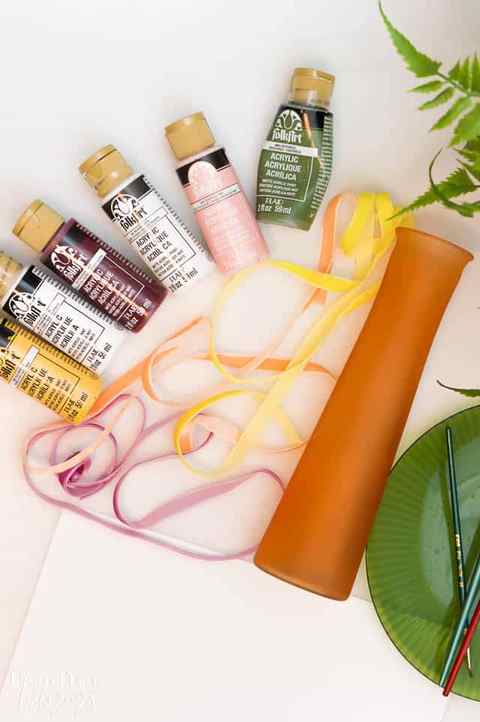
What you need for painting glass with acrylic paint:
- Repurpose a vase you already have or pick up one from your local Dollar Tree or dollar store
- Acrylic craft paint in pink, berry red, yellow, and green
- Small paintbrushes, paper towels, water, and a scrap piece of paper
- Velvet trim (optional)
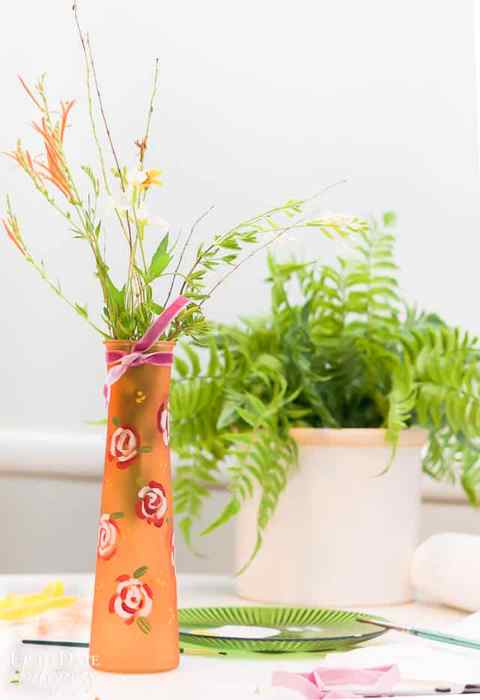
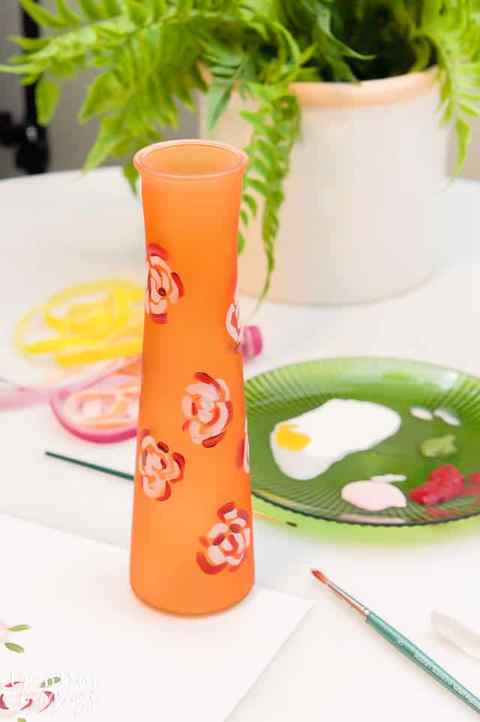
How to paint a glass vase in acrylic paint.
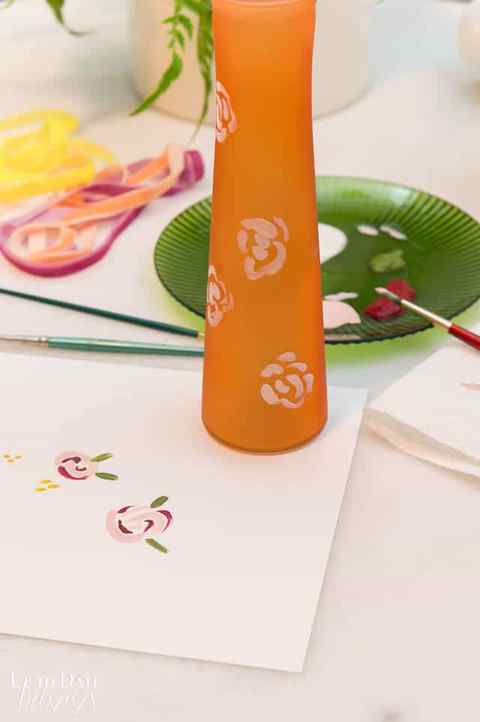
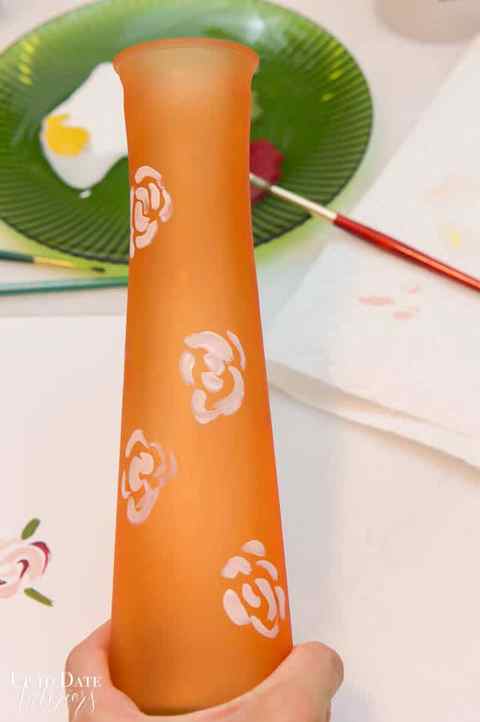
- Start by creating a template on a scrap piece of paper. Paint a rose shape by using small curved strokes in light pink paint and fill in the gaps with berry red paint.
- Use one paint color at a time so you don’t have to keep washing your brush. Start with the light pink and paint your rose outlines all over the vase spacing them out as evenly as you can. But don’t overthink it!
- Fill them in with the berry red. If your paint is too thin make sure your brush is fairly dry. Use a little water on your brush and dab on a paper towel then dip into paint that’s too thick!
- Add leaves with green by using the flat part of the brush tip to create a leaf shape. Fill in some of the empty space around with yellow dots in groupings of three or just a single dot. This can help even out the rose pattern.
- Spray a coat of polyurethane or use a brush and craft bottle of polyurethane after the paint dries if you want extra protection.
- Tie a piece of velvet trim at the top of the vase. Try a little bow or just a tie.
How to Paint a Glass Vase for Fall
Yield: A Floral Vase
Active Time: 20 minutes
Additional Time: 10 minutes
Total Time: 30 minutes
Difficulty: easy
Find out how to paint a floral pattern on a dollar tree glass vase with acrylic paint to create a designer-inspired decor on a budget!
- Dollar store vase
- Acrylic paint in pink, red, yellow, and green
- Velvet ribbon 12 inches long
Tools
- Paint brushes
- Paper towel
- Paper or plastic plate
- Water
- Use a template or draw a template for simple roses with pink and red paint.
- Start with pink and paint the rose outline all over the vase.
- Use the darker red paint to fill in the roses.
- Add two leaves to each rosette with green paint. Fill in the gaps with a single yellow dot or groupings of three.
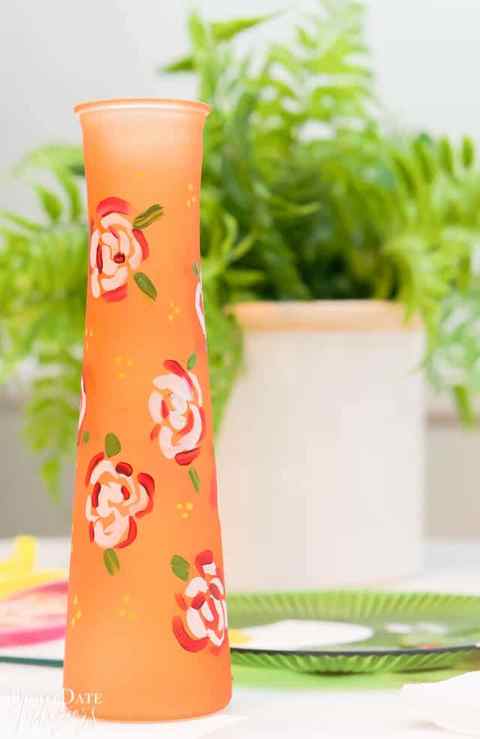
- Spray a coat of polyurethane after the paint dries.
- Tie a piece of velvet ribbon at the top of the vase.


