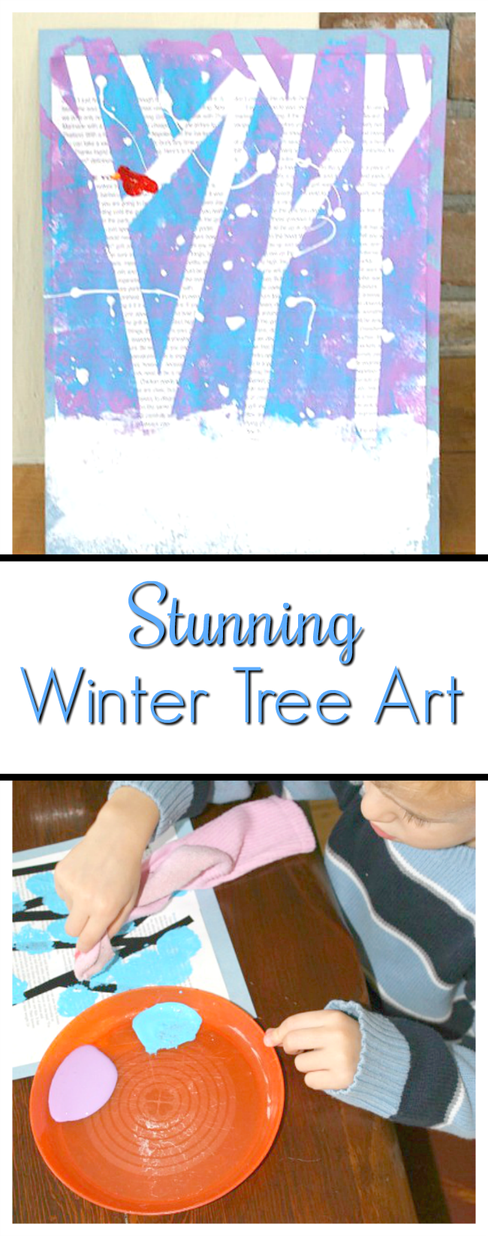
The first day students came in, we read the book “Snowballs” by Lois Elhert which features some really beautiful winter-themed collages (one of which is birch trees and birds). We talk about how the illustrations in the book were created (collages – and technically assemblages Once we were done talking I gave each student a piece of 6″x12″ white drawing paper and had them draw two vertical lines on their paper with a ruler to divide the space up into three sections. Students were then given a Styrofoam plate with black tempera on it and a rectangle piece of scrap cardboard (about the size of an index card). I demonstrated how they could lightly dip their cardboard into the paint, then drag it on an angle across each section to create a birch tree looking effect. Students repeated this for all three sections. **When you put the black paint on a plate you need to shake it side to side to spread the paint out so the puddle isn’t so deep!
On the second day students created a piece of textured painted-paper using a watercolor resist technique (crayon & pan watercolor) on a sheet of 15″x12″ white drawing paper.
On the third day I had my students cut their paper from the first day (the trees) along the pencil lines to create 3 trunks. Then had them cut a really skinny rectangle from their widest trunk. This piece was divided into 4 smaller pieces to create the branches. Students then picked a sheet of 15″x12″ colored construction paper to use for their backgrounds and glued their trees to it.
On the fourth day I had a really short class period with my students (only 20 minutes because I had to take them to the winter assembly), so I gave them a container of white tempera and had them use the back of their paintbrush to create “snow” dots on their page.
Finally on the fifth and final day students got back their textured painted paper and cut out shapes to create birds. The only thing I gave to the students to help them with this was a main body template (teardrop shape) to ensure that they made the body of their birds big enough. All other details they created entirely on their own.
Birch Winter Tree Art Project
I was given some lovely magazines lately – and I have really been enjoying them. But, like anything that stays in my hands too long, one of those magazines has been sacrificed to our crafting.
This time as a birch winter tree art project!
I must say, this winter art project turned out even better than I had imagined it would. It looks great! And we learned quite a bit along the way, as our first attempt was a major fail. And so was our second.
Two things we learned while creating this birch winter tree art project:
1. Electrical tape does NOT come off of paper the same way that painters tape does … please do not use electrical tape
2. Some lovely new magazines use recycled ‘greener’ pages … these do not mix well with painters tape. For this winter art project you need the glossy magazine paper.
And finally, on our third (and final … this was it – now or never) attempt, we succeeded!
Please note that these pictures are a mixture of all three attempts — you may see electrical tape (DO NOT USE IT!), you may see recycled, dull magazine paper (DO NOT USE IT!) …. you see I try to balance taking pictures of our activities with actually enjoying them with my little ones. So by our third attempt I was needed heavier on the, “It will work this time, we can do it!” side of the camera.
And now, with by far the most warnings and precautions I have ever given prior to introducing a SIMPLE art project, I bring you that simple winter art project!
For this birch tree craft we used:
Painters tape (eventually)
A page from a glossy magazine with lots of text (eventually)
Blue, purple, and white acrylic paint
A sock (or sponge) and a paint brush
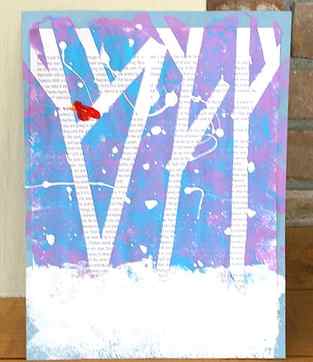
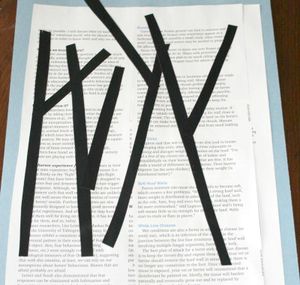
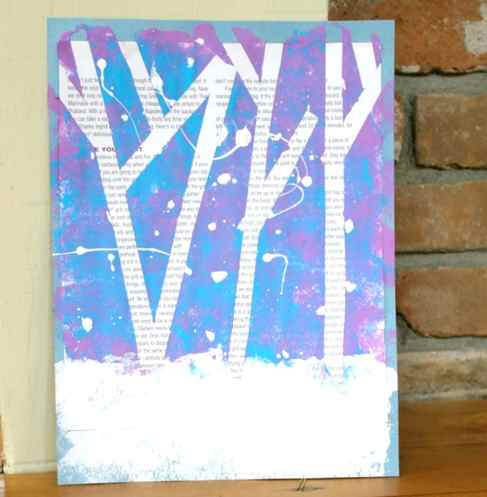
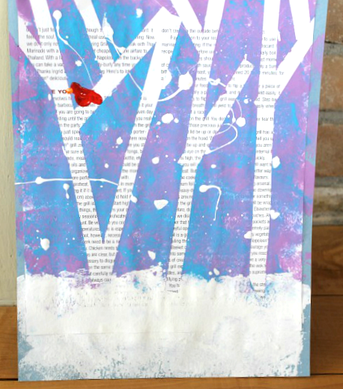
To begin, we glued the magazine page to a piece of construction paper.
Next, we cut skinny strips of the painters tape and arranged them in ‘birch tree like’ configurations on the page.
Then it was time for painting. We didn’t have a sponge on hand, so opted to use a sock. I actually really liked using a sock with my 4 year old for this art project – he could hold it well, and it gave a great texture.
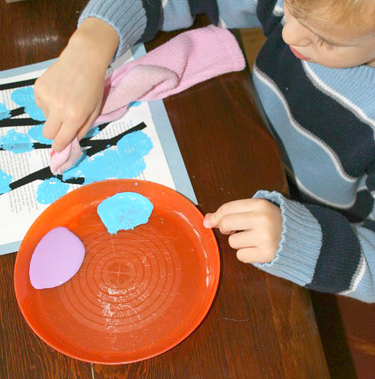
They dotted some blue and some purple all over the page until it was completely covered (except for the area under the trees where the snow as going to be)
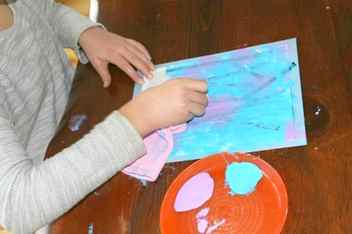
After, they sponged on some white paint at the bottom. My 12 year old daughter stated that it really needed some snow …. some splatter painted snow none-the-less. I cringed, but agreed.
Once the paintings had dried for 20 minutes or so, we carefully peeled off the tape.
Madeline decided hers needed a little cardinal … it did add a lovely touch!
This winter art project took some trial and error. But that in itself was a good learning experience for my little ones – to persevere with a positive attitude (well, relatively positive, I am human).
And we were rewarded with success, and a lovely winter tree painting to display as well. And a story of Mama crumpling up the second attempt… with a positive attitude though.
Please consider following us on Facebook so we can share more creative ideas with you! Or join over 300 000 other readers on the How Wee Learn Pinterest Boards! Thank you!
Thank you for reading friends! I hope you are having a wonderful week.
Winter Birds and Birch Trees (1st)


The first day students came in, we read the book “Snowballs” by Lois Elhert which features some really beautiful winter-themed collages (one of which is birch trees and birds). We talk about how the illustrations in the book were created (collages – and technically assemblages Once we were done talking I gave each student a piece of 6″x12″ white drawing paper and had them draw two vertical lines on their paper with a ruler to divide the space up into three sections. Students were then given a Styrofoam plate with black tempera on it and a rectangle piece of scrap cardboard (about the size of an index card). I demonstrated how they could lightly dip their cardboard into the paint, then drag it on an angle across each section to create a birch tree looking effect. Students repeated this for all three sections. **When you put the black paint on a plate you need to shake it side to side to spread the paint out so the puddle isn’t so deep!
On the second day students created a piece of textured painted-paper using a watercolor resist technique (crayon & pan watercolor) on a sheet of 15″x12″ white drawing paper.
On the third day I had my students cut their paper from the first day (the trees) along the pencil lines to create 3 trunks. Then had them cut a really skinny rectangle from their widest trunk. This piece was divided into 4 smaller pieces to create the branches. Students then picked a sheet of 15″x12″ colored construction paper to use for their backgrounds and glued their trees to it.
On the fourth day I had a really short class period with my students (only 20 minutes because I had to take them to the winter assembly), so I gave them a container of white tempera and had them use the back of their paintbrush to create “snow” dots on their page.
Finally on the fifth and final day students got back their textured painted paper and cut out shapes to create birds. The only thing I gave to the students to help them with this was a main body template (teardrop shape) to ensure that they made the body of their birds big enough. All other details they created entirely on their own.
I can’t wait to do this project again with another group when we get back from winter break! So cute! 🙂


