Believe it or not, this airy bedroom used to be a dark hole thanks to its knotty pine surround. Crisp, bright white paint from floor to ceiling instantly transformed the small space, providing a blank backdrop for homeowner Ted Kennedy Watson’s (@watsonkennedy) punchy layers of sea-faring themed furnishings such as nautical flags, anchor pillows, and old lockers.
48 Beach House Decor Ideas That Will Make Major Waves in Any Interior
Give your home a beach house vibe with these easy, breezy decorating ideas. No ocean required.
By Jennifer Kopf Updated: Jul 26, 2021
Save Article
There’s something undeniably appealing about easy, breezy beach house style. It happens the minute you step through the front door and into that light and airy space—with one big exhale, you instantly feel relaxed, comfortable, and oh, so happy. It could be the sea air and soothing sounds of waves, but let’s not discount the decor, from casual layering of no-frills furnishings made of natural materials, pops of fun color, and collected finds from nature. Not to mention the charming coastal and nautical elements found in stunning beach retreats, such as framed seascape wall art, seashell-adorned mirrors and accessories, ship-worthy lighting, brass finishes, and anything and everything in all shades of blue!
Even if you don’t live in the dreamiest little seaside cottage in one of the most charming beach towns in the U.S., you can instantly transport yourself to a seaside locale far, far away with the addition of a few tasteful beach house decor ideas. Getting the beach house look—and its laid-back vibe—is as easy as 1) painting your walls the best white paint color, 2) choosing a mix of comfy, casual, and carefree furniture (Adirondack chairs, anyone?), and 3) adding plenty of personality with pops of color and coastal-inspired accessories. Check out these 48 dreamy rooms that are packed with beach house decorating inspiration to get you started.
Dining With A View
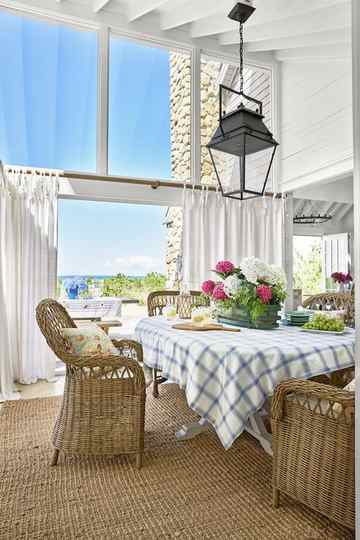
Alec Hemer; Styling: Stacy Kunstel
Thanks to a wall of floor-to-ceiling windows and sliding doors, all eyes are on the prize in this dreamy dining room. To add softness, homeowner Marsha Ahearn had breezy tie-top curtains made from 100-year-old French sheets found at the Brimfield antiques shows. Adding to the room’s casual look, rather than a chandelier, a lightweight, but hunky lantern hangs above the generous dining table. Pillows made from vintage bark cloth fabric add feminine pattern to the mix of natural wicker chairs.
Retro Charm
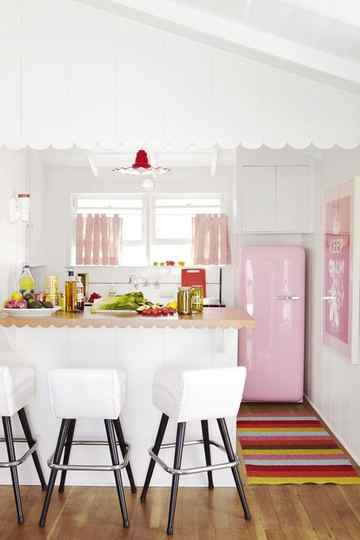
Victoria Pearson
Three words sum up the oh-so-cute kitchen in designer Krista Ewart’s California beach cottage: scallops, scallops, and more scallops. Oh, a perfectly pink Smeg refrigerator, too!
Follow along to learn how to paint a daisy and other painting skills.
- Watercolor paper
- Masking tape to hold the paper in place
- Masking fluid
- Paintbrushes
- Bar soap
- Watercolor paints
- Table salt
Draw a small cluster of simple daisies. You can take inspiration from my painting above, or create your own composition. Just be sure that each flower has its own space.
Wet a bar of hand soap and coat your brush bristles thoroughly before dipping your brush into masking fluid. Cover all of the flowers and stems completely and neatly with the masking fluid. You may need to wash your brush, re-coat it with soap and masking fluid a few times before this step is complete. Allow your fluid to dry completely before going to Step 2.
Step 2: The first wash

Mix your desired background colors on your palette before wetting your entire page thoroughly. For this painting, I used Indian Yellow, Ultramarine Blue, Payne’s Gray, Hooker’s Green and Burnt Umber.
Your first wash is going to be what is called a “wet on wet” wash. It will be loose, quick and soft. Starting with your lightest color first, lay on your Indian Yellow. Use a Number 12 round brush for this first large wash.

Now, quickly paint on your blues and greens in upward motion strokes. Start with your brush on the bottom edge of the paper and stroke upwards to create a grasslike background.

Step 3: Deepening the colors
While you first wash is still wet, switch to a Number 3 round brush and, with a thickened pigment mixture, start adding grass strokes, alternating between the blue, green and yellow colors. Your grass strokes should always start from the bottom of the page, moving up in a quick and fluid motion.

While your wash is still wet, sprinkle a bit of salt onto the bottom grassy part of your painting. The salt will absorb the water and colors and create a beautiful texture as it dries. Just a little bit of salt goes a long way, so don’t over-salt your project! You may also “splatter” your painting by loading your brush with paint and tapping it gently with one hand over the paper.
Allow the entire page to dry until it’s flat and completely dry to the touch. You can use a hair dryer to help speed along the drying process.


