Ever gazed up at the night sky and wondered just how those astonishingly beautiful photos of galaxies, nebulae, and star clusters are created? Well, it’s a magical marriage of astrophotography, science, and art. It demands both technical mastery and creative vision.
Simple Watercolor Painting: Mini Nebulas Using a Variegated Wash
Nebulas are full of mystery, color, and life. They are literally made up of gas, molecules, atoms, and clouds of dust. Such enigmas are captured in this simple watercolor painting tutorial, which will make use of the variegated wash technique.
- Watercolor postcard/paper (110lb, size 6″ x 4″)
- Bow compass, or an HB pencil and a round object to draw a circle
- Paper towels or a rag
Paints (Winsor & Newton’s Cotman Watercolor)
- Permanent Rose
- Indigo
- Lemon Yellow Hue (optional)
- Viridian Hue (optional)
- Cadmium Red Hue (optional)
Acrylic Paint
- Titanium White
Brushes
- Léonard Series 20RO Ruby: Synthetic round brush (no. 20)
- Artisti: Synthetic round brush (no. 18)
- Escoda Perla Series: Synthetic round brush (no. 1)
- Round brush (no. 4) (optional)
Step 1: Wash with Base Colors

While there’s no need for an outline sketch, use a bow compass to draw a circle in the middle of your watercolor paper. You can also use a pencil and draw around any round object, as long as it fits inside your paper! This will help to frame your nebula as if you were gazing into the night sky through a telescope. Start your simple watercolor painting by painting the nebula’s base colors. Using the wet-on-dry technique, pick up Permanent Rose using a no. 18 round brush, and brush lightly along the center of the nebula. Next, add some flat washes of Indigo, with some graded washes of the same color that bleeds into the middle area. This gives more visual texture to your watercolor painting. Be careful with the bleeding area, as you want to keep both colors distinct while harmonizing with each other. For the best gradated effect, allow both colors to settle and meet, and let them blend naturally before the paint dries.
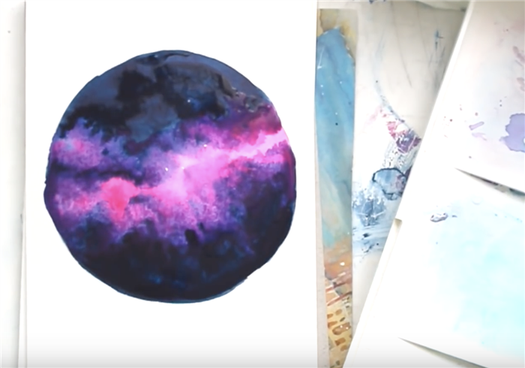
Without waiting for your base to dry, mix your Indigo paint with the Permanent Rose still left on your palette, and the result will be a more mauve or violet shade. Lightly brush this violet hue onto the areas where both colors meet, to further highlight the blended area. As you add these colors, you will be using the variegated wash technique (i.e. adding wet paint in wet paint), since your paper is still wet with paint. The result should be a blooming swirl of colors, where the upper and lower parts of your nebula is framing the middle with dark Indigo. You can continue to add more of the Permanent Rose paint onto the center to make the colors more vibrant. Try to keep your color placement as random as possible as well, so it looks more cloud-like in form. You have to be careful not to overdo the mixing and blending of colors as this will create mud, instead of a natural-looking fusion of hues.
Step 3: Adding Marbling and Starry Details
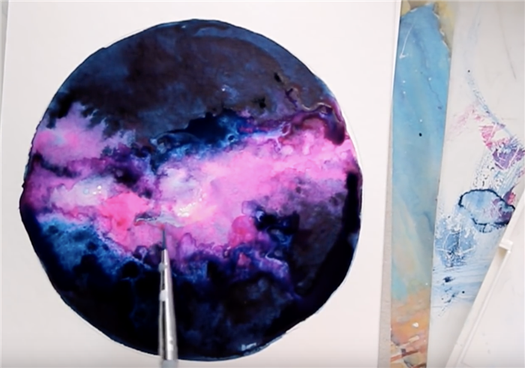
Using calculated control, use a damp no. 20 round brush to gently lift some of the paint at the center part of your nebula to make it have a more marbled look. Make sure to scrub gently on the areas you want to be lighter! You can also add thicker paint in the areas you want to highlight with more intense hues. After the previous layers are dry, switch to a no. 1 round brush, and with a bit of Titanium White acrylic paint, gently dot clusters of stars in some areas at the center. Don’t add too many, as you’ll sprinkle more on in the next step!
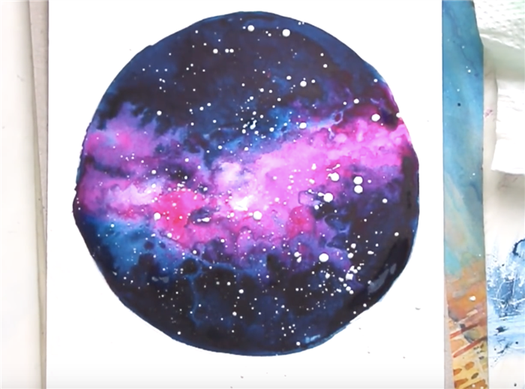
Now it’s time to add a sprinkling of stars onto your nebula. Using your no. 18 round brush, pick up more Titanium White acrylic paint and gently tap your brush against a stick or another brush. This will create random white flecks across your simple watercolor painting. You can also switch to a no. 4 round brush for smaller dots. Keep sprinkling until you feel that there are enough stars.
The Artistic Side of Astrophotography
Astrophotography is a perfect marriage of science and art.
– Miguel Claro
I know how true this is because I have been working hard to create better images for the past few years. I normally use Photoshop for my artistic efforts to bring out the details hidden in my raw data.
I often use this example to explain to my friends how creative astrophotography is: If two people try to photograph the same target with the same equipment, the results will look very different. Why? Because there is a large artistic element in the creation of an astrophoto.
For example, creating wide-field shots of an astronomical target such as the Milky Way may involve adding a stunning landscape into the mix. The composition of the photo can create different emotional effects and complement the object in the sky.
Photographing the moon over a spooky landscape with an old church might evoke feelings of mystery. The Milky Way above a mountain range can create an amazing picture filled with grandeur.
In my opinion, it is not true to say that astrophotography creates fake photos. The colours are there, hidden in the raw photographs we take. We bring these colours out according to our tastes, and this is where we begin to get creative.
I always try to bring out the most detail I can without going too far. I don’t like very bright, saturated colours, which to me look unreal. I prefer more natural colours, so I tone them down a little. I have seen so many astrophotographers go too far with over-saturated reds, blues, yellows, and oranges.
Astrophotography science and art is a fine balance between realism and creativity. By editing in different ways, we can emphasise the details of an object. If we enhance the red colour, for example, we highlight areas of a nebula that have hydrogen alpha gases. This can also be done using an HA filter.
It is also possible to use different colour palettes to enhance the features of a deep sky object, as the Hubble Telescope does when using the Hubble palette.
In astrophotography, we create representations of reality with a large slice of artistic licence! If there was no creative element, I don’t think I would like this so much.
For instance, here are two images of the Orion Nebula:
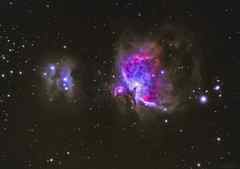
In the captivating landscapes of Serra de Aire, Portugal, close to the mystical Mira de Aire Caves complex. That’s where Miguel Claro, armed with his portable Vixen Polarie Star Tracker Mount, a Canon 60Da camera, and an Astro Professional ED 80 telescope, crafted this stunning image. (Image credit: Miguel Claro)
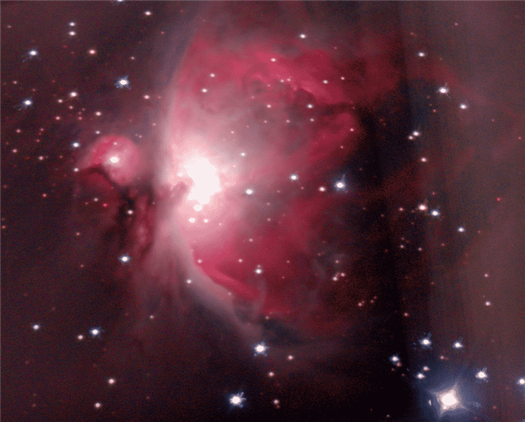
This was an image I took in 2021, and now I can see how blown out the core was. But apart from that, I was pleased with the image at that stage of my astro journey. Look at the colours. Very understated. I was mainly going for detail in this picture rather than trying to get the most vivid colours.
The Science of Capturing Light in Astrophotography
The secret of how we create such amazing astrophotos lies in the science of light! Astrophotography is a game of chasing photons, the tiny particles of light that journey from distant celestial bodies to your camera’s sensor.
Ever since I first started trying to take photos of the night sky, I’ve been blown away by the fact that the light I am capturing has come from thousands or even millions of light years away! I can’t believe I am looking back in time at what my target looked like in the distant past. It’s incredible!
Long Exposure is the key term here. This technique allows the camera to soak up more light, unveiling the wonders hidden in the inky blackness of the night sky. It’s like leaving a bucket out to catch rain – the longer you leave it, the more it collects. Only here is your bucket: the camera sensor is collecting light particles.
But wait, what about the movement of the Earth? Surely that must blur the stars, right? This is where the genius of tracking mounts comes into play. These devices follow the stars’ path across the sky, counteracting Earth’s rotation and keeping your target steady.
Remember, capturing the perfect astrophoto is a dance between your camera, the night sky, and the earth itself.
Beyond the mechanics, there’s the matter of camera settings. ISO, aperture, and shutter speed are all vital in astrophotography. Mastering these settings, understanding how they interact, and customising them to the conditions of the night sky are crucial steps in getting that perfect shot.
Astrophotography science and art perfectly balanced. This is the essence of the best astronomical photos.
Choosing the Right Gear for Astrophotography
The equipment that you use for astrophotography will have a huge impact on the quality of your images. This is why it’s important to choose wisely so that you can take the best possible images for the level you are at. It is important that the gear you choose is also practical and will enable you to learn how to be a better astrophotographer.
I would caution you against buying without doing research first and being clear about your current level of experience. It’s also important to know what you want to focus on. Are you interested in deep-sky objects or planets? Do you want to photograph up close with a telescope or wide-field with a camera and lens?
I found that at the start, it’s a good idea not to spend too much and to buy easy-to-use equipment. You can then upgrade later, when you have the skill and knowledge to use more complex and advanced gear.
I started with a low-budget Celestron 130slt Goto telescope. It had an alt-az mount, which was very simple to use. I tried taking photos of planets like Mars, Jupiter, and Saturn and took some shots of the moon. This got me started and taught me the basics of using a telescope and DSLR camera.
I then jumped to an equatorial mount but kept my reflector telescope OTA (optical telescope assembly, just the telescope tube part). This was a huge jump and forced me to learn Polar Alignment and other techniques. My images are now many times better and look more professional.
So take it in steps that take you ever upward. Astrophotography involves a steep learning curve, but there is no need to make it too difficult. Choosing the wrong equipment is costly and very frustrating! I’ve experienced that frustration, and it is no fun!
In essence, the equipment you need for your astrophotography setup will include:
- A telescope mount or star tracker
- A camera (DSLR or electronic Astro camera)
- Filters
- A laptop or PC (not necessary when you start astrophotography)
That’s it. Buying the best you can afford is another good tip. You’ll be happier with the result, and the equipment will last longer. Cutting corners is never a good idea in astrophotography, but there are opportunities to do some DIY. For example, I 3D printed parts to modify the position of my primary mirror for prime focus, and I 3D printed a Bahtinov Mask for accurate focus.


