He re are some cute little Christmas ornaments for your tree or to gift to a friend.
A Beautiful and Simple Christmas Decoration: DIY Wood Christmas Tree Tutorial

I LOVE Christmas decor. You too? Awesome. You’re in the right place! I also love budget-friendly decor, which is exactly what this DIY wood Christmas tree decor is. It’s fun and simple to make, and is a great addition to your home around Christmastime. Even better: You can customize it to whatever color best matches your decor: Love modern homes? Paint them black and white! Love farmhouse style? Paint them white and distress the edges. Love traditional Christmas colors? Paint them bright red and green!
So let’s jump in – it’s about time that I share this simple tutorial that you can follow too.
Thanks to Purdy for sponsoring this post. I received compensation but all opinions stated here are my own. I’ve loved and owned Purdy products for a very long time!
Tools & Materials
- Purdy 2″ Angled Nylox Paint Brush
- Purdy Revolution Jumbo Mini Roller Frame
- Purdy White Dove 1/4″ NapMini Roller Cover
- Purdy Paint Pail
- Purdy Premium Folding Multi-Tool
- Sherwin-Williams ProClassic Interior Acrylic Latex in Accessible Beige and a custom match color
- Minwax Stainable Wood Filler
- Two 6′ 1×2 pine boards
- Tack cloths
- 220 grit sandpaper
- Miter saw
- Wood glue
- Pin nailer
Looking to purchase Purdy paint brushes, rollers, and other products for an upcoming project? Head HERE to see what retailers near you carry Purdy products.
Time to Complete
This project took me about 2 days to complete, given the dry time of the wood glue. Active work time was about 4 hours.
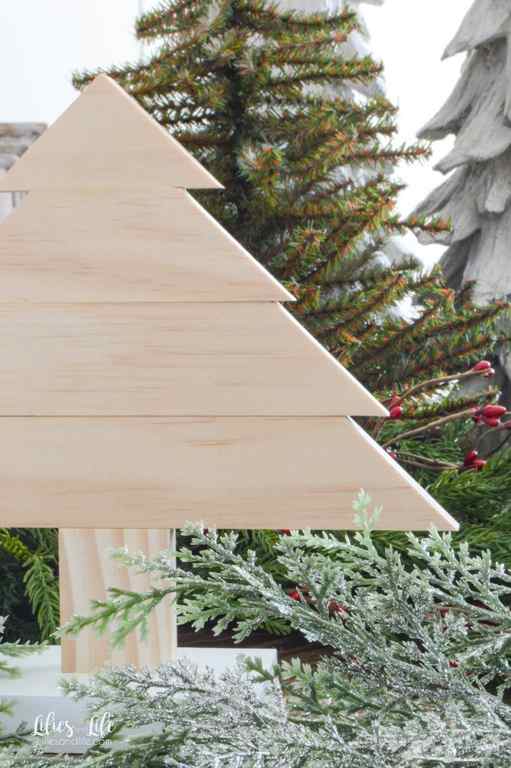
STEP 1: Cut 1×2 pine boards into pieces for two Christmas trees.

Cut list (see the picture below for more details)
Two 3 1/2″ pieces cut at 30 degree angles on each end, both ends slanting inward (for trunk of trees)
Two 10 1/4″ pieces cut at 30 degree angles on each end, both slanting inward (for base of trees)
Eight 5 1/4″ pieces cut at 30 degree angles on each end, slanting the same way (for bottom four limbs of each tree)
Two 7″ pieces cut at 30 degree angles on each end, both ends slanting inward (for top right corners of trees)
Two 6 1/8″ pieces cut at 30 degree angles on each end, both ends slanting inward (For top left sides of trees)

STEP 2: Sand boards

Using 220 grit sandpaper, sand the boards to remove any rough spots. Remove sanding dust with a tack cloth.
STEP 3: Assemble the boards into two trees

Use wood glue and a pin nailer to assemble the boards into two trees.
Overlap the side boards by 1″.
Allow the wood glue time to fully dry.
STEP 4: Fill any holes and crevices with wood filler

The Purdy Premium Folding Multi-Tool can be used in many ways but one of the most common ways I use it is to push wood filler into crevices and smooth it out on the surface. It works great for this!
STEP 5: Paint the trees

Grab your painting supplies and decide on paint colors for your two trees.
Whenever I’m painting a smooth surface and I want the paint finish to look smooth, I grab a Purdy 2″ Angled Nylox Paint Brush. It has soft bristles, which results in a smooth finish.

You could just use a paint brush for these trees but to make the project go faster, I also used a Purdy Revolution Jumbo Mini Roller Frame. For a super smooth finish, I chose a roller cover with a short nap, the Purdy White Dove 1/4″ Nap Mini Roller Cover. These are the same products I use for refinishing furniture too!

The Purdy Paint Pail is perfect for holding your paint, mini roller, and paint brush. It’s easy to hold as you work as well!
For paint colors, I chose Accessible Beige and a pale green custom match color. I used one of my go-to paint products for smooth and durable finishes: Sherwin-Williams ProClassic Interior Acrylic Latex.
I applied two coats of paint, giving it time to dry in between coats.
DIY Wooden Christmas Trees
I have been itching to do a DIY project and with Christmas around the corner, my mind is consumed with the holidays! So I used some scrap wood pieces from my DIY Barn Door and created a fun and easy DIY tutorial for you to try!

This post contains affiliate links. For more information, see my disclosures here.
Supplies
- Wood Pieces for Tree: 1 1/2″ W X 1/2″ thick (lengths vary)
- Wood Piece for base
- Miter Saw
- Wood Glue
- Paint or stain (optional)
1- Cut Wood pieces
I recommend cutting each piece to be 2 inches difference in length. For example, below I cut my pieces into 6 in, 4 in, 2 in, and the final peek of the tree. Make sure your miter saw is set at a 45 degree angle.

2- Glue tree pieces together
Next, take your Elmers wood glue and glue each piece together. Make sure to have a wet paper towel close by to clean up any leakage from the glue. Let dry for about 1 hour


3- Cut your truck and stand
I used a 2 inch trunk for my taller tree and a 1 1/2 inch trunk for my shorter tree. I then cut about a 4″ x 4″ stand for my taller tree and a 3″ x 3″ stand for my shorter tree.
The stands can be really any size you like. They just have to be large enough to hold the tree up.
4- Glue Trunk and stand together
Use your wood glue to secure the truck and stand together. Let dry for about 1 hour.

5- Glue Tree and base together
Use your wood glue again to glue the tree and base together. Let dry overnight and tah dah!! Paint them, leave them raw, get creative!


These trees can be made in all types of shapes and sizes. Try out different cut angles for different trees! Merry Christmas and happy DIY-ing


