- Start with a very light drawing of the leaves, mix up a warm yellow / green, consisting of New Gamboge and a small amount of Ultramarine. Although I’m using a mop brush a round brush would work just as well.
- Drop in a little Burnt Umber wet in wet. This creates a nice color variation.
- Continue pulling the paint down into a point. Avoid the temptation to do too much brushing and smoothing out, just allow the Burnt Umber to flow wherever it chooses. Part of the fun of watercolor is knowing when to just leave it and let it do it’s own thing.
- Carefully paint in the leaf stem with the point of your mop brush, or use a rigger, if you’re worried about the line getting too thick.
- The larger poplar leaf is obviously much further along in the decay process, it’s darker with rich reds and warm neutrals, but the painting process is basically the same as before
- I’m starting with Burnt Umber this time though and dropping in Alizarin Crimson and Burnt Sienna to create some warmer color variations.
- To give the leaf some interesting texture, I lifted some color away by gently dabbing with a paper towel.
- Don’t allow the paint to dry completely as it will need to be at least partly wet for the next stage
- To create the veins of the leaf, use the edge of a palette knife, or something similar to scrape out some thin lines.
- Leaves tend to decay fastest around their edges. To indicate these darkened spots, mix a vibrant dark neutral tone using Burnt Umber, Alizarin Crimson and Ultramarine. Drop spots of this color in and around the edges of the leaf.
- I painted the small oak leaf next drawing from my previously mixed pool of neutrals and mixing in a little green (New Gamboge plus Ultramarine)
- As with the Poplar leaf I added some dark neutral mix around the edges and allowed that to blend in. As the original color starts to dry and more color is added, a few “Cauliflowers” start to form. Normally I would try and avoid creating cauliflowers but in this case it’s creating a nice realistic texture that I like so I’m just going to allow those cauliflowers to form naturally and even encourage them.
- The last leaf is the Pohutukawa leaf. I’ve used a variegated mix of dark neutral and ultramarine. For the hole in the leaf, I’ve left a spot of white paper and encourage the paint to pool around that spot creating some nice darks. Paint will only flow where the paper is wet, so don’t ever worry about paint flowing into your reserved areas of white paper.
- At this stage, we just need to start adding some details. So it’s time to let everything completely dry and bring out the the Rigger brush. The green poplar leaf has has veins running through it that are a slightly darker green than the leaf itself. Remember that watercolor is additive. i.e. it gets darker with every additional layer so start by adding some of your existing green mix it may already be dark enough.
- Dragging the rigger brush works works well for adding some more texture
- A little Payne’s Grey is perfect for adding some of the dark spots on the green poplar leaf.
- I felt that the whole image was maybe a bit too clean, so adding a little spatter by gently dipping the rigger in wet paint and tapping it with my finger.
- Adding a few tiny shadows along the veins of the leaves adds a nice little touch of realism.
- Pay attention to the direction of the light and you will notice that the thin leaf stems will also have an edge that is in shadow so I carefully added those shadows. Little details like this really enhance the illusions of three dimensionality and make your paintings pop.
- There are multiple shadows cast by the leaves themselves. They are quite light and diffused, so, rather than create hard edges here, go back to the mop brush again and paint some clean water in the area where the shadows will be.
- Using a very pale wash of Paynes Grey, paint in the shadows. As you have already laid down a wash of pure water, the Paynes Grey will now spread out and create the effect of diffused shadows.
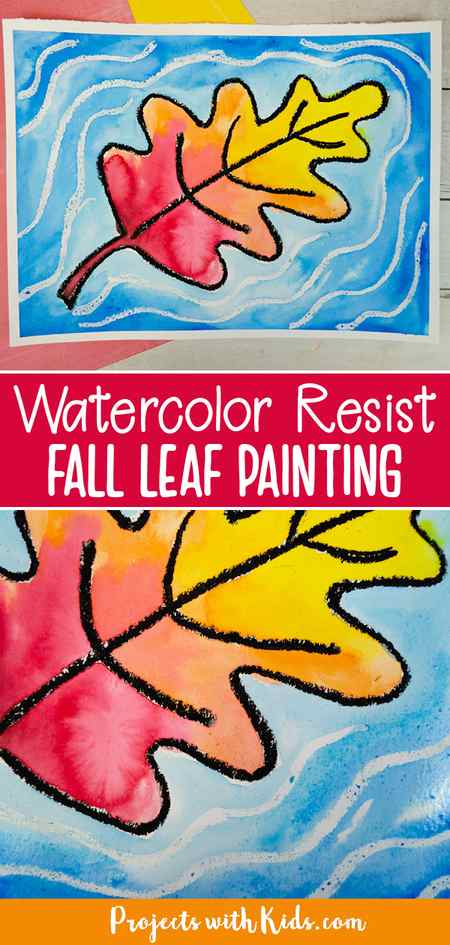
How to Make a Watercolor Resist Fall Leaf Painting for Kids

Kids will have fun making this watercolor resist fall leaf painting. Use oil pastels as a resist technique to make it look like the leaf is creating ripples in the water and as a barrier to help paint in the leaf. This is also a great opportunity to talk to kids about warm and cool colors.
There are so many fun watercolor techniques for kids to try! Take a look at my collection of watercolor painting for kids for more fun and creative ideas.

For this project, I created a free printable template to make this art project even easier for you. This template is available to my email subscribers. Fill out the form below to get the free template.
After signing up you will receive a welcome email with your download link.
If you are looking for more fall art projects take a look at my collection of creative fall painting ideas for kids! There are ideas for kids of all ages that use different types of art materials and techniques.
Create your own watercolor resist fall leaf painting
This post contains affiliate links. As an Amazon Associate, I earn from qualifying purchases. If you would like more information please review my privacy & disclosure policy.

Supplies
- Watercolor paper
- Watercolor paint (you can use a watercolor set or liquid watercolors)
- Paintbrushes
- Oil pastels in black and white
- Paint palette and water dish
- Pencil
- Scissors
- Painter’s tape and wooden board (optional)
Instructions for your fall leaf art
1. First, print and cut out a leaf template. There are three different templates to choose from. Kids can also choose to draw their own leaf if they like.

2. Prepare your watercolor paper by taping it down to a wooden board with painter’s tape. This is an optional step but helps with keeping the paper nice and flat as kids are painting and while it’s drying.
If you don’t have a wooden board, you can try taping your paper down to the table or just skip this step altogether.

3. Trace the leaf template onto your watercolor paper with a pencil. Draw in the details on the leaf.
4. Trace the leaf drawing with black oil pastel. Press hard and use thicker lines to get the best results.

Use a white oil pastel to make wavy lines around the leaf to create ripples in the water. This will be a bit more of a challenge for kids, as it can be hard to see as you are drawing with white pastel. Remind kids to press hard and use thick lines.
5. Get your leaf paint colors ready. Two to three colors work well. Mix up your colors in a paint palette, making sure to test them out on scrap paper first.

Watercolors will always dry lighter so if you want really vibrant colors it’s best to test them out first.
Start by painting the leaf with clean water, being careful not to paint the water outside of the black pastel lines. Paint the leaf with one color at a time, letting the wet paper and paint help to mix the colors together to create new shades and interesting patterns.
Let this dry completely before moving on.

6. Choose one or two blue colors for the water. I used one shade of blue for the example and just layered on more paint around the edges to make it darker.
Paint the paper around the leaf with clean water to start. Paint the water blue being careful not to paint inside the leaf. Once you have the water painted, go over the edges with more paint to make those areas darker.

Let your paper dry completely on a flat surface. Once it’s dry, carefully remove the tape around the edges.

This watercolor resist fall leaf painting is the perfect fall art project idea for kids! Using oil pastels as a resist technique and a leaf template makes it easier for kids of all ages to make.
Fill in the form below to get your free printable template!
After signing up you will receive a welcome email with your download link.
More fall art kids will love


Follow me on Pinterest for more amazing project ideas.
Pin this painting idea for later
Yield: 1 watercolor painting
How To Paint Fall Leaves in Watercolor: Easy Beginners Tutorial

Autumn leaves make a fascinating subject for a still life. Their simplicity of form provides us with a subject that can be approached in several ways An abstract approach could be a pure study in shape, color, texture and composition. Whereas a realistic approach would focus on the purely representational. This particular painting has elements of all these so it’s somewhere in between but that’s o.k. There are no rules, only possibilities!
I found this little collection of leaves in my garden. In case you were wondering, it consists of a couple Poplar leaves (The two large ones) , an Oak (The small one) and I think, a native New Zealand Pohutukawa leaf (The long skinny one). I arranged them in various configurations until I settled on the composition above. They remind me of a group of arrowheads, giving a sense of movement and leading the eye in different directions.
The colours in fall leaves are naturally harmonious, as they are all on the warm side of the colour wheel. Even the green leaf is still a very warm green that leans strongly towards yellow.
Although the color wheel can help us understand the relationship that colors have to each other, it’s not the whole story. The color wheel tells us nothing about neutrals. ie earth colors that are so prevalent in Autumn leaves. I’ve included Burnt Umber and Burnt Sienna in my palette purely for convenience but those can be mixed too.
Tip
Neutral colors similar to Burnt Umber and Burnt Sienna can be mixed by combining the three primaries and altering the proportions of red, yellow and blue.
Painting Fall Leaves In Watercolor Step By Step
- Start with a very light drawing of the leaves, mix up a warm yellow / green, consisting of New Gamboge and a small amount of Ultramarine. Although I’m using a mop brush a round brush would work just as well.
- Drop in a little Burnt Umber wet in wet. This creates a nice color variation.
- Continue pulling the paint down into a point. Avoid the temptation to do too much brushing and smoothing out, just allow the Burnt Umber to flow wherever it chooses. Part of the fun of watercolor is knowing when to just leave it and let it do it’s own thing.
- Carefully paint in the leaf stem with the point of your mop brush, or use a rigger, if you’re worried about the line getting too thick.
- The larger poplar leaf is obviously much further along in the decay process, it’s darker with rich reds and warm neutrals, but the painting process is basically the same as before
- I’m starting with Burnt Umber this time though and dropping in Alizarin Crimson and Burnt Sienna to create some warmer color variations.
- To give the leaf some interesting texture, I lifted some color away by gently dabbing with a paper towel.
- Don’t allow the paint to dry completely as it will need to be at least partly wet for the next stage
- To create the veins of the leaf, use the edge of a palette knife, or something similar to scrape out some thin lines.
- Leaves tend to decay fastest around their edges. To indicate these darkened spots, mix a vibrant dark neutral tone using Burnt Umber, Alizarin Crimson and Ultramarine. Drop spots of this color in and around the edges of the leaf.
- I painted the small oak leaf next drawing from my previously mixed pool of neutrals and mixing in a little green (New Gamboge plus Ultramarine)
- As with the Poplar leaf I added some dark neutral mix around the edges and allowed that to blend in. As the original color starts to dry and more color is added, a few “Cauliflowers” start to form. Normally I would try and avoid creating cauliflowers but in this case it’s creating a nice realistic texture that I like so I’m just going to allow those cauliflowers to form naturally and even encourage them.
- The last leaf is the Pohutukawa leaf. I’ve used a variegated mix of dark neutral and ultramarine. For the hole in the leaf, I’ve left a spot of white paper and encourage the paint to pool around that spot creating some nice darks. Paint will only flow where the paper is wet, so don’t ever worry about paint flowing into your reserved areas of white paper.
- At this stage, we just need to start adding some details. So it’s time to let everything completely dry and bring out the the Rigger brush. The green poplar leaf has has veins running through it that are a slightly darker green than the leaf itself. Remember that watercolor is additive. i.e. it gets darker with every additional layer so start by adding some of your existing green mix it may already be dark enough.
- Dragging the rigger brush works works well for adding some more texture
- A little Payne’s Grey is perfect for adding some of the dark spots on the green poplar leaf.
- I felt that the whole image was maybe a bit too clean, so adding a little spatter by gently dipping the rigger in wet paint and tapping it with my finger.
- Adding a few tiny shadows along the veins of the leaves adds a nice little touch of realism.
- Pay attention to the direction of the light and you will notice that the thin leaf stems will also have an edge that is in shadow so I carefully added those shadows. Little details like this really enhance the illusions of three dimensionality and make your paintings pop.
- There are multiple shadows cast by the leaves themselves. They are quite light and diffused, so, rather than create hard edges here, go back to the mop brush again and paint some clean water in the area where the shadows will be.
- Using a very pale wash of Paynes Grey, paint in the shadows. As you have already laid down a wash of pure water, the Paynes Grey will now spread out and create the effect of diffused shadows.
Here’s the finished painting. If you’d like to have a go at painting this yourself can download a hi res copy of my reference photos from here.
Use the mixing chart below as a guide but feel free to experiment with your own color combinations.
Watch The Video
Here’s the video of me painting in (Mostly) Real time from my YouTube channel . Why not have a go and follow along with me?

Get Instant Access: Price $59

Get Instant Access: Price $47
Get Instant Access: Price $97


